


- Preface
- 1. Overview
- 2. VDPMill Configuration
- 3. VDPMill Document Processing
-
- 3.1. Processing Basics
- 3.2. Splitting
- 3.3. Formatting and XSLT
- 3.4. Custom Post-processing
- 3.5. Joining XEPOUT Files
- 3.6. Separated Output File Generation
- 4. VDPMill Interactive GUI Application
- 5. VDPMill Ticket Application
- 6. How To Use XML Generators
- 7. VDPMill Control Panel
- 8. VDPMill Job Monitor
- 9. VDPMill Command Line Interface
- A. VDPMill Job Manager
- B. VDPMill XML-RPC Components
- C. Job Ticket Format Description
- D. Document Post-processing
- Index
The RenderX VDPMill User Guide provides background information about what VDPMill does. It explains how to use the product. The manual consists of the following sections:
-
Overview
-
VDPMill Configuration
-
VDPMill Document Processing
-
VDPMill Interactive GUI Application
-
VDPMill Ticket Application
-
VDPMill Control Panel
-
VDPMill Job Monitor
-
VDPMill Command Line Interface
VDPMill runs on most systems where Java Virtual Machine 1.6 or newer is available. This includes:
-
Unixes;
-
Microsoft Windows;
-
Linux;
-
Mac OS X;
-
Other platforms and operating systems.
VDPMill requires Sun Java VM 1.6 or higher to run properly.
VDPMill supports XSL-FO formatting via RenderX XEP engine (the required version is 4.18 or higher).
A PDF viewer is required in order to view PDF output. Adobe provides a free one which can be downloaded from Adobe.
To view PostScript files, one option is to use GhostView which may be used for viewing PDF as well. Versions are available for most operating systems.
To view the AFP documents, the IBM AFP Viewer plug-in is needed in Web browser.
To view the RenderX intermediate XEPOUT file, any XML editor is needed.
The following table lists acronyms which are used in this manual:
Table 1. Acronyms
| Acronym | Full Term |
|---|---|
| CLI | Command Line Interface |
| GUI | Graphical User Interface |
| PI | XML Processing Instruction |
| URL | Uniform Resource Locator (World Wide Web address) |
| W3C | World Wide Web Consortium |
| XML | eXtensible Markup Language |
| XSL | eXtensible Stylesheet Language |
| XSL-FO | eXtensible Stylesheet Language Formatting Objects |
| XSLT | XSL Transformation |
| XEPOUT | XEP intermediate OUTput format |
| XML-RPC | eXtensible Markup Language - Remote Procedure Call protocol (XML-RPC) |
You can contact RenderX technical support by:
-
Using the RenderX support portal at http://www.renderx.com/support/index.html
-
Sending an email to support@renderx.com
-
Calling 1 (650) 328-8000
This section contains introductory information about VDPMill.
VDPMill is a library of Java classes for splitting, collecting XML data and converting it to printable formats, such as PDF, PostScript, AFP and to the RenderX intermediate XML format XEPOUT.
The VDPMill concept is to build a complete solution for small to large businesses for collecting, composing and creating print packages of content to address batch print for mailing and distribution, as well as creating of scheduled volumes of information for archive or other forms of distribution such as email.
The document processing steps are described in Chapter 3, VDPMill Document Processing
VDPMill distribution includes a GUI-based tools suitable for the users that prefer graphical user interface to use VDPMill functionality interactively, to make VDPMill job tickets, apply them to VDPMill job processing engine, run, stop, configure VDPMill components. For detailed description, see Chapter 4, VDPMill Interactive GUI Application, Chapter 5, VDPMill Ticket Application , Chapter 7, VDPMill Control Panel.
There are command-line interfaces (CLI) for VDPMill which provide full functionality and are suitable for users, who prefer Unix-like systems. They also can be used to call VDPMill from shell/batch scripts and Makefiles.
To install VDPMill, run the VDPMill installer via the command line:
java -jar setup-vdpmill-4.0.1.084.jar |
and follow the instructions given by the installer.
Normal, interactive installation of Java-based application assumes the user to answer several questions asked by the GUI installer. These questions may include target installation directory, answering Yes/No if you agree with the license terms, etc.
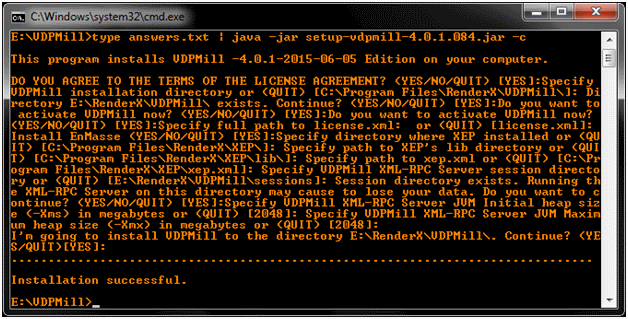
RenderX products, including VDPMill, are also capable of unattended installation. It requires an Answer File that holds answers to questions the user would normally answer to a GUI-based installation.
To create the Answer File:
Open command line and start installation in the interactive command line mode (-c option):
java -jar setup-vdpmill-4.0.1.084.jar -c |
Answer the questions the installer asks until the last one ("I'm going install VDPMill:").

Save every answer you entered into a text file (e.g., answers.txt). An empty line assumes the default answer.
For the answers listed in the screenshot above, the answers.txt would be like this:
YES E:\RenderX\VDPMill YES E:\VDPMill\license.xml YES YES |
Each line represents an answer for a particular question.
|
Important: |
Mind the empty lines kept intact since a missed or an extra one may lead subsequent answers being applied to wrong questions. |
As soon as the Answer File is ready, apply this file with the installer's command line at each host the application is being installed:
Windows:
type answers.txt | java -jar setup-vdpmill-4.0.1.084.jar -c |
Linux:
cat answers.txt | java -jar setup-vdpmill-4.0.1.084.jar -c |
The installer will read the answers and apply them within the installation process.
VDPMill package includes the following:
- bin/
-
Running scripts for VDPMill components and VDPMill Control Panel
- vdpmill(.bat), vdpmill-gui(.bat) [1]
-
VDPMill CLI and VDPMill Interactive GUI Application running scripts respectively (for more details see Chapter 9, VDPMill Command Line Interface and Chapter 4, VDPMill Interactive GUI Application).
- vdpmill-ticket(.bat) [1]
-
The running script for VDPMill Ticket GUI application (for detailed information see Chapter 5, VDPMill Ticket Application ).
- vdpmill-control-panel(.bat)[1]
-
VDPMill Control Panel running script (for detailed information see Chapter 7, VDPMill Control Panel).
- vdpmill-xmlrpc-server(.bat)[1]
-
Script to run VDPMill XML-RPC Server manually (for detailed information see Section B.1, “XML-RPC Server ”).
- vdpmill-xmlrpc-server-bot(.bat)[1]
-
This script is used to run VDPMill XML-RPC Server from VDPMill Control Panel and supports command-line arguments for Java Virtual Machine initial and maximum heap sizes and log file path. See Chapter 7, VDPMill Control Panel and Appendix B, VDPMill XML-RPC Components .
- vdpmill-xmlrpc-client(.bat)[1]
-
Script to run VDPMill XML-RPC client CLI application (for detailed information see Section B.2, “XML-RPC Client ”).
- mapforcecmd.exe
-
Altova MapForce command-line driver. This file appears in the file system, if MapForce integrated version if VDPMill is installed.
- conf/
-
VDPMill configuration files (for details see Chapter 2, VDPMill Configuration for).
- doc/
-
VDPMill User Guide, license text files.
- lib/
-
VDPMill JAR files, L2FPROD JAR files, Apache XML-RPC JAR files.
- samples/
-
VDPMill usage samples.
- EnMasse
-
EnMasse (appears if the "Install EnMasse" option has been chosen in the installer).
VDPMill components store intermediate and temporary data in the file system during running. They use the following files and directories:
- <TMP>/xeptmp
-
The directory where the temporary files created by XEP during final output files generation in VDPMill Interactive GUI Application are stored . <TMP> is the Operating System temporary folder.
- <TMP>/vdpmillserver
-
The directory where the temporary files created by VDPMill XML-RPC Server are stored.
- <HOME>AppData/Local/vdpmill or <HOME>/.vdpmill
-
The directory where the VDPMill settings and intermediate files generated during processing are stored. <HOME> is the user's home directory running VDPMill.
- Session directory for VDPMill Control Panel.
-
This directory is used by VDPMill Control Panel and VDPMill XML-RPC Server to store VDPMill job processing sessions, log files and auxiliary data. After the path is set during the VDPMill installation it can be modified by using VDPMill Control Panel or by editing conf/controlpanel.conf file manually.
|
Important: |
VDPMill should have full access to the directories listed above. |
To uninstall VDPMill, remove the VDPMill installation directory and all its content. Also remove the directories and files listed in the list above.
[1] Everywhere throughout this guide, extensions are shown in brackets for batch files for Windows-based computer systems; the names without these extensions refer to shell files for Unix- and Linux-based systems and Mac OS X.
VDPMill includes the following configuration files:
-
vdpmill.conf - Common configuration parameters. It includes common options and links to component configuration files.
-
splitter.conf - Input XML file splitting rules. It contains information about splitting start point and split point settings.
-
controlpanel.conf - VDPMill Control Panel configuration file.
Table 2.1. vdpmill.conf file options
| Name | Possible Values | Default Value | Description |
|---|---|---|---|
| log-level | error, warning, info, log, none | log | Sets the log-level. log means that all messages (there are four types of messages: log, information, error, and warning) are displayed or written to the log. info means everything except log messages. warning means errors and warnings. error means errors only. |
| preformat-threads-count | positive integer | 1 | The number of pre-formatting threads. |
| format-threads-count | positive integer | 10 | The number of formatting threads. |
| postformat-threads-count | positive integer | 2 | The number of threads which generate separated output files in final formats (PDF, PS, AFP, XEPOUT). |
| join-threads-count | positive integer | 1 | The number of threads which generated joined output files in final formats (PDF, PS, AFP, XEPOUT, etc). |
| data-buffer-size | positive integer | 1048576 | The buffer size for I/O operations on files and sockets. |
| tmpdir | existing folder name | no default value | A folder to store temporary files.[1] |
| toaster-attempts | positive integer | 5 | The number of attempts to reconnect to EnMasse. |
|
[1] Relative URLs are resolved relative to the vdpmill.conf file location. For example, if the configuration file C:/VDPMill/conf/vdpmill.conf contains a ../../splitter.conf URL, the path to splitter.conf will be resolved relative to the vdpmill.conf URL. vdpmill.conf’s URL is file:/C:/VDPMill/conf/vdpmill.conf. After the resolving, the absolute URL of splitter.conf will be file:/C:/splitter.conf. |
|||
Table 2.2. vdpmill.conf elements
| Element Name | Description |
|---|---|
| local-enmasse | Local EnMasse configuration.[1] The configuration attribute is the URL of the toaster.conf file. The directory is the URL of EnMasse installation directory[1]. |
| remote-enmasse | Remote EnMasse configuration. The host attribute is the hostname EnMasse runs on. The port attribute is a TCP port EnMasse runs on. format is the EnMasse output format (the possible value is xep). |
| xep | XEP configuration. The configuration attribute is the URL of the xep.xml file. [1] |
| xml-generators |
XML generators to be used in VDPMill Ticket and
VDPMill Interactive applications.
For more details, see the Chapter 6, How To Use XML Generators.
The nested xml-generator elements have the following attributes:
|
| formatter | VDPMill formatter options. The type attribute is the formatter type, the possible values are xep[2] and enmasse. |
| generator | VDPMill generator options. The type attribute is the generator type. The possible value is xep.[3]. |
| splitter | Splitter configuration. The rules attribute is an URL of the splitter.conf rules file.[1] |
|
[1] For EnMasse configuration see EnMasse User Guide. [2] xep options can be found in XEP Configuration. [3] Options must be written as format:com.renderx.xep:OPTION_NAME_FROM_XEP, e.g. pdf:com.renderx.xep.DROP_UNUSED_DESTINATIONS. For XEP options, see XEP Output Formats. |
|
splitter.conf defines splitter type and input XML document splitting rules, split start type and split point type.
The splitter types can be the following:
-
splitter1g - Single pass splitter. For detailed description, see Section 3.2.2, “Splitting Basics”.
-
splitter2g - Double pass splitter. For detailed description, see Section 3.2.4, “Splitter 2g - Double Pass Splitter”.
The split start types can be the following:
-
pi - Split start is set as PI.
-
element - Split start is set as XML element definition.
The split point types can be the following:
-
pi - Split point is set as PI.
-
element-count - Split point is set as element count.
The splitting rules are explained in the table below
Table 2.3. splitter.conf
| Element Name | Description | Example |
|---|---|---|
| splitter | Defines the splitter type by the type attribute, the split start point type by the split-start-type attribute and the split point type by the split-point-type attribute. |
<splitter xmlns="http://www.renderx.com/DF/splitter/config" type="splitter1g" split-start-type="pi" split-point-type="element-count"> |
| start-point-pi | Start point PI should be specified by two attributes: target and data. |
<start-point-pi target="xepx-df-split" data="start"/> |
| start-point-element | Start point element should be specified by two attributes: name and namespace. |
<start-point-element name="page" namespace="http://www.renderx.com/XEP/xep"/> |
| split-point-pi | Split point PI should be specified by two attributes: target and data. |
<split-point-pi target="xepx-df-split" data="here"/> |
| split-point-element-count | Split point element count should be specified by the element-count attribute. |
<split-point-element-count element-count="10"/> |
controlpanel.conf stores VDPMill Control Panel Configuration.
Table 2.4. Parameters
| vdpmill | The configuration attribute is the URL of VDPMill configuration file used in VDPMill Control Panel [1]. |
| jobmanager | The session-dir attribute is the URL to the session directory for VDPMill Control Panel[1]. This directory contains VDPMill job processing session information, intermediate files generated during processing. By default it contains serverlogs subdirectory for VDPMill XML-RPC Server log files. The jobmanager element may contain nested option element to define the limit of the list for finished jobs in VDPMill Job Manager. |
| xml-rpc |
The executable attribute is the URL[1] of
vdpmill-xmlrpc-server-bot(.bat)[1] file.
The log-dir attribute is the URL of the directory where
VDPMill Control Panel stores XML-RPC Server log files. When VDPMill Control Panel
runs the server it creates serverlog_YYYY_MM_DD.log
log file in the log-dir
directory. All the log messages go to that file until the server is restarted.
If the log file exists it is appended.
The xml-rpc tag may contain the following nested option elements:
|
The logical flow of document processing can be divided into three phases:
Pre-formatting steps are the following:
-
Pre-split XSLT - An XSLT transformation used to customize the source file for special business rule or functional requirements during the formatting run. For example, the stylesheet may insert processing instructions in the source for splitting the document.
-
Splitting - The file is split according to its structure and splitting rules. A document is split either by element or by processing instructions in the source.
-
Post-split XSLT - An XSLT transformation used to generate an XSL-FO file from the individual split XML source files. This is convenient when the source xml is very large and contains batches of data. For example, an xml source with many customer invoices.
-
Formatting - XSL-FO is fed into the formatter, which creates and fills pages according to the specification defined in the XSL-FO document. The results of the formatting stage are XEPOUT files to be processed later. If formatter-type in VDPMill configuration is enmasse, VDPMill uses EnMasse Toaster to format the documents. In this case an embedded XSLT can be applied to the XML file if it contains a reference to stylesheet via <xml-stylesheet ...> processing instruction
-
Custom Post-processing - User-defined post-processing of XEPOUT intermediate document before the generation and joining phases. See Appendix D, Document Post-processing
-
Joining - Concatenation of XEPOUT documents together. If splitting has been applied, generated chunk XEPOUT documents are joined and one joined output file is generated for one input file. If no splitting, one output file is generated for all the source files.
-
Separated Generation - XEPOUT file is converted to the requested output format supported by RenderX XEP. For more detailed information, see XEP User Guide.
XSLT transforms a user-defined XML document to another XML document. Several tasks can be done in this stage of processing (adding barcodes to a document, etc). Basically XSLT is used to generate XSL-FO files from XML documents.
Splitting divides a file into smaller chunks. The content and size of the chunks depend on the source file and the splitting rules. The split chunks can be formatted and then delivered in a printable format. They can be joined after the formatting into one large file. Splitting large files helps to avoid out of memory errors on large file formatting processes.
Formatting converts XSL-FO files to the XEPOUT format. If the source file contains a reference to a stylesheet, or an external stylesheet specified (in the GUI, from the command line, or via VDPMill API), XSLT is done before formatting.
Custom Post-processing can be used to customize a formatted document before generation (adding watermarks to a document, applying transpromo, filtering OMR marks or any user-defined actions).
The Joining functionality can be used to get one large output file after Splitting and Formatting and generate large printable documents. It also can be used to concatenate XEPOUT files from other sources.
Separated output generation makes printable documents /PDF, PostScript, AFP/ from XEPOUT files.
Large files can cause out of memory errors during formatting. Splitting allows dividing a large file into small ones and formatting them simultaneously, which makes formatting process faster.
An XML file may contain collected information about similar but different things. It can be split to be delivered as a collection of separate printable files.
An XML file contains two parts:
-
Common parts - content that should appear in each split chunk,
-
Parts to be split - content that should be split into chunks.
For example, here is an XSL-FO file, where the part to be split (split area) contains the fo:block elements with their content and the common parts in this file are:
-
Header - the content from the beginning of the file to the <fo:flow> start tag included;
-
Footer - the content from the </fo:flow> end tag to the end of the file;
<?xml version="1.0"?>
<fo:root xmlns:fo="http://www.w3.org/1999/XSL/Format">
  <fo:layout-master-set>
    <fo:simple-page-master master-name="all-pages">
      <fo:region-body region-name="xsl-region-body" margin="0.7in"
               column-gap="0.25in" border="0.25pt solid gray" padding="6pt"/>
    </fo:simple-page-master>
  </fo:layout-master-set>
  <fo:page-sequence master-reference="all-pages">
    <fo:flow flow-name="xsl-region-body">
      <fo:block> DATA1 </fo:block>
      <fo:block> DATA2 </fo:block>
      <fo:block> DATA3 </fo:block>
      <fo:block> DATA4 </fo:block>
    </fo:flow>
  </fo:page-sequence>
</fo:root>
|
Let's introduce two splitting terms:
-
Splitting start point - a place in an XML file which separates the head common part from the split area.
-
Split points - places where data in split area can be separated.
In the example above, the split start point lies after the <fo:flow> start tag. Split points can be placed between <fo:block> elements. For example, if four chunks are needed, it means that each chunk will contain one fo:block element, and the split files will be the following:
<?xml version="1.0"?>
<fo:root xmlns:fo="http://www.w3.org/1999/XSL/Format">
  <fo:layout-master-set>
    <fo:simple-page-master master-name="all-pages">
      <fo:region-body region-name="xsl-region-body" margin="0.7in"
               column-gap="0.25in" border="0.25pt solid gray" padding="6pt"/>
    </fo:simple-page-master>
  </fo:layout-master-set>
  <fo:page-sequence master-reference="all-pages">
    <fo:flow flow-name="xsl-region-body">
      <fo:block> DATA1 </fo:block>
    </fo:flow>
  </fo:page-sequence>
 </fo:root>
|
...
<?xml version="1.0"?>
<fo:root xmlns:fo="http://www.w3.org/1999/XSL/Format">
  <fo:layout-master-set>
    <fo:simple-page-master master-name="all-pages">
      <fo:region-body region-name="xsl-region-body" margin="0.7in"
               column-gap="0.25in" border="0.25pt solid gray" padding="6pt"/>
    </fo:simple-page-master>
  </fo:layout-master-set>
  <fo:page-sequence master-reference="all-pages">
    <fo:flow flow-name="xsl-region-body">
      <fo:block> DATA4 </fo:block>
    </fo:flow>
  </fo:page-sequence>
</fo:root>
|
|
Important: |
Currently, only end tags can be repeated in split files. |
|
Important: |
Split start point and split points must occur on the same level in an XML file with the single pass splitter (Splitter 1g). |
VDPMill provides two ways to define a split start point, as well as two ways to define split point. For details see Section 2.3, “splitter.conf Description”.
A split start point can be defined in the XML files as:
-
PI
-
Start tag
Splitter 2g can be used to split an XML file which contains split points on mixed levels in the document. It works similarly to the single pass splitter - Splitter 1g (see Section 3.2.2, “Splitting Basics”) - except that the document can be split into chunks constructed from different level data. Here is an example:
<?xml version="1.0"?>
<fo:root xmlns:fo="http://www.w3.org/1999/XSL/Format">
  <fo:layout-master-set>
    <fo:simple-page-master master-name="all-pages">
      <fo:region-body region-name="xsl-region-body" margin="0.7in"
               column-gap="0.25in" border="0.25pt solid gray" padding="6pt"/>
     </fo:simple-page-master>
  </fo:layout-master-set>

  <?xepx-df-split start?>

  <fo:page-sequence master-reference="all-pages">
    <fo:flow flow-name="xsl-region-body">
      <fo:block> DATA1 </fo:block>
    </fo:flow>
  </fo:page-sequence>

  <?xepx-df-split here?>

  <fo:page-sequence master-reference="all-pages">
    <fo:flow flow-name="xsl-region-body">
      <fo:block> DATA2 </fo:block>
    </fo:flow>
  </fo:page-sequence>

  <?xepx-df-split here?>

  <fo:page-sequence master-reference="all-pages">
    <fo:flow flow-name="xsl-region-body">
      <fo:block> DATA3 </fo:block>
      <fo:block> DATA4 </fo:block>
      <fo:block> DATA5 </fo:block>

      <?xepx-df-split here?>

      <fo:block> DATA6 </fo:block>
      <fo:block> DATA7 </fo:block>

    </fo:flow>
  </fo:page-sequence>
</fo:root>
|
The chunks generated from the example above will be the following:
<?xml version="1.0"?>
<fo:root xmlns:fo="http://www.w3.org/1999/XSL/Format">
  <fo:layout-master-set>
    <fo:simple-page-master master-name="all-pages">
      <fo:region-body region-name="xsl-region-body" margin="0.7in"
               column-gap="0.25in" border="0.25pt solid gray" padding="6pt"/>
    </fo:simple-page-master>
  </fo:layout-master-set>

  <fo:page-sequence master-reference="all-pages">
    <fo:flow flow-name="xsl-region-body">
      <fo:block> DATA1 </fo:block>
    </fo:flow>
  </fo:page-sequence>
</fo:root>
|
<?xml version="1.0"?>
<fo:root xmlns:fo="http://www.w3.org/1999/XSL/Format">
  <fo:layout-master-set>
    <fo:simple-page-master master-name="all-pages">
      <fo:region-body region-name="xsl-region-body" margin="0.7in"
               column-gap="0.25in" border="0.25pt solid gray" padding="6pt"/>
    </fo:simple-page-master>
  </fo:layout-master-set>

  <fo:page-sequence master-reference="all-pages">
    <fo:flow flow-name="xsl-region-body">
      <fo:block> DATA2 </fo:block>
    </fo:flow>
  </fo:page-sequence>
</fo:root>
|
<?xml version="1.0"?>
<fo:root xmlns:fo="http://www.w3.org/1999/XSL/Format">
  <fo:layout-master-set>
    <fo:simple-page-master master-name="all-pages">
      <fo:region-body region-name="xsl-region-body" margin="0.7in"
               column-gap="0.25in" border="0.25pt solid gray" padding="6pt"/>
     </fo:simple-page-master>
  </fo:layout-master-set>

  <fo:page-sequence master-reference="all-pages">
    <fo:flow flow-name="xsl-region-body">
      <fo:block> DATA2 </fo:block>
      <fo:block> DATA4 </fo:block>
      <fo:block> DATA5 </fo:block>
    </fo:flow>
  </fo:page-sequence>
</fo:root>
|
<?xml version="1.0"?>
<fo:root xmlns:fo="http://www.w3.org/1999/XSL/Format">
  <fo:layout-master-set>
    <fo:simple-page-master master-name="all-pages">
      <fo:region-body region-name="xsl-region-body" margin="0.7in"
               column-gap="0.25in" border="0.25pt solid gray" padding="6pt"/>
     </fo:simple-page-master>
  </fo:layout-master-set>

  <fo:page-sequence master-reference="all-pages">
    <fo:flow flow-name="xsl-region-body">
      <fo:block> DATA6 </fo:block>
      <fo:block> DATA7 </fo:block>
    </fo:flow>
  </fo:page-sequence>
</fo:root>
|
If an XML files has been split it may be important to control the appearance of the chunk in the final output. For these purposes VDPMill uses XML PIs to get information of final formats for separated and joined output files. There are two XML PIs to control joined and separated output generation from the chunk documents: <?xepx-vdpmill-skip-join format?> <?xepx-vdpmill-skip-gen format?> where format is one of output formats available in XEP. <?xepx-vdpmill-skip-join format?> means that the chunk document which contains the PI should skip joining for format. <?xepx-vdpmill-skip-gen format?> means to skip the generation of a separated document in format.
Cross-references can cause problems, if the referenced destination does not lie in the same chunk as the reference itself.
Consider the XSL-FO example file from Section 3.2.2, “Splitting Basics”. The file should be split into chunks containing three <fo:block> elements each. In this case, splitting start point can be defined in that file as a processing instruction and a split point should be defined after the third <fo:block>.
<?xml version="1.0"?>
<fo:root xmlns:fo="http://www.w3.org/1999/XSL/Format">
  <fo:layout-master-set>
    <fo:simple-page-master master-name="all-pages">
      <fo:region-body region-name="xsl-region-body" margin="0.7in"
               column-gap="0.25in" border="0.25pt solid gray" padding="6pt"/>
    </fo:simple-page-master>
  </fo:layout-master-set>
  <fo:page-sequence master-reference="all-pages">
    <fo:flow flow-name="xsl-region-body">
    <?xepx-df-split start?> (1)
      <fo:block> DATA1 </fo:block>
      <fo:block> DATA2 </fo:block>
      <fo:block> DATA3 </fo:block> (2)
      <fo:block> DATA4 </fo:block>
      (3)
    </fo:flow>
  </fo:page-sequence>
</fo:root>
|
The appropriate splitter configuration file should be the following:
<?xml version="1.0" encoding="utf-8"?>
<splitter xmlns="http://www.renderx.com/DF/splitter/config" type="splitter1g"
      split-start-type="pi" split-point-type="element-count">
  <start-point-pi target="xepx-df-split" data="start"/> (1)
  <start-point-element name="page" namespace=""/>
  <split-point-pi target="xepx-df-split" data="here"/>
  <split-point-element-count element-count="3"/> (2)
</splitter>
|
VDPMill uses RenderX XEP and EnMasse to format XSL-FO files.
The XML file will be transformed before formatting if it contains a reference to a stylesheet. This option is supported only if the formatter-type is enmasse (See Section 2.2, “ vdpmill.conf Description”). VDPMill also allows pre- and post- split xsl transformations (See Pre-split XSLT and Post-split XSLT points in Chapter 3, VDPMill Document Processing).
|
Important: |
The EnMasse instance used by VDPMill Formatter should be configured to run as Toaster and to produce XEPOUT files. For details see the EnMasse documentation. Running the EnMasse instance used by VDPMill on the same physical machine is the best option, because this ensures correct processing of document external resources (stylesheets, images) which appear in the documents as relative URIs. |
XEPOUT documents can be processed specially before final format files are generated. Since XEPOUT documents are in XML, a special post-processor can handle them and pass modified XEPOUT document to the final format generator or joiner.
For the detailed description of document post-processing see Appendix D, Document Post-processing.
Some printers can accept large files (PostScript, AFP). Large print files can be generated with VDPMill by joining XEPOUT chunks. Simply, XEPOUT files are concatenated by adding the pages sequence from the second file to the first and so on. In the example below there are three separated XEPOUT files and the joining of these files is the result:
the separated files:
<?xml version="1.0" encoding="UTF-8"?>

<xep:document xmlns:xep="http://www.renderx.com/XEP/xep" producer="XEP 4.13"
              creator="Unknown" author="Unknown" title="Untitled">

  <xep:page width="576000" height="792000" page-number="1" page-id="1">
    <xep:word-spacing value="0"/>
    <xep:letter-spacing value="0"/>
    <xep:font-stretch value="1.0"/>
    <xep:font family="Helvetica" weight="400" style="normal" variant="normal"
              size="12000"/>
    <xep:gray-color gray="0.0"/>
    <xep:text value="D" x="56400" y="725334" width="8184"/>
    ...
  </xep:page>
</xep:document>
|
<?xml version="1.0" encoding="UTF-8"?>

<xep:document xmlns:xep="http://www.renderx.com/XEP/xep" producer="XEP 4.13"
              creator="Unknown" author="Unknown" title="Untitled">

  <xep:page width="576000" height="792000" page-number="1" page-id="1">
    ...
  </xep:page>
</xep:document>
|
<?xml version="1.0" encoding="UTF-8"?>

<xep:document xmlns:xep="http://www.renderx.com/XEP/xep" producer="XEP 4.13"
              creator="Unknown" author="Unknown" title="Untitled">

  <xep:page width="576000" height="792000" page-number="1" page-id="1">
    ...
  </xep:page>
</xep:document>
|
the result:
<?xml version="1.0" encoding="UTF-8"?>

<xep:document xmlns:xep="http://www.renderx.com/XEP/xep" producer="XEP 4.13"
              creator="Unknown" author="Unknown" title="Untitled">

  <xep:page width="576000" height="792000" page-number="1" page-id="1">
    <xep:word-spacing value="0"/>
    <xep:letter-spacing value="0"/>
    <xep:font-stretch value="1.0"/>
    <xep:font family="Helvetica" weight="400" style="normal" variant="normal"
              size="12000"/>
    <xep:gray-color gray="0.0"/>
    <xep:text value="D" x="56400" y="725334" width="8184"/>
    ...
  </xep:page>


  <xep:page width="576000" height="792000" page-number="1" page-id="1">
  ...
  </xep:page>

  <xep:page width="576000" height="792000" page-number="1" page-id="1">
  ...
  </xep:page>
</xep:document>
|
VDPMill supports flexible Join operations. For example, it is possible to get joined PDF output, separated PS, joined AFP, joined and separated XEPOUT files (see Chapter 4, VDPMill Interactive GUI Application and Chapter 9, VDPMill Command Line Interface).
Chunk document appearance in the joined output files can be controlled using special XML PIs. See Section 3.2.5, “Final Format Generation Control using XML PIs”.
The Generation process makes printable files from chunk XEPOUT documents. For available output formats and final format options see XEP User Guide.
Chunk document appearance in the joined output files can be controlled using special XML PIs. See Section 3.2.5, “Final Format Generation Control using XML PIs”.
VDPMill contains a user-friendly GUI tool called the VDPMill Interactive Application. Use of VDPMill Interactive Application simplifies the whole functionality of VDPMill.
VDPMill Interactive application look and feel varies depending on the operating system the application is running on.
To open VDPMill Interactive, launch the vdpmill-gui script (the vdpmill-gui.bat batch file for MS Windows) in the /bin directory located in the VDPMill installation directory.
To process a file, first add it to the list of input files.
Procedure 4.1. To add an existing XML or XSL-FO file:
-
Click File from the main menu.
The File menu is displayed.
-
click Add ... or press Ctrl+O from the File menu.
The file open dialog box is displayed.
-
Browse for the files you wish to add.
The files are added to the Input Files list within VDPMill Interactive.
If you need to exclude files, select the appropriate checkboxes in the list of input files and click the
 Remove button on toolbar or select Remove
Selected from the File menu.
Remove button on toolbar or select Remove
Selected from the File menu.
It is also possible to move selected input files up and down using
 Up and
 Down buttons or sort by clicking on the column titles.
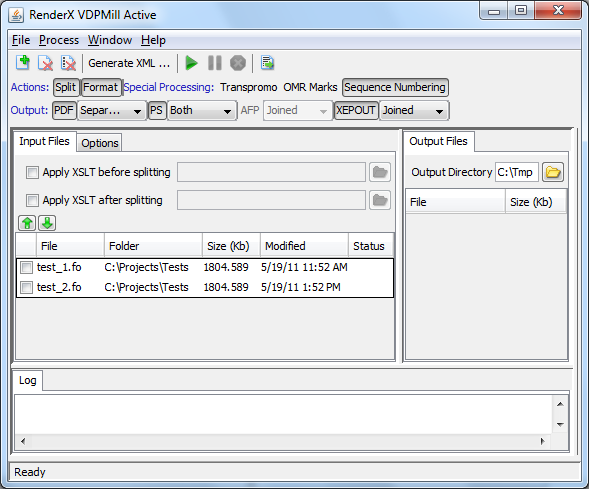
Once the files are added, they can be processed with VDPMill and output files will be generated in the chosen output format(s).
Procedure 4.2. To process XML files:
-
Select Apply XSLT and specify an XSLT stylesheet (use the
 Browse... button next to the text field), if the
input files should be transformed before and/or after splitting.
Browse... button next to the text field), if the
input files should be transformed before and/or after splitting.
-
Select the desired actions (format and/or split) on the main toolbar above the Input Files list.
-
Select output format(s) for result files and output document types (separated, joined, both).
-
Choose the output directory by clicking the
Browse... button or by typing the full directory
path in the Output Directory text box.
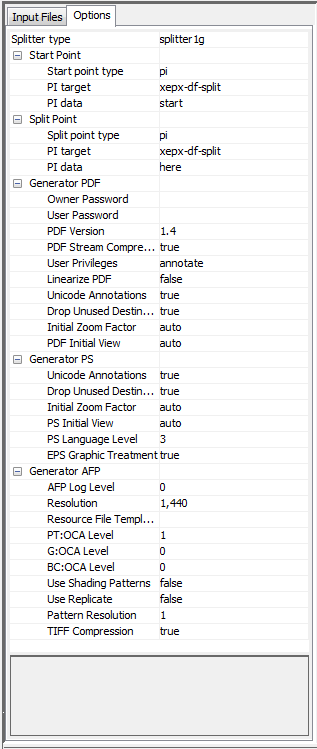
-
Adjust splitting and final format generation option on the Options panel.
-
Press the
 Process button. The logging information will be
displayed in the Input Files tab.
When processing is in progress, it can be paused by clicking the
Process button. The logging information will be
displayed in the Input Files tab.
When processing is in progress, it can be paused by clicking the
 Pause button or interrupted by clicking
 Cancel button.
If an error occurs during processing, VDPMill writes an error message to the log and pauses processing. Then processing can be resumed or canceled. If VDPMill Interactive exits when processing is paused, it stores processing progress and it is possible to continue processing on the next run.
It is possible to save current project state and load it later to process. Project file is an XML job ticket which contains all defined project specific settings and document processing options. For VDPMill Job Ticket format descriptionSee Appendix C, Job Ticket Format Description.
To save the project select Save Project... from File menu. Select the directory and filename in directory browser and save the project file.
To load the project select Open Project... from File menu, choose the saved or manually created project file. All settings defined in project file should be loaded.

VDPMill parameters can be configured by using the GUI.
Procedure 4.3. To configure VDPMill:
-
Select Window from the main menu. The Window menu is displayed.
-
Make sure that the Configuration menu item is checked.
-
Select the VDPMill tab to change VDPMill core options.
-
Select the EnMasse tab to change EnMasse settings.

For a detailed description of VDPMill parameters and component types see Chapter 2, VDPMill Configuration and Section 7.4, “Configuring VDPMill Core Parameters ”.
VDPMill Ticket Application (VDPMillTicket) is a GUI tool to create VDPMill Job Ticket files. To launch the application run vdpmill-ticket script (the vdpmill-ticket.bat batch file for MS Windows) in the /bin directory located in the VDPMill installation directory.
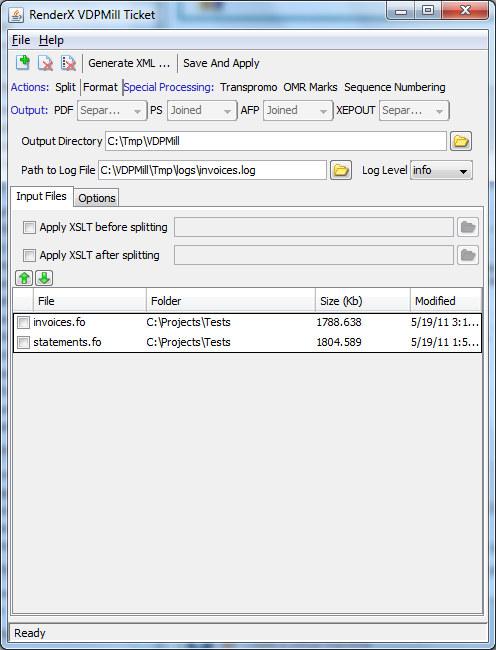
This application is a light-weight variation of VDPMill Interactive application and has a simple user interface to specify input files, pre/post-split stylesheet paths, desired actions, output targets, output directory, splitting options, options for output formats, output directory, path to log file, log level and special processing options.
VDPMillTicket (as well as VDPMill Interactive) saves projects as VDPMill Job Ticket format files. For VDPMill Job Ticket format description see Appendix C, Job Ticket Format Description.
Once the ticket file is created it can be processed by pressing Save And Apply button or using VDPMill CLI tool (Chapter 9, VDPMill Command Line Interface), VDPMill Control Panel (Chapter 7, VDPMill Control Panel), VDPMill XML-RPC Client CLI tool (Section B.2, “XML-RPC Client ”).
In VDPMill terms, an XML generator is an executable file that takes two command-line arguments (the input file in any format and the output XML file), runs modally (without returning the control until it finishes running) and returning 0 on successful generation and a positive integer on failure. The generated XML file becomes an input file for VDPMill Ticket and VDPMill Interactive applications.
|
Note: |
Altova MapForce command-line driver To use Altova MapForce with VDPMill, you need to have a special command-line driver which provides the aforementioned functionality for MapForce. You may use your own driver which complies with the requirements above or use the one which is developed by RenderX. It takes a MapForce document (.mfd) file as the first command-line argument and generates XML file using MapFore API. The generated XML is stored in the file specified by the second command-line argument. Depending on the distribution package you have received, this file may or may not be automatically installed (the bin\mapforcecmd.exe file in the VDPMill installation directory on the Windows platforms) during the VDPMill installation. If the file has not been installed, you may obtain it separately from RenderX. |
XML generators are useful when the input XML files need to be generated from some data providers, such as databases or web-services, or the input XML stream needs to be modified by an external application.
Procedure 6.1. To use an XML generator:
-
Press
 Generate XML... button in
VDPMill Ticket or VDPMill Interactive
applications. The XML generators dialog is displayed:
Generate XML... button in
VDPMill Ticket or VDPMill Interactive
applications. The XML generators dialog is displayed:
-
Choose the generator in
 Generators
list.
Generators
list.
-
Click
Browse button to browse for the input file.
The file open dialog box is displayed.
-
Browse for the input file.
-
Click
Browse button to browse for the output XML file.
The file save dialog box is displayed.
-
Click
 Generate button to generate the XML file.
Important:
Modal Workflow
The application will stop responding until the XML generator returns control back to the application.
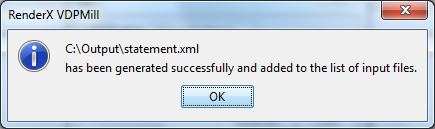
Upon successful generation, the generated XML file is added to the list of the input files in VDPMill Ticket or VDPMill Interactive application:
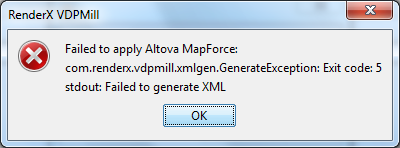
Upon failure, a message box is displayed with standard error and standard output messages coming from the XML generator:

|
Important: |
The |
VDPMill Interactive and VDPMill Ticket applications use XML generators, as configured in the vdpmill.conf file. Users are free to configure VDPMill to use any suitable executable as an XML generator. To add a new XML generator to the vdpmill.conf file add a nested xml-generator element to the xml-generators element in vdpmill.conf file (add the xml-generators element first, if it doesn't exist).
Here is an example of a new XML generator configured:
  ...
  <xep configuration="xep.xml"/>
  <xml-generators>
    <xml-generator name="RenderX DB2XML" command="file:/DB2XML/db2xmldriver.exe"
                      input-file-extensions="dxt/xml"/>
  </xml-generators>
  <formatter type="enmasse">
  ...
|
For more details, see vdpmill.conf description. The input-file-extensions attribute is a slash-separated (/) list of file extensions, which is used to browse for the input file in XML Generators dialog box.
VDPMill Altova MapForce Edition is preconfigured to use MapForce as an XML generator. In this version, the default vdpmill.conf file includes the following xml-generator element:
  ...
  <xml-generators>
    <xml-generator name="Altova MapForce" command="../bin/mapforcecmd.exe"
                      input-file-extensions="mfd"/>
  </xml-generators>
  ...
|
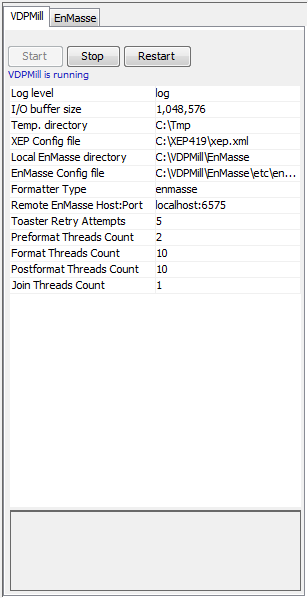
VDPMill Control Panel is a GUI application to run/stop/configure VDPMill XML-RPC Server and EnMasse. It runs VDPMill XML-RPC Server and EnMasse as background processes.
To open VDPMill Control Panel, launch the vdpmill-control-panel script (the vdpmill-control-panel.bat batch file for MS Windows) in the /bin directory located in the VDPMill installation directory.
VDPMill Control Panel displays the status of XML-RPC Server and its parameters on the XML-RPC Server tab. To run/stop/restart the VDPMill XML-RPC Server press Start/Stop/Restart buttons on the XML-RPC Server tab.
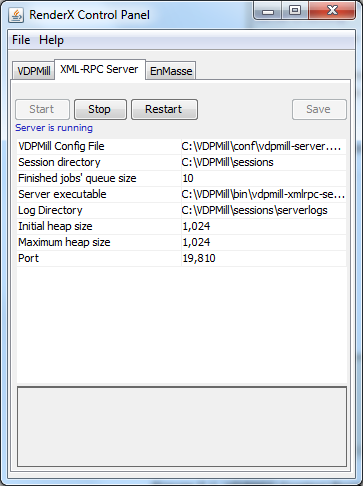
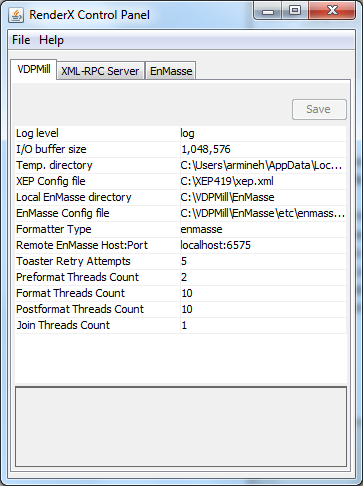
VDPMill Control Panel allows to change configuration parameters via GUI. After parameter changes it is necessary to save changes and restart the server. Press Save button to save parameter changes. For detailed information about configuration parameters see Section 2.4, “ controlpanel.conf Description ”.
If a firewall is used to allow/deny network connections, the TCP port for VDPMill XML-RPC Server must be allowed for incoming connections from the local host.
VDPMill Core Parameters are displayed on the VDPMill tab in the control panel application. It is necessary to save parameters and restart the XML-RPC Server and EnMasse (if EnMasse-related parameter is changed and EnMasse is selected as formatter - Formatter Type = enmasse). For detailed information about VDPMill Core configuration parameters, see Section 2.2, “ vdpmill.conf Description”.
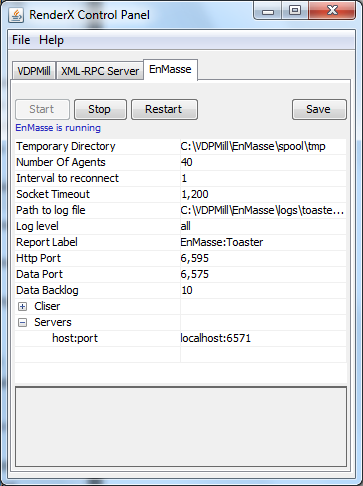
EnMasse tab contains Start, Stop and Restart buttons to control the EnMasse processing and options table to change EnMasse configuration parameters. After any changes it is necessary to save the configuration changes and restart EnMasse. For detailed information about EnMasse configuration parameters see EnMasse User Guide
VDPMill Job Monitor is a GUI application to apply and manipulate with jobs.
The Job Monitor connects to the VDPMill XML-RPC Server on the specified port and displays the jobs applied to the server. If it is failed to connect to the server, it tries to reconnect after a time period. Any active job can be paused/resumed or canceled and it is possible to set priority to the non finished jobs.
To open VDPMill Job Monitor, launch the vdpmill-job-monitor script (the vdpmill-job-monitor.bat batch file for MS Windows) in the /bin directory located in the VDPMill installation directory.
Job Monitor is used to apply/pause/resume jobs and view the jobs applied to the server. It displays the jobs as a four-column table, containing ticket file name, status, priority and the job Id created to process the ticket. To use Job Monitor, the VDPMill XML-RPC Server should be started (see Section 7.3, “Configuring and Running XML-RPC Server ”).
To process a job, a ticket file should be applied. Select Apply Job
from the File menu or click on the
 on the
processing toolbar. Select the ticket file(s) to be applied from the open
file browser. The application applies the selected job tickets to the server
which queues the jobs for further processing. If a ticket file contains
invalid ticket data corresponding error message appears in the log and the
server ignores the ticket.
on the
processing toolbar. Select the ticket file(s) to be applied from the open
file browser. The application applies the selected job tickets to the server
which queues the jobs for further processing. If a ticket file contains
invalid ticket data corresponding error message appears in the log and the
server ignores the ticket.
It is also possible to create a new ticket. The
 Create New Ticket button opens VDPMill Ticket
Application (see Chapter 5, VDPMill Ticket Application
).
Create New Ticket button opens VDPMill Ticket
Application (see Chapter 5, VDPMill Ticket Application
).
Once a job is applied it can be paused/canceled or resumed after pausing.
To pause/resume/cancel job processing check the job and click on
Pause,
 Resume and
Cancel buttons
on the processing toolbar or select Pause, Resume and
Cancel from the Process menu respectively.
Resume and
Cancel buttons
on the processing toolbar or select Pause, Resume and
Cancel from the Process menu respectively.
Until the job is in process, it is possible to set its priority. To change the job's priority, select the job, change priority on the processing tool bar and press Set button. The new priority should appear for the job in the Jobs list table.
Finished jobs are always inactive and manipulations are not allowed.
For detailed information about job states and allowed operations see Section A.3, “Job States”.
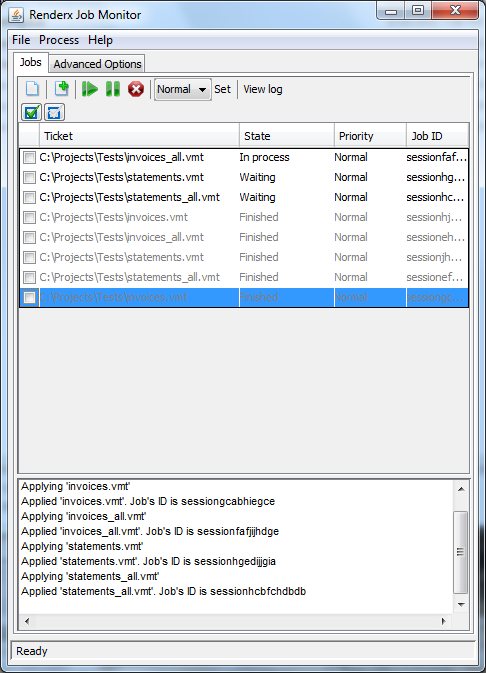
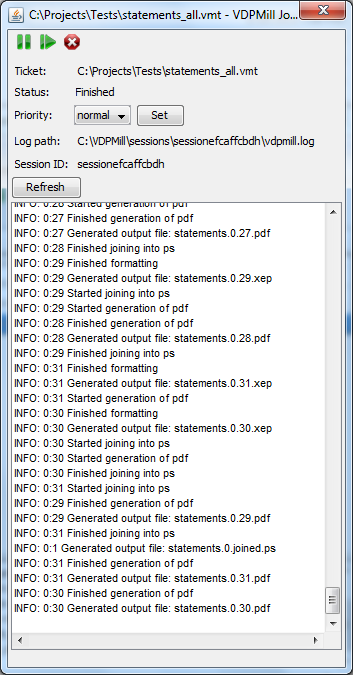
Job Monitor logs all the job operations in the log panel that is below the jobs table. It is also possible to hide/show the log panel by selecting the Show Log from the File menu. To open the particular job's log separately, select the job and press View Log button on the processing tool bar or double click on the job in the jobs list, then Job Monitor displays log messages for the job (if any) in a separated window that contains Pause/Resume/Cancel buttons as well.
Advanced Options tab allows to define the port number to connect to the XML-RPC server. The default port number is 19810. It should be applied after changes by pressing Apply button. To revert port number value to the last value before changes press Revert button. To reload from the state file press Reload from State file button.

The VDPMill command line syntax is the following:
            Usage: com.renderx.df.Main -h|--help|
                or
            [-d ] -c configfile -p|--project projectfile
                or
            [-d ] -c configfile -o outputdir actions
            [-f format ] [-j format ]
            [--pre-split-stylesheet stylesheet ]
            [--post-split-stylesheet stylesheet ]
            [--post-process-tranpromo] [--post-process-omr]
            [--post-process-sequence] files
|
where:
-
-h, --help - print help and exit.
-
-d - turn the debug mode on. Prints detailed information.
-
-c configfile - the VDPMill configuration file. A relative path is resolved relative to the current directory.
-
-p projectfile - VDPMill project file. If this option is set, all options described below will be ignored. A relative path is resolved relative to the current directory.
-
--pre-split-stylesheet - XSLT stylesheet to apply to input documents before splitting.
-
--post-split-stylesheet - XSLT stylesheet to apply to input documents after splitting.
-
-o output - output directory if many files are produced, or a single output file.
-
-f format - output format. One of the formats supported by the generator selected in the generator configuration file. Can be specified multiple times to produce many output files from each formatted file.
-
-j format - output format to join files. If there is no split action, all the input files will be joined together. Otherwise each input file will be split into chunks and joined together after formatting. Can be specified multiple times to produce many output files.
-
actions - actions to perform on the input file(s):
-
split - split input file(s).
-
split format - split input file(s) and then format split chunks, generate output file(s) for selected output format(s), join split chunks together if -j format specified, write output files in the output directory.
-
format - format input file(s), generate output file(s) for selected output format(s).
-
-
--post-process-omr - enable predefined OMR post-processing.
-
--post-process-transpromo - enable predefined Transpromo post-processing.
-
--post-process-sequence - enable predefined sequence number generation post-processing.
-
files - input files.
Job Manager is an internal component of VDPMill intended for queueing and processing VDPMill jobs. It accepts VDPMill job tickets (see Appendix C, Job Ticket Format Description), queues them and processes sequentially. Once a job is applied, it can be paused/canceled/resumed after pausing. Jobs are identified using unique identifiers generated by Job Manager when a job is applied.
The job applied to the job manager goes to the queue monitored by a separate thread that takes the first job with 'waiting' status from the queue to process. After the current job is finished Job Manager puts it to the finished jobs list that is being held to provide information about last finished jobs to the client components. The size of the list for finished jobs is limited (the limit is configurable). When the limit is exceeded the oldest finished job is removed from the list. All the files and directories for that job are removed as well.
Job Manager stores all the queued jobs and finished jobs list to the session directory on quit and loads saved jobs on launching. The path to session directory is a configurable parameter of Job Manager.
For detailed information about VDPMill Job Manager and its API see VDPMill DevKit package, the API documentation.
The list below describes job actions without technical details (refer to VDPMill DevKit package for Job Manager API documentation).
- apply ticket
-
validates and queues the ticket for processing if valid, or reports the error occurred during the validation.
- pause job-id
-
pauses the given job. If the job currently is in process, it enters the pausing mode. Error flag is returned if the given job is not found, or the pause operation is not allowed for the job.
- cancel job-id
-
cancels the job. If the job currently is in process it enters the canceling mode. Error flag is returned if the given job is not found, or the cancel operation is not allowed for that job. When the job is canceled, it is removed from the queue. All files and folders for that job is removed from the session directory.
- resume job-id
-
resumes the previously paused or failed job. The job takes waiting status and is processed, when it's turn comes. Error flag is returned if the given job is not found or the resume operation is not allowed for that job.
- list jobs
-
returns a map job-id -> job-status for all the queued and finished jobs. Returns an empty map if there are no queued/finished jobs.
- get-state job-id
-
returns the current state for the given job or error flag if the job is not found.
The table below describes the states that a job can have when it is applied to Job Manager. Depending on its state, several actions can be allowed for the job. Possible subsequent states of the job depend on the current state as well.
Table A.1. Job States, Allowed Actions, Possible Subsequent States
| State | Allowed Actions | Possible Subsequent States |
|---|---|---|
| waiting | pause, cancel | processing, paused |
| processing | pause, cancel | pausing, canceling, failed, finished |
| paused | resume, cancel | waiting |
| failed | resume, cancel | waiting |
| pausing | no actions allowed | paused, failed, finished |
| canceling | no actions allowed | no subsequent state |
| finished | no actions allowed | no subsequent state |
VDPMill XML-RPC Server is an XML-RPC interface to VDPMill Job Manager. It provides the Job Manager's functionality via XML-RPC protocol and allows to run job processing in a separate process. VDPMill XML-RPC Server makes possible to use VDPMill full functionality from applications which are built using languages/frameworks providing libraries for XML-RPC.
The server opens a TCP port and listens for incoming connections. The port to listen to is a configurable parameter and it must not be used when the server is starting. When the server starts it launches VDPMill Job Manager and transfers incoming requests to it. For Job Manager information see Appendix A, VDPMill Job Manager.
For detailed information about the API of VDPMill XML-RPC Server refer to VDPMill API documentation in VDPMill DevKit package.
VDPMill XML-RPC Server can be run through the command line (see Section B.1, “XML-RPC Server ”) or from VDPMill Control Panel (see Chapter 7, VDPMill Control Panel).
VDPMill XML-RPC Server uses Apache libraries for XML-RPC.
VDPMill package includes XML-RPC Server running scripts. The bin/vdpmill-xmlrpc-server(.bat)[1] script has the following command-line parameters:
            Usage: com.renderx.vdpmill.xmlrpc.Server [-d]
                                                     [-p port]
                                                     [-f finished-jobs-list-size>]
                                                     VDPMILL.CONF
                                                     SESSION_DIR
|
where:
-
-d - debug mode.
-
port - TCP port for the server to listen on. The given port must be free when the server starts.
-
finished-jobs-list-size - finished jobs list limit. For the detailed description of this parameter see Appendix A, VDPMill Job Manager.
-
VDPMILL.CONF - path to VDPMill configuration file.
-
SESSION_DIR - path to session directory to load previous sessions on Job Manager start and to store session on quit.
The server writes all the log messages to the standard error stream, that can be redirected to a file using > or >> redirection symbols in the command line.
VDPMill XML-RPC Client is a Java class to connect and call methods of VDPMill XML-RPC Server.
VDPMill package includes the bin/vdpmill-xmlrpc-client(.bat)[1] script which allows to call VDPMill XML-RPC Server methods using the command-line interface. This tool is built around VDPMill XML-RPC Client. The command-line syntax is the following:
              Usage: xmlrpc-client [-p port]
                                   [-t timeout]
                                   command
                                   param
                                   [param2]
|
where:
-
port - VDPMill XML-RPC port to connect to.
-
timeout - socket timeout in milliseconds.
-
command - apply|pause|resume|list|priority|stop
-
param - job ticket file path for the apply command, job-id for other commands.
-
stop server stops the server
-
list all - lists all queued jobs.
-
param2 - additional parameter for priority command, that should appear as priority <job-id> normal/high/low.
VDPMill Job Tickets describe VDPMill jobs. The ticket contains information about input files, output formats, output directory, XSLT stylesheets and other information needed for the job to be processed. VDPMill Interactive and VDPMill Ticket GUI applications use this format to store/load projects.
<?xml version="1.0" encoding="UTF-8"?>
  <project xmlns="http://www.renderx.com/VDPMill/job/definition"
           version="1.0"> (1)
    <option name="inputfilescurrentdir" value="/home/user/DATA"/> (2)
    <option name="log-file" value="/home/user/DATA/logfile.log"/>
    <option name="log-level" value="info"/>
    ...
    <input-files> (3)
      <file path="/home/user/DATA/test1.xml"/> (4)
      <file path="/home/user/DATA/test2.xml"/>
      <file path="/home/user/DATA/test3.xml"/>
    </input-files>

    <xslt role="pre-split"
          stylesheet="/home/user/DATA/stylesheets/barcode.xsl"/> (5)
    <xslt role="post-split"
          stylesheet="/home/user/DATA/styelsheets/statement2fo.xsl"/> (6)

    <action name="split"> (7)
      <option name="type" value="splitter1g"/> (8)
      <option name="split-start-type" value="element"/>
      <option name="start-point-namespace" value=""/>
      <option name="start-point-name" value="statement-data"/>
      <option name="split-point-type" value="element-count"/>
      <option name="split-point-element-count" value="1"/>
    </action>

    <action name="format"/> (9)

    <output directory="/home/user/DATA/output"> (10)
      <option name="pdf:com.renderx.xep.COMPRESS" value="true"/> (11)
      <option name="ps:com.renderx.xep.LANGUAGE_LEVEL" value="3"/>
      <option name="afp:com.renderx.xep.USE_PTOCA_LEVEL" value="1"/>

      <post-processing name="transpromo"/> (12)

      <target format="pdf" separated="true"/> (13)
      <target format="ps" separated="true"/>
      <target format="ps" separated="false"/>
      <target format="afp" separated="false"/>
    </output>
  </project>
|
Post-processing is applied on XEP intermediate format documents (XEPOUT documents) to customize print streams. Several transformations can be applied at this step.
Since XEPOUT documents are in XML format, post-processors are SAX event filters which handle SAX events from the source XEPOUT file and pass them to the underlying SAX handlers to generate the final output files.
XEPOUT documents may contain special XML processing instructions to control post-processing. As well as there is an XML tag pinpoint that can be specified in the source XSL-FO file. XEP processes pinpoint tags transparently and the tags specified in XSL-FO files appear in the resulting XEPOUT document after formatting.
For the detailed description of XEP intermediate format see XEPOUT description.
VDPMill package provides the following post-processing implementations:
Transpromo, also known as "statement-based marketing", integrates a TRANSactional document with proactive PROMOtional marketing. TransPromo provides an opportunity to blend marketing messages with must-read transaction statements such as invoices, statements, benefit confirmations, explanations, and other notifications to influence behavior and ultimately drive business volume. VDPMill is using Transpromo plug-in to place images on the pages. Image is being placed on the page from a given set of images. Size of the necessary image for the page is being calculated automatically. Image choosing can be done by setting if current image set should be used for specified type of documents (separated or joined) or for specified format. If no document format and type specified, default image set will be used.
Optical Marks are special marks previously put on paper and can be read by OMR reading software. OMR marks are used to deliver processing instructions to cutting, folding and other postpress machines. For example, an OMR mark can be used to specify the type of the envelope which the letter should be put in. Currently VDPMill includes two specifications: ABC Office 630 series (see the specification) and Pitney Bowes 8 series (see the specification ). Specification is an XML file which contains information about specific OMR marks. Implementation concepts:
-
Marks element should have default-mark-value attribute, that determines if each nested mark element is shown or not. Each mark can override that value with self-defined default-mark-value attribute.
-
Default-mark-value can also be overridden for elements with pin-name and pi-name attributes.
<omr:mark position="2" name="eoc" pin-name="eoc.pinpointmatch"/>
The attribute pin-name identifies the XEPOUT element to look for. Specifically, should be searched for the occurrence of an pinpoint element with a value of eoc.pinpointmatch. If the pinpoint exists anywhere within that page, then eoc.pinpointmatch should be left on the page. On those pages where the pinpoint is not found, the mark should be removed. For pinpoint elements with pi-name attribute, default-mark-value can be overridden with a xep-omr-safety on[off] processing instruction in XEPOUT file.
-
Parity mark. Parity is an odd or even match, based on the specs. Parity mark in OMR spec file should contain parity-value attribute with odd/even value. If no parity-value is found the mark is ignored.
-
xep-omr off processing instruction would exclude the marks from the output.
XEPOUT file should also contain specification file and name information. For that purpose processing instructions with omr-spec-file and omr-spec-name targets should be used. Relative OMR specification file path is resolved relative to the input xml file.
<?omr-spec-file file:OMR/OMR.Specs.xml?> <?omr-spec-name pitney-bowes-8-series?> |
Sequence number generation plugin is used to generate page sequence numbers. It searches matching xep:text elements on matching pages and puts current sequence number as a text.
This plugin working algorithm based on using fo:inline elements with monospace Courier font (Courier font comes with default XEP package). XEP Formatter renders <fo:inline font-family="Courier" font-size="0pt">marker</fo:inline> element as a solid <:xep:text value="marker".../> element. 0 size is used to avoid rendering marker text, because it is removed by the sequence plugin. For sequence number generation page layout should be designed to have enough free areas for generated sequence numbers.
Pages are matched using type parameter and the current page number.
The plugin matches xep:text element if all of the following conditions are true:
-
the element is on a matched page or suppress-unused option is false and the page comes after any matched page;
-
the value attribute equals to the location parameter;
-
last xep:font element describes Courier 0-size font.
In the resulting XEPOUT document xep:font family="Courier" ... size="0" element is removed or replaced by default Helvetica, 12pt font, if xep:font family="Courier" was the first xep:font element on the current page.
The parameters which control the sequence numbering are the following:
-
start - initial sequence number. Non-negative integer. Default value is 1;
-
digits - 0 padding and number of digits or no 0 padding. For example, 000 means 3 digits with 0 padding, # means no 0 padding. Default value is # - no 0 padding;
-
type - odd, even, all, [INTEGER]- increment sequence number for all, odd, even pages or for pages with a number which matches the following condition: pagenumber%[INTEGER] == 0. Default value is all;
-
location - the xep:text value to replace. For example: <xep:text value="myseqpinpoint"> will be replaced if the location parameter is myseqpinpoint. Default value is ppsequence;
-
suppress-unused - true, false - controls matching xep:text treatment matching on unmatched pages. If true, all the matched xep:font, xep:text elements are removed from the unmatched pages. If the matched xep:font was the first font description on the page, it is replaced by default Helvetica, 12pt font. If this parameter is false, all the matched xep:font, xep:text elements on unmatched pages are treated as for matched pages. Default value is false.
To use sequence post-processing in VDPMill, the job ticket should contain <post-processing name="sequence"> element with or without (in this case the default values will be used) nested <option> elements. For example, sequence post-processing with start number 3, 6 digits with 0 padding on odd pages can be described in a ticket file as the following:
<post-processing name="sequence"> <option name="start" value="3"/> <option name="digits" value="000000"/> <option name="type" value="odd"/> <option name="location" value="seq"/> <option name="suppress-unused" value="false"/> </post-processing> |
In this case the <xep:text value="seq" .../> elements on the 1st and 2nd pages become 3, the <xep:text value="seq" .../> elements on the 3rd and 4th pages become 4 and so on. Any other <xep:text> elements on all pages remain untouched.
Also sequence number generation can be controlled using XML PIs in XEPOUT file. The following fragment of XEPOUT file sets up sequence number generation as in the example above, except xep:font, xep:text element treatment on unmatched pages:
<xml version="1.0">
<?xep-sequence-start 3?>
<?xep-sequence-digits 000000?>
<?xep-sequence-type odd?>
<?xep-sequence-location seq?>
<?xep-sequence-suppress-unused seq?>
<xep:document ... >
  <xep:page ...>
    ...
  </xep:page>
</xep:document>
|
Here the matched xep:text elements are removed from even pages. The matched xep:font is removed or replaced by default Helvetica, 12pt font if it is the first xep:font on the page.
|
Important: |
XML PIs take precedence of plugin options in ticket file. |
|
Important: |
All the matched xep:text, xep:font are removed from the pages which come before the first matched page. |
-
- Custom Post-processing, Processing Basics
- Formatting, Processing Basics
- Generation, Processing Basics
- Joining, Processing Basics
- Post-processing, Custom Post-processing
- Post-split XSLT, Processing Basics
- Splitting, Processing Basics
- XSLT, Formatting and XSLT
A
- Acronyms, Acronyms
- Adding an Existing XML or XSL-FO File, Adding Files
- Adding Files, Adding Files
C
- Configuration, VDPMill Configuration Files
D
- Description, What is VDPMill Ticket Application?
- Document Contents, What is in this Document?
- Document Processing, Processing Basics
E
- Export log, Export Log
F
- Formatting, Formatting and XSLT
G
- Generation, Separated Output File Generation
- GUI Interactive Tool, What Is VDPMill Interactive GUI Application?
J
- Job Manager, VDPMill Job Manager
-
- Description, Job Manager Brief Description
- Job Actions, Job Manager Actions
- Job States, Job States
- Job Ticket, Job Ticket Format Description
- Joining, Joining XEPOUT Files
P
- Package Content, VDPMill Package Content and Appearance in the File System
- Post-formatting, Processing Basics
- Post-processing, Document Post-processing
- Pre-formatting, Processing Basics
- Pre-split XSLT, Processing Basics
- Prerequisites, Prerequisites
- Processing files, Processing Files
- Processing files with VDPMill Interactive, Processing Files Using VDPMill Interactive
- Processing XML Files, Processing Files
- Project save/load, Project Save/Load
S
- Sequence Numbering, Sequence Numbering
- Splitter 2g, Splitter 2g - Double Pass Splitter
- Splitter Configuration, splitter.conf Description
- Splitting, Splitting
T
- Technical Support, Technical Support
- Transpromo, Transpromo
U
- Unattended Install, Unattended Installation
- Uninstall, Uninstalling VDPMill
V
- VDPMill Command Line Interface, Using VDPMill from the Command Line
- VDPMill Configuration, vdpmill.conf Description
- VDPMill Control Panel, VDPMill Control Panel
-
- Configuration, controlpanel.conf Description
- Description, What is VDPMill Control Panel?
- EnMasse, Configuring and Running EnMasse
- Open, Launching VDPMill Control Panel
- VDPMill Core Parameters, Configuring VDPMill Core Parameters
- XML-RPC Server, Configuring and Running XML-RPC Server
- VDPMill Interactive
-
- Access, Launching VDPMill Interactive Application
- Add an XML or XSL-FO file, Adding Files
- Adding Files, Adding Files
- Configuration, Configuring VDPMill in VDPMill Interactive
- Export log, Export Log
- Open, Launching VDPMill Interactive Application
- Processing files, Processing Files
- Processing files with VDPMill, Processing Files Using VDPMill Interactive
- Processing XML Files, Processing Files
- Project save/load, Project Save/Load
- VDPMill Interactive GUI Application, What Is VDPMill Interactive GUI Application?
- VDPMill Job Monitor, VDPMill Job Monitor
-
- Description, What is VDPMill Job Monitor?
- Job Monitor Advanced Options Tab, Job Monitor Advanced Options
- Job Monitor Jobs Tab, Using VDPMill Job Monitor
- Open, Launching VDPMill Job Monitor
- VDPMill Ticket Application, VDPMill Ticket Application
X
- XML Generators, How To Use XML Generators
-
- Configure, How To Configure XML Generators
- Usage, Using XML Generators
- XML-RPC, VDPMill XML-RPC Components
-
- Client , XML-RPC Client
- Server , XML-RPC Server