


© Copyright 2005-2025 RenderX, Inc. All rights reserved.
This documentation contains proprietary information belonging to RenderX, and is provided under a license agreement containing restrictions on use and disclosure. It is also protected by international copyright law.
Because of continued product development, the information contained in this document may change without notice. The information and intellectual property contained herein are confidential and remain the exclusive intellectual property of RenderX. If you find any problems in the documentation, please report them to us in writing. RenderX does not warrant that this document is error-free.
No part of this publication may be reproduced, stored in a retrieval system, or transmitted in any form or by any means - electronic, mechanical, photocopying, recording or otherwise - without the prior written permission of RenderX.
RenderX
Telephone: 1 (650) 328-8000
Fax: 1 (650) 328-8008
Website: http://renderx.com
You can also contact us by using the online form.
- 1. Preface
- 2. Overview
- 3. XEP Assistant
- 4. Using the Command Line
- 5. Configuring XEP
-
- 5.1. Configuring XEP using XEP Assistant
- 5.2. Configuring XEP via the XEP Configuration File
-
- 5.2.1. Configuration Structure
- 5.2.2. Core Options
- 5.2.3. Configuring Output Formats
-
- Unicode Strings in Annotations (PDF, PostScript)
- Initial Zoom Factor (PDF, PostScript)
- PDF Initial View (PDF, PostScript)
- Logical Page Numbering (PDF)
- Page Layout (PDF)
- PDF Viewer Preferences (PDF)
- Treatment of Unused Destinations (PDF, PostScript)
- ICC Profile (PDF)
- PDF/X Support (PDF)
- PDF/A Support (PDF)
- Prepress Support (PDF, PostScript)
- PDF Version (PDF)
- Compression of PDF Streams (PDF)
- Linearization (PDF)
- Document Security (PDF)
- PostScript Language Level (PostScript)
- EPS Graphics Treatment (PostScript)
- Page Device Control (PostScript)
- Invoke Medium Map (AFP)
- Page Labeling (PostScript)
- Custom Comments (PostScript)
- Image Inline Threshold (PostScript)
- Images Treatment in XML Output (XEP, SVG, XHTML)
- Break pages (SVG/XHTML)
- Generate first N pages (SVG/XHTML)
- Generate XForms (XHTML)
- 5.2.4. External Document Injection (PDF)
- 5.2.5. Configuring Fonts
- 5.2.6. Configuring Languages
- 5.3. Resolution of External Entities and URIs
- 6. XEP AFP Generator
-
- 6.1. Generating AFP Documents
- 6.2. Fonts
- 6.3. Images
- 6.4. Highlight Color Support
- 6.5. Graphics Support
- 6.6. Barcodes Support
- 6.7. FORMDEF Resource
- 6.8. Configuring the XEP AFP Generator
- 6.9. Bullets support
- 6.10. International Character Set Support
- 6.11. Limitations of the XEP AFP Generator
- 6.12. Frequently Asked Questions
- 7. XEP SVG Generator
- 8. XEP XPS Generator
- 9. XEP XHTML Generator
- 10. XEP PPML Generator
- A. XSL-FO Conformance
- B. RenderX Extensions
-
- B.1. Document Information
- B.2. Document Outline (Bookmarks)
- B.3. Indexes
- B.4. Flow Sections
- B.5. Last Page Number Reference
- B.6. Change Bars
- B.7. Background Image Scaling and Content Type
- B.8. Initial Destination
- B.9. Omitted Initial Header in Tables
- B.10. Base URI Definition:
xml:base - B.11. Rounded Borders
- B.12. Border and Padding on Regions
- B.13. Floats Alignment
- B.14. Multicolumn Footnotes
- B.15. Unique Footnotes
- B.16. Watermark
- B.17. Transpromo
- B.18. PDF Forms module
- B.19. JavaScript for PDF
- B.20. Multimedia features
- B.21. Rich Media
- B.22. PDF Note Annotations
- B.23. Overprint
- B.24. Barcodes
- C. Linguistic Algorithms
- D. Supported Fonts
- E. Supported Graphic Formats
- F. XEP Intermediate Output Format Specification
- G. Accessibility Support in XEP
- H. List of Output Generators' Options
- I. Configuration File DTD
- J. DocBook Support
The RenderX User Guide provides background information about what XEP does and explains how to use the product. The manual is divided into the following sections:
Operating systems
XEP runs on most systems where Java Virtual Machine 1.8 or newer is available. This includes:
-
Unixes;
-
Microsoft Windows;
-
Linux;
-
Mac OS X;
-
Other platforms and Operation Systems.
Java Runtime
XEP requires a Java Runtime (JRE) version 1.8 or later.
The latest version to support JRE 1.4 was XEP 4.28.
XEP demonstrates best performance running under the newest JRE available to the date. JRE is not shipped within XEP distributions.
AFP Backend requires charsets.jar module to be installed with JRE. By default, JRE is installed without this module. In order to add the module during the JRE installation, run JRE installer and check the "additional languages support" checkbox.
Note:
Actual checkbox name may vary for different versions and localizations of JRE.
Third Party Software
In order to run, XEP requires an XSLT processor.
Technically, any XSLT processor is suitable, provided that it supports
JAXP (https://docs.oracle.com/javase/8/docs/technotes/guides/xml/jaxp/index.html),
e.g. it implements
javax.xml.parsers.SAXParserFactory and
javax.xml.transform.TransformerFactory.
XEP is optimized for and most thoroughly tested with the SAXON XSLT Processor by Michael Kay (http://saxon.sourceforge.net).
XEP distribution includes Saxon version 6.5.5.
Apache Crimson, XSLT processor
(https://xml.apache.org/crimson/),
crimson.jar, is used internally for performance considerations.
Optional. Apache XML Entity and Catalog Resolver,
(https://xerces.apache.org/xml-commons/components/resolver/),
resolver.jar, can be used for XML Entity and XML Catalog.
See Section 5.3 and
Section J.2 for further details.
For barcode generation XEP uses ZXing ("Zebra Crossing")
barcode scanning library.
The library is distributed with XEP.
It is available from
Github under the terms of Apache License.
To enable barcode generation functionality,
the XEP ClassPath must include a reference to the library (e.g. ZXing-core-3.3.2.jar)
Supplementary Software
In order to view PDF output, a viewer is required. Adobe provides a free Adobe Acrobat Reader which can be downloaded and installed from the Adobe website.
To view PostScript files, one option is to use GhostView, which may be used for viewing PDF as well. Versions are available for most operating systems.
XEP requires a license to run. There are two types of licenses: Full and Trial.
License is stored in a file, typically license.xml residing
in XEP installation directory. The corresponding variable in XEP configuration
file
points to the location of the license file. See Section 5.1.1 for more details.
XEP license has modular structure. Some features are controlled by a special
key and therefore require such key in license.xml license file
in order to work.
Note:
Since the Trial license automatically generated on RenderX site contains no special keys, the corresponding features will be disabled by default. If you are evaluating XEP and need the Trial version to process documents that require these features, please contact RenderX Sales department.
Features that require a special key in license file
The following table lists acronyms used in this manual:
Table 1.1. Acronyms
| Acronym | Full Term |
|---|---|
| CJK | Chinese Japanese Korean (Unicode UTF-8 encoding standard for Asian character set) |
| CMYK | Cyan-Magenta-Yellow-Key/blacK (4-color ink model used for printing) |
| DTD | Document Type Definition |
| IPA | Internet Protocol Address |
| PODi | The Digital Printing Initiative |
| PPML | Personalized Print Markup Language |
| SMIL | Synchronized Multimedia Integration Language |
| SVG | Scalable Vector Graphics |
| SWF | Small Web Format. Flash Format File (Adobe Systems Incorporated) |
| XPS | XML Paper Specification |
| XHTML | Extensible HyperText Markup Language |
| URL | Uniform Resource Locater (world wide web address) |
| W3C | World Wide Web Consortium |
| XML | eXtensible Markup Language |
| XSL | eXtensible Stylesheet Language |
| XSL-FO | eXtensible Stylesheet Language Formatting Objects |
| JRE | Java Runtime Environment |
| JDK | Java Development Kit |
You can contact RenderX technical support by:
-
Using the RenderX support portal at http://renderx.com/support/index.html
-
Sending an email to support@renderx.com
-
Calling 1 (650) 328-8000
This section contains introductory information about XEP.
XEP is a library of Java classes that converts XML data to printable formats, such as PDF, PostScript, AFP, PPML. It can also produce SVG, XPS and XHTML files. XEP accepts either an XSL-FO file, or an XML file paired with an XSL stylesheet, as input. The XSL stylesheet can be specified via -xsl command line parameter or via xml-stylesheet processing instruction. In the case of XML with XSL input, XEP uses an internal XSLT transformer to preprocess the XML file according to the XSL stylesheet, thereby converting it to an XSL-FO file. The XEP engine then processes the XSL-FO file.
The logical flow of document processing can be divided into three phases, as illustrated in the following figure:

-
Parsing - XEP reads the XSL-FO file and creates an internal representation of the file in memory.
-
Formatting - The XSL-FO is fed into the formatter which creates and fills pages according to the specification defined in the XSL-FO document. Results of the formatting stage can be output as XML to be further processed later.
-
Generating - The XSL-FO file is converted to the requested output format - PDF, PostScript, AFP, SVG, XPS, XHTML or PPML.
XEP can be run in three different environments:
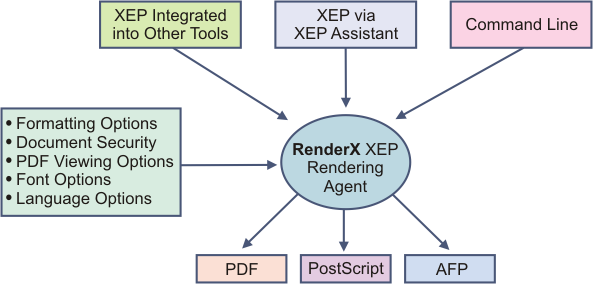
XEP can be configured to allow users to apply settings, such as fonts, languages and formatting options, according to their preferences. For a detailed reference please refer to Chapter 5.
This section provides an introduction to the basic terms that are used throughout this documentation.
- PDF (Portable Document Format)
-
PDF is a universal file format that preserves the fonts, images, graphics, and layout of any source document, regardless of the application and platform that were used to create it. See the Adobe Web site http://www.adobe.com for more information.
- PostScript®
-
Adobe® PostScript® is the worldwide printing and imaging standard. Used by print service providers, publishers, corporations and government agencies around the globe, Adobe PostScript 3 gives you the power to print visually-rich documents. See the Adobe Web site http://www.adobe.com for more information.
- AFP (Advanced Function Printing)
-
AFP is an architecture standard for High Volume Transaction Output, supported by such vendors of printing equipment as IBM, Kodak and Xerox. AFP has built-in support for text and raster graphic output, vector graphic, vector and raster fonts, as well as many other features. The entire document structure of AFP document is organized by means of a higher level protocol called MO:DCA which links all printable objects together and builds the whole document.
- PPML (Personalized Print Markup Language)
-
The Personalized Print Markup Language (PPML) standard was introduced in May 2000 by PODi (see the PODi: the Digital Printing Initiative, website: http://www.podi.org). PPML is for high-volume and full-color variable data printing. Key concepts include the ability to leverage existing standards and to ensure interoperability between and among hardware and software vendors. PPML promotes the development of highly efficient print streams through object-level addressability and reusability for page components in a print workflow. PPML is an open industry standard that uses an XML grammar to define how to compose digital assets into objects, pages, documents, and sets.
- SVG
-
SVG is a language for describing two-dimensional graphics in XML. A World Wide Web Consortium specification. See the W3C website http://www.w3.org/TR/SVG/ for more information.
- XPS
-
The XML Paper Specification describes electronic paper in a way that can be read by hardware, read by software, and read by people. See the Microsoft website http://www.microsoft.com/whdc/xps/default.mspx for more information.
- XHTML
-
Extensible Hypertext Markup Language. XHTML is a markup language that has the same depth of expression as HTML, but also conforms to XML syntax. A World Wide Web Consortium specification. See the W3C website http://www.w3.org/TR/xhtml1/ for more information.
- XForms
-
XForms is an XML format for the specification of a data processing model for XML data and user interface(s) for the XML data, such as web forms. A World Wide Web Consortium specification. See the W3C website http://www.w3.org/TR/xforms11/ for more information.
- XSL-FO
-
XSL, Formatting objects. A standard way of specifying how content should be presented. A World Wide Web Consortium specification. See the W3C website http://www.w3.org/TR/xsl/ for more information.
XEP contains a user-friendly GUI tool, called XEP Assistant. Use of XEP Assistant simplifies rendering from XML or XSL-FO into the desired output format.
To open XEP Assistant, browse to the XEP Installation
directory and launch x4u.bat or x4u bash script.
To render a file, first of all, you must open the XML or XSL-FO file you wish to publish.

Once an XML file is open, it must first be "transformed" before it can be formatted to PDF, PostScript, AFP, SVG, XPS, XHTML or PPML output. "Transforming" refers to the assignment of various settings required to apply an XSL stylesheet to your XML file. The result of the transforming is that the XML file is transformed into an XSL-FO. The XSL-FO is than formatted to your final output format (PDF, PS, AFP, SVG, XPS, XHTML or PPML).
-
From the main menu, click Formatting.
The Formatting menu is displayed.
-
From the Formatting menu, click Start.
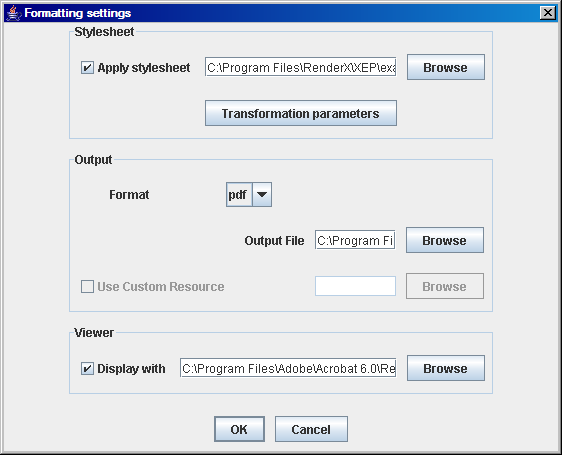
The Formatting settings dialog box appears.
-
Set the desired settings as described in the following table.
Table 3.1. Formatting Settings
Parameter Description Stylesheet Apply stylesheet Check the Apply stylesheet checkbox to apply a stylesheet (XSL) to the XML file. Click Browse to browse to the location of the XSL file you wish to apply as a stylesheet to your XML file. Transformation parameters This button is only enabled when the Apply Stylesheet checkbox is selected. Refer to Figure 3.3, and Table 3.2 for a complete description. Output Format Select the format to which you want to render the XML file. Available options are PDF, PS, AFP, SVG, XPS, HTML and PPML. Output File Select the location and name of the file to which the output will be saved. The default output file name is the identical path and file name as the current XML file with the file extension of the chosen output type.
Note:
If a file with the same name already exists in the chosen location, the new file will overwrite the preexisting file with no warning.
Set Resource The Use Custom Resource section is only enabled when AFP is selected as the output format. Click Browse to select the location of the resource file. A resource can be attached to an AFP document to control certain reusable objects like images or FORMDEFs. Viewer Display With Check the Display With checkbox to automatically display the output once rendering is complete. Browse to the location of the program with which you wish to view the rendered file. -
Click OK to format the file, and Cancel to cancel the formatting.
-
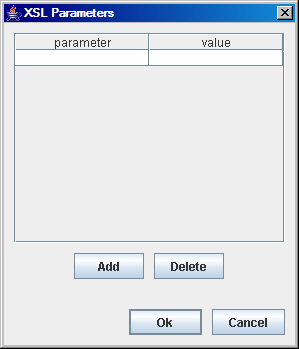
From the Formatting settings dialog box, click the Transformation parameters button (only enabled when the Apply stylesheet checkbox is selected).
The XSL Parameters dialog box appears.
-
Fill in the fields as described in the following table:
Table 3.2. XSL Parameters
Field Description parameter The name of the variable used in the XSL file to represent a parameter value. value The value corresponding to the variable. -
Click Add to add a new parameter, or highlight a parameter and click Delete to delete the selected parameter.
-
Click OK to apply changes, or click Cancel to close the dialog box without applying your changes.
This topic describes how to run XEP from the command line.
XEP can be run from the command line, as follows:
-
On all platforms, by invoking Java directly from the command line.
-
On Windows, XEP can be run from a Command Prompt window via the
xep.batbatch file. -
On Linux, MAC, and UNIX, XEP can be run from a command shell, via the
xepbash script.
To learn more about the xep.bat batch file or
the xep bash script, open the file in a text editor.
These files use standard scripting features available in the operating
system.
The syntax of the Java command is:
java com.renderx.xep.XSLDriver {options} {switches} {arguments}
The above syntax has been simplified by assuming that the directory
containing the Java executable is specified in your PATH environment
variable, and that the full path of the xep.jar file
is in your CLASSPATH environment variable. If you specify
an XSL file to convert an XML source document into XSL-FO, then it is
assumed that saxon.jar or xt.jar
are also specified in your CLASSPATH environment variable.
The syntax of the Windows batch and Linux/MAC shell command is:
xep {options} {switches} {arguments}
The above syntax assumes that the full path to the Windows batch file
xep.bat or the Linux/MAC shell script
xep is specified in the PATH
environment variable, or that the current directory is the directory
containing the Windows batch file or Linux/MAC shell script.
The options, switches, and arguments are the same whether XEP is run via Java, via a Windows batch file, or via a Linux/MAC shell script.
The XEP options are used to configure and customize the behavior of the XEP rendering engine.
XEP requires a configuration file in order to run. By default, the
formatter looks for a file named xep.xml in the
current directory. If a different configuration file is used, the path to
the configuration file must be specified on the command line.
XEP is a flexible tool in which the configuration can be customized according to your preferences. There are several methods to customize XEP. These methods are summarized in the following table:
Table 4.1. Customizing XEP Configuration
| Customization | Description | Syntax |
|---|---|---|
|
Editing the configuration file. |
The xep.xml configuration file can be
customized, thereby customizing all transformations. There are two
ways to customize the file:
|
For editing xep.xml in a text editor,
see Section 5.2.
For the XEP Assistant, see Section 5.1. |
| Setting a custom configuration file. | You can set a custom configuration file in the command line
for a single file transformation. The location of the custom
configuration file can be specified as either a file name in the
local file system or as a URL.
All subsequent file
transformations will continue to use the standard
|
-DCONFIG=<CUSTOM_FILE_PATH> |
| Customizing the XEP configuration through the command line. | In the command line, the configuration can be customized
for a single file transformation. The
Note:It is possible to specify multiple options in the same command line. Note:If there is a contradiction between the configuration file and the customization through the command line, the command line overrides the settings specified in the configuration file. |
-D<OPTION_NAME>=<OPTION_VALUE> |
Note:
If any string contains spaces, the entire string must be enclosed in quotation marks.
The XEP switches configure the behavior of the command line utility.
Table 4.2. XEP Switches
The XEP arguments instruct XEP how to process a file. For example, arguments may specify the input file, the target format to render to, and the output filename. When multiple arguments are specified, they must be specified in the following order:
( [-xml] <infile> [-xsl <stylesheet>] {-param <name=value>}
         | -fo <infile>
         | -xep <infile> )
[-format]
[[-<output format>] <outfile>]
The XEP arguments are described in the following table.
Table 4.3. XEP Arguments
This section presents a number of examples of how to run XEP from the command line.
To list all available options and switches:
-
At the system prompt, enter:
xep -help.A list of all available commands is displayed.
c:\myfiles>xep -help
XEP 4.31.1348 build 20230101
java com.renderx.xep.XSLDriver
       {<option>}
       {-quiet | -version | -valid | -hosted | -help}
       ( [-xml] <infile> [-xsl <stylesheet>] {-param <name=value>}
         | -fo <infile>
         | -xep <infile> )
       [-f]
       [[-<output format>] <outfile>]
Available output formats: at (XEP), xep (XEP), pdf (PDF), ps (Postscript),
afp (AFP), svg (SVG), xps (XPS),  html (XHTML), ppml (PPML).
To view the version of XEP you are currently running:
-
At the system prompt, enter:
xep -versionThe version you are currently running as well as the build are displayed.
c:\myfiles>xep -version XEP 4.31.1348 build 20230101 (document [system-id file:stdin] -
Press
<Ctrl> + <C>to exit XEP interactive mode.
To render an XML document to PDF:
-
To render the XML document
CommandLine.xmlto PDF, using the stylesheetcustom-fo.xslto transform the XML to an XSL-FO document and relying on the default settings for the output format and output filename, at the system prompt, enter:xep CommandLIne.xml -xsl custom-fo.xsl
This section describes how to configure XEP according to your preferences by using XEP Assistant.
To configure XEP:
-
From the main menu, select Options.
The Options menu is displayed.
-
From the Options menu, select Edit.
The XEP Configuration dialogue box is displayed.
-
Click the Main tab, the Backends tab, the Languages tab or the Fonts tab.
For See Main tab Section 5.1.1 Backends tab Section 5.1.2 Languages tab Section 5.1.3 Fonts tab Section 5.1.4 -
Configure the required parameters and click Save to save and close, or Exit to close without saving your changes.
The default configuration settings can be set in the Main tab.
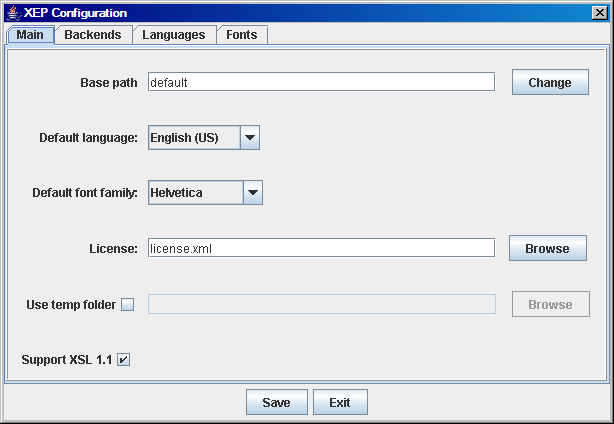
Table 5.1. XEP Configuration Main Tab Parameters
Using Backends, you can control certain properties in the output documents. There are different available properties for each output type. Select the output type and then configure the properties for the specific output type selected. Refer to the appropriate figure and table for more information on each output type.
To select the output type:
-
On the Backends tab, click Select backend.
-
Select PDF, PostScript, AFP, SVG, HTML or PPML.
The Backend Parameters screen populates with parameters based on the selected backend.
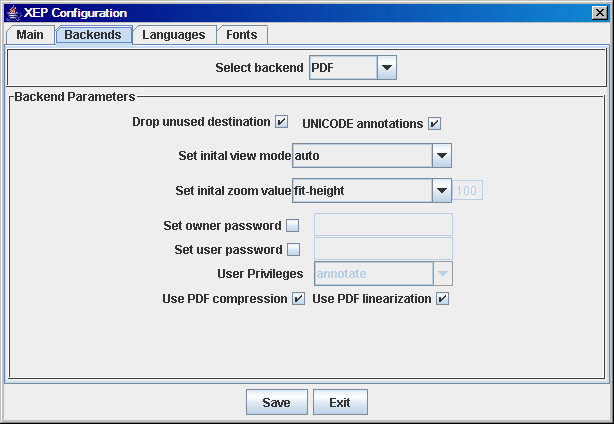
Table 5.2. XEP Configuration Backends Tab PDF Parameters
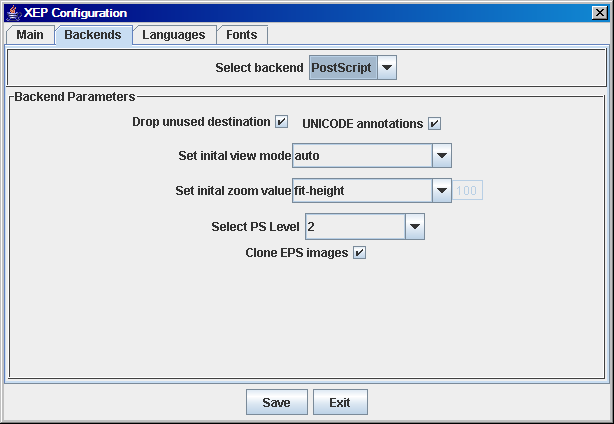
Table 5.3. XEP Configuration Backend Tab for Configuring PostScript Parameters
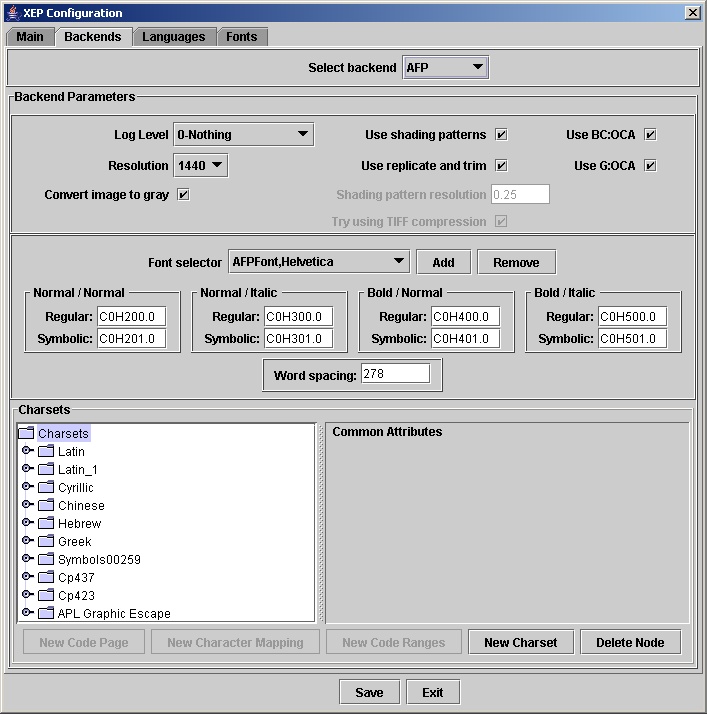
Table 5.4. XEP Configuration Backends Tab AFP Parameters
Please refer to Section 6.8 of this document for details.
To view and edit an AFP font and its sub values:
-
Click the AFPFonts drop down box (see Figure 5.4).
-
Select the font you wish to view/edit.
Note:
AFP font names are comprised of the word
<AFPFont>followed by a comma and the XEP font name, such as<AFPFont, Verdana>.All sub values are populated based on the font selected.
-
View or edit all AFP font sub values.
-
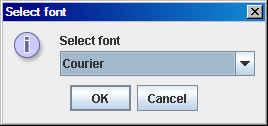
Click AddAFPFont (see Figure 5.4).
A dialog box opens containing a list of all supported fonts as displayed in the following figure:
-
Select the font you wish to add to the AFP fonts.
-
Click OK to add the font or Cancel to close the box without adding a new font.
The selected font is added.
-
From the AFPFonts drop down box, select the font you wish to remove (see Figure 5.4).
-
Click RemoveAFPFont.
The selected font is removed.
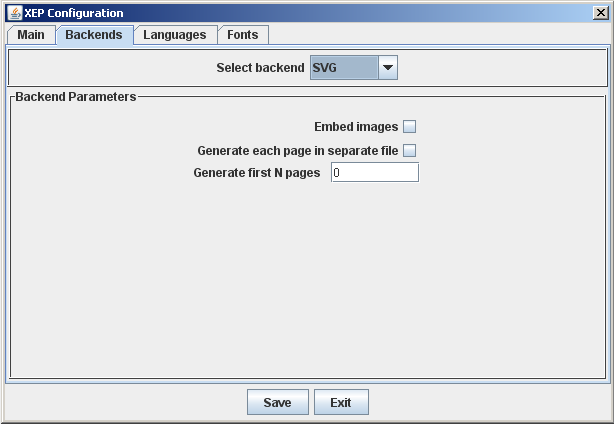
Table 5.5. XEP Configuration Backends Tab SVG Parameters
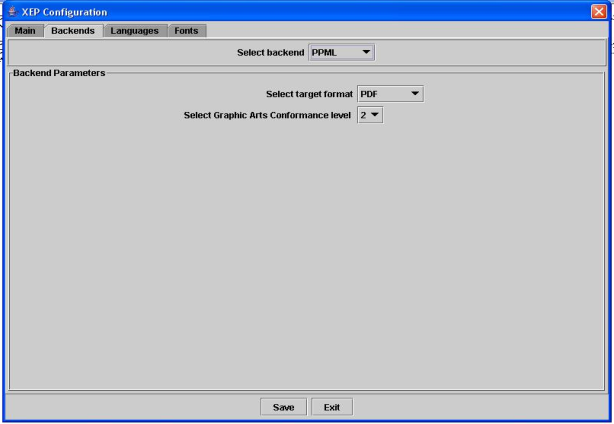
Table 5.6. XEP Configuration Backends Tab PPML Parameters
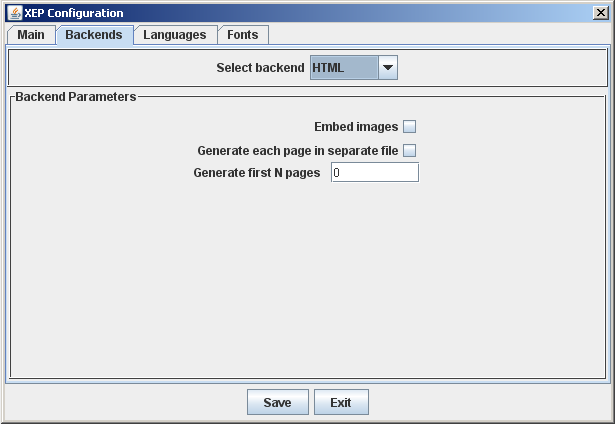
Table 5.7. XEP Configuration Backends Tab XHTML Parameters
Languages can be configured in the Languages tab.
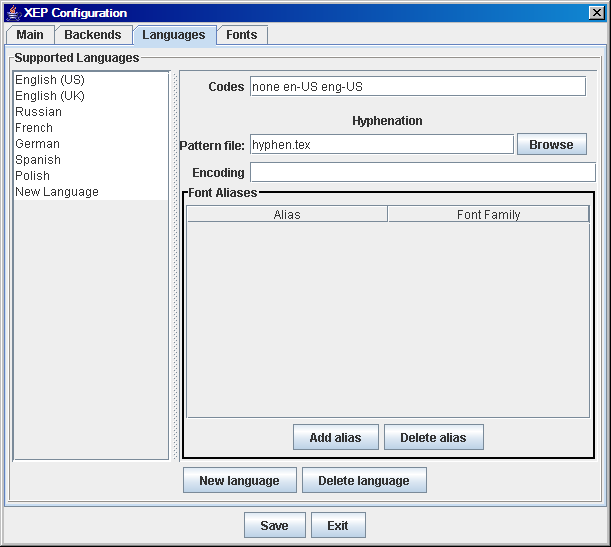
Table 5.8. XEP Configuration Languages Tab
Fonts are categorized into families, which is the basic configuration unit in XEP, and then further into groups. A font family is a set of fonts that share a common design but differ in stylistic attributes, such as upright or italic, light or bold. A group consists of several font families wrapped into one container element. Groups can be nested, forming complex font hierarchies.
In the left column, there is the font hierarchy that contains groups, families, and fonts. Click on a node to display and edit its common attributes. Double-click a node to open its children.
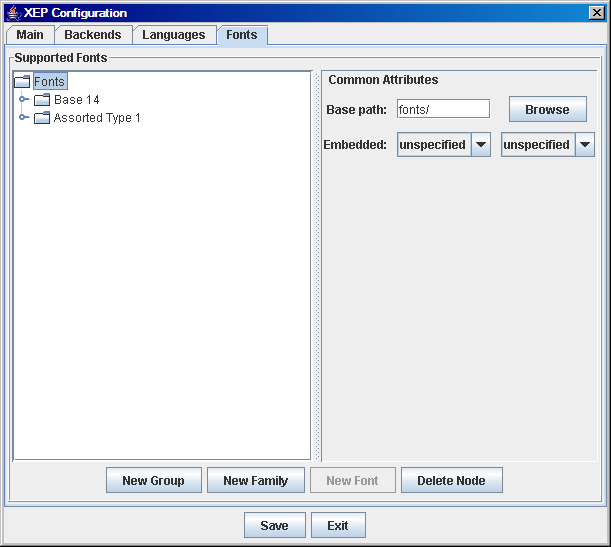
Table 5.9. XEP Configuration - Fonts Tab Parameters
This topic describes in detail how to configure XEP by creating or modifying an XEP configuration file.
XEP is controlled by a single configuration file which contains core formatting options, fonts available to the formatter, and language-specific data.
The XEP configuration file must always be accessible to the
formatter. Methods for locating the configuration file are
platform-dependent. Please refer to specific platform documentation for
details. By default, the formatter looks for a file named
xep.xml in the directory where it is currently
running.
The configuration file is an XML document in a special namespace:
"http://www.renderx.com/XEP/config". The root of the
configuration file is a <config>
element which includes three major subsections:
-
<options>- Options for XEP rendering core and backends are defined inside the<options>element. -
<fonts>- Fonts configuration is contained inside the<fonts>element. -
<languages>- Hyphenation and language-dependent parameters are configured in the<languages>element.
Some parameters can accept URLs as values. In such cases, the
location of the configuration file is used as a base to resolve relative
URLs. The base URL can be overridden for any subtree of the
configuration file, by utilizing the xml:base attribute.
Note:
All relative URLs in parameter values stored in a referenced
file are resolved with respect to that file, rather than the top-level
configuration file. Attribute xml:base in the referrer file has
no effect on URLs that are contained in another file.
The use of a monolithic configuration file is usually the most
convenient way to store the configuration, as it simplifies switching
between different XEP configurations, and facilitates environmental
tuneup. However, occasionally it may be wiser to move parts of the
configuration into separate files, such as when font configuration is
reused across multiple setups. The configuration file supports
modularization. Any container element can be moved into a separate XML
file whose location is specified by an href attribute.
XEP is controlled by several
options which can be set in the configuration file.
An option is defined by an <option>
element. It has a name and an associated value:
name=value<options> element. The following core options
are defined for XEP 4.18:
Table 5.10. Core Options
| Option | Possible Values | Description |
|---|---|---|
LICENSE |
free text Default: |
The location of the license file. At startup, XEP looks for a license file, and only runs if the signature on the license matches the public key associated with the specific edition of the formatter. Additionally, this file is used as an access key to XEP online update service. The parameter
can be specified either as a file name in the local file system,
or as a URL. In addition to common protocols,
|
VALIDATE |
true, false Default: true |
Controls the input validation.
CautionIn non-validating mode, XEP uses less memory, and runs faster. However, less errors are intercepted, and the results of formatting are less predictable for malformed print. This setting is discouraged unless your stylesheets are throughly debugged. |
DISCARD_IF_NOT_VALID |
true, false Default: true |
Controls the termination of processing upon unsuccessful validation. |
STRICTNESS |
|
Determines the validator's level of strictness. |
SUPPORT_XSL11 |
true, false Default: true |
CautionDEPRECATED. In XEP 4.19
the stylesheet that used to convert some XSL 1.1 features
into respective RenderX extensions has been refactored into Java code
in XEP core, for higher performance and lower memory requirements.
The option
|
ENABLE_FOLIO
|
true, false Default: false |
Turns on/off support for
<fo:folio-prefix> and
<fo:folio-suffix> on
elements
<fo:page-number-citation> and
<fo:page-number-citation-last>.
Note:This is implemented in Java code as a second pass on input to resolve forward references. This approach may take additional time and memory. Note:Support for
|
TMPDIR |
Default: none |
The path to the directory for temporary files. If
set, this parameter must point to a writable directory,
specified either as a path in the local file system or as a
file URL. To disable writing temporary files to disk, specify
Note:To avoid file name clashes, a separate temporary directory should be specified for each process running XEP. |
BROKENIMAGE |
free text Default:
|
The icon inserted as a replacement for broken or missing images. The parameter
can be specified either as a file name in the local file system,
or as a URL. In addition to the common protocols,
|
PAGE_WIDTH |
Default: 576pt (8 in) | Sets the default page width. |
PAGE_HEIGHT |
Default: 792pt (11 in) | Sets the default page height. |
KERN |
true, false Default: true |
Controls whether the formatter uses or ignores glyph kerning data to determine character positions. |
ENABLE_ACCESSIBILITY |
true, false Default: false |
Controls whether the formatter uses a special mode to create accessible PDF documents. |
ROLE_MAP |
free text | Path to PDF Structure Tags configuration file.
The parameter can be specified either as a file name in the local file system, or
as an URL.
In addition to the common protocols,
This configuration file can be used to re-map roles of PDF Structure Tags
or to eliminate some input
Note:Accessible PDF documents must be tagged. Set ENABLE_ACCESSIBILITY core option to true. |
OMIT_FOOTER_AT_BREAK |
true, false Default: false |
Defines whether tables footers are omitted at breaks by default. |
SPOT_COLOR_TRANSLATION_TABLE |
free text |
Path to Spotcolor-to-CMYK translation table file for use
in rgb-icc() function with
#SpotColor pseudo profile.
The parameter
can be specified either as a file name in the local file system,
or as an URL. In addition to the common protocols,
Default: none, all spot colors come out black. Note:This table was hard-coded in previous versions of XEP. Due to license restrictions, it has been removed from the current version. Users are recommended to download this table from PANTONE® site and specify this option accordingly. |
IMAGE_MEMOIZE_THRESHOLD |
integer Default: 0 |
Controls the way SVG images in <fo:instream-foreign-object> elements and
data: images are cached.
Provided that The default value 0 enables the old-style (prior to XEP 4.15) caching: disk is not used and images are cached in memory. The value 1 means that if such an image has been read back from disk more than once, if will be memoized to provide faster access. This is the correct choice for rendering to the Intermediate Format or for pure generation jobs. The value 2 suites best for running from XSL FO to PDF or PostScript. Higher values are for running more than one output generator concurrently. Note:When rendering from XSL FO, minimal heap requirements may be achieved if both
|
ENABLE_PAGE_NUMBERS |
true, false
Default: false |
Controls how XEP internally processes page numbering.
Note:Turning this value to true is only required if (1) the document contains PDF injection and also (2) the document uses page numbering. However, having this value true breaks backward-compatibility if any XEPOUT post-processing was involved. See Section 5.2.4 for more details. |
XEP can render to several different output formats including PDF, PostScript, AFP, SVG, XPS, XHTML and PPML. Certain properties of output documents can be controlled in two ways:
-
Processing Instructions - The processing instructions are used to specify information that does not affect formatting and is safely ignored by the XSL-FO processors.
Each processing instruction begins with a prefix that identifies the output generator to which the instruction is addressed. For the standard PDF generator, the prefix is
<?xep-pdf-, for PostScript, the prefix is*><?xep-postscript-, for AFP, the prefix is*><?xep-afp-, for SVG, the prefix is*><?xep-svg-, for XHTML, the prefix is*><?xep-html-and for PPML, the prefix is*><?xep-ppml-. Generators ignore processing instructions that do not start with their assigned prefixes. In particular, PDF generator instructions are invisible to the PostScript generator, and vice versa.*>Instructions that pertain to an entire document should be placed at the top of the document, before or right after the
<fo:root>start tag. Instructions that pertain to a single page of the documentation should be specified inside<fo:simple-page-master>object used to generate that page. -
Generator Options - Generator options affect the entire output document. Some features affect only parts of the input document and can only be expressed with processing instructions.
Generator Options can be used to set default settings for output generators. They are specified inside the
<options>element in the configuration file. To distinguish them from the core options, they are wrapped in the<generator-options>element. The following table describes the attribute of the<generator-options>tag:Table 5.11. Generator-Options Attributes
Attribute Possible Values Description FORMATPDF, PS, AFP, SVG, XPS, HTML, PPML Format defines the target output format for the generator. The following is an example of a fragment which turns on the linearization for the PDF generator and sets initial zoom factor to
fit-widthfor both PostScript and PDF backends:<generator-options format="PDF"> <option name="LINEARIZE" value="true"/> <option name="INITIAL_ZOOM" value="fit-width"/> </generator-options> <generator-options format="PostScript"> <option name="INITIAL_ZOOM" value="fit-width"/> </generator-options>
All options can be controlled using processing instructions, and some options can be controlled by use of generator options. The following sections describe available processing instructions and generator options as well where they can be utilized.
<?xep-pdf-unicode-annotationsvalue?> <?xep-postscript-unicode-annotationsvalue?>
These processing instructions enable or disable the use of
Unicode to represent PDF annotations strings, such as bookmark text
and document info. In PostScript, the information is coded in
pdfmark operators and used for further conversion
to PDF.
The following are possible values:
-
true - Enable use of 16-bit Unicode to represent annotation strings. In this mode, XEP uses 8-bit
PDF Encodingfor strings that can be represented inAdobeStandardcharacter set and 16-bit Unicode for strings containing characters not included inAdobeStandard. -
false - Unicode is not used. Annotations are always represented in 8-bit
PDF Encoding; characters not included in theAdobeStandardset are replaced by bullet symbols. This option may be used to enforce compatibility with older versions of PDF software that do not support Unicode, such as Adobe Acrobat 3.0.
Default: true
This feature can also be controlled by UNICODE_ANNOTATIONS option in the configuration file for PDF and PostScript generators.
<?xep-pdf-initial-zoomvalue?> <?xep-postscript-initial-zoomvalue?>
These processing instructions specify the magnification factor
to be activated when the file is first opened in the PDF viewer. In
PostScript, the information is coded in pdfmark
operators and used for further conversion to PDF.
The following are possible values:
-
auto - Page scaling is not specified.
-
fit - The page is scaled to fit completely into the
view port. -
fit-width - The page is scaled so that its width matches the width of the
view port. -
fit-height - The page is scaled so that its height matches the height of the
view port. -
number or percentage - The page is scaled by the number or percentage specified in the enabled box.
Default: auto
This feature can also be controlled by the INITIAL_ZOOM option in the configuration file for PDF and PostScript generators.
<?xep-pdf-view-modevalue?> <?xep-postscript-view-modevalue?>
These processing instructions set the view mode to be activated
in the PDF viewer when the PDF file is rendered and viewed. In
PostScript, the information is coded in pdfmark
operators and used for further conversion to PDF.
The following are possible values:
-
auto - If there are bookmarks in the document, the bookmarks pane is displayed. Otherwise, all auxiliary panes are hidden.
-
show-none - All auxiliary panes are hidden.
-
show-bookmarks - The bookmarks pane is displayed.
-
show-thumbnails - The thumbnails pane is displayed.
-
full-screen - The document is displayed in full screen-mode.
Default: auto
This feature can also be controlled by the VIEW_MODE option in the configuration file for PDF and PostScript generators.
<?xep-pdf-logical-page-numbering value?>
This processing instruction controls a page numbering scheme for the PDF document.
The following are possible values:
-
true - Logical page numbers are written to the PDF file.
-
false - Logical page numbers are ignored.
Default: true
Note:
Adobe Acrobat has a special check box Use logical page numbers. To show logical page numbers of a PDF document, make sure this control is enabled.
This feature can also be controlled by the LOGICAL_PAGE_NUMBERING option in the configuration file for PDF generator.
<?xep-pdf-page-layout value?>
This processing instruction controls initial page layout when a PDF document is open.
The following are possible values:
-
auto - Uses settings of viewer application.
-
single-page - Displays one page at a time.
-
continuous - Displays pages continuously in one column.
-
two-columns-left - Displays pages continuously in two columns, with odd-numbered pages to the left.
-
two-columns-right - Displays pages continuously in two columns, with odd-numbered pages to the right.
-
two-pages-left - Displays pages in two columns, by two pages at a time, with odd-numbered pages to the left. PDF 1.5.
-
two-pages-right - Displays pages in two columns, by two pages at a time, with odd-numbered pages to the right. PDF 1.5.
Default: auto
This feature can also be controlled by the PAGE_LAYOUT option in the configuration file for PDF generator.
<?xep-pdf-viewer-preferences value?>
This processing instruction controls viewer preferences for a PDF document.
The value is a comma or space separated list of keywords. Each one enables the respective viewer option. The following are supported keywords:
-
hide-toolbar - Hides the viewer application's tool bars when the document is active.
-
hide-menubar - Hides the viewer application's menu bar when the document is active.
-
hide-window-ui - Hides user interface elements in the document's window (such as scroll bars and navigation controls), leaving only the document's contents displayed.
-
fit-window - Resizes the document's window to fit the size of the first displayed page.
-
center-window - Positions the document's window in the center of the screen.
-
display-document-title - Controls whether the window's title bar displays the document title taken from the "title" entry of
<rx:meta-info>. If absent, the title bar instead displays the name of the PDF file containing the document.
Default: empty list
This feature can also be controlled by the VIEWER_PREFERENCES option in the configuration file for PDF generator.
<?xep-pdf-drop-unused-destinationsvalue?> <?xep-postscript-drop-unused-destinationsvalue?>
These processing instructions specify whether named destinations
are created for objects not referenced within the document. In
PostScript, the information is coded in pdfmark
operators and used for further conversion to PDF.
The following are possible values:
-
true - Named destinations are created only for objects used as targets in
internal-destinationattributes. -
false - Named destinations are created for all objects that have an
idattribute.
Default: true
This feature can also be controlled by the DROP_UNUSED_DESTINATIONS option in the configuration file for PDF and PostScript generators.
<?xep-pdf-icc-profile URL?>
These processing instructions specify a characterized printing
condition. PDF/X and PDF/A-1 specifications require the presence of the
characterized printing condition ( /OutputIntent
entry in the PDF catalog dictionary). URL
is the URI of the ICC file. It should follow the XSL-FO notation for
uri-specification: url( ).
<?xep-pdf-pdf-x value?>
This processing instruction sets PDF/X compliance level.
The following are possible values:
-
none - No PDF/X restrictions are applied.
-
pdf-x-1a - Sets PDF/X-1a compliance level. The rendered PDF will comply with the PDF-X-1a:2001 spec.
-
pdf-x-3 - Sets PDF/X-3 compliance level. The rendered PDF will comply with the PDF-X-3:2001 spec.
Default: none
<?xep-pdf-pdf-a value?>
This processing instruction sets PDF/A compliance level.
The following are possible values:
-
none - No PDF/A restrictions are applied.
-
pdf-a-1a - Sets PDF/A-1a compliance level. The rendered PDF will comply with level A of the PDF/A-1:2005 spec.
Note:
PDF/A-1a compliant documents must be tagged. Set ENABLE_ACCESSIBILITY core option to true. -
pdf-a-1b - Sets PDF/A-1b compliance level. The rendered PDF will comply with level B of the PDF/A-1:2005 spec.
-
pdf-a-3b - Sets PDF/A-3b compliance level. The rendered PDF will comply with level B of the PDF/A-3:2012 spec.
Default: none
The following processing instructions define features that support the prepress production workflow.
<?xep-pdf-crop-offsetvalue?> <?xep-postscript-crop-offsetvalue?>
These processing instructions specify offsets from the
meaningful content on the page to the edges of the physical media
(/MediaBox entry in the PDF page dictionary). Its
value is a series of 1 to 4 length
specifiers that set offsets from the edges of the page area (as
specified in the XSL-FO input document) to the corresponding edges of
the /MediaBox. Rules for expanding the value are
the same as for the padding property in
XSL-FO.
<?xep-pdf-bleedvalue?> <?xep-postscript-bleedvalue?>
These processing instructions specify the bleeds — an extra
space around the page area into which the contents of the page may
protrude (/BleedBox entry in the PDF page
dictionary). Its value is a series of 1 to
4 length specifiers that set offsets from the edges of the page area
(as specified in the XSL-FO input document) to the corresponding edges
of the /BleedBox. Rules for expanding the value are
the same as for the padding property in
XSL-FO.
If bleed values exceed the respective crop offsets, the latter are increased to make room for the bleeds.
<?xep-pdf-crop-mark-widthvalue?> <?xep-postscript-crop-mark-widthvalue?>
These processing instructions display crop marks on the page.
value defines line width for the marks;
setting it to 0 disables drawing of crop marks.
<?xep-pdf-bleed-mark-widthvalue?> <?xep-postscript-bleed-mark-widthvalue?>
These processing instructions display bleed marks on the page.
value defines line width for the marks;
setting it to 0 disables drawing of bleed marks.
<?xep-pdf-printer-markURL?> <?xep-postscript-printer-markURL?>
These processing instructions specify additional SVG images to
be drawn in the offset area surrounding the page (specified by
crop-offset and bleed
parameters). Printer marks are clipped to the outside of the bleed
rectangle. This facility can be used to create registration targets
and color bars; the respective sample SVG images are enclosed in XEP
distribution. URL is the URL to the
location of the SVG file. It should follow the XSL-FO notation for
uri-specification: url( ).
<?xep-pdf-pdf-version value?>
This processing instruction sets target PDF version.
The following are possible values:
-
1.3
-
1.4
-
1.5
-
any higher version is allowed here, since PDF versions are backward compatible.
Default: 1.4
Note:
When set to 1.3, advanced features of PDF 1.4 are disabled.
This feature can also be controlled by PDF_VERSION option in the configuration file for the PDF generator.
<?xep-pdf-compress value?>
This processing instruction controls compression of content streams in PDF.
The following are possible values:
-
true - PDF streams are compressed using the Flate algorithm.
-
false - PDF streams are not compressed. This option is useful for debugging.
Default: true
This feature can also be controlled by the COMPRESS option in the configuration file for the PDF generator.
<?xep-pdf-linearize value?>
This processing instruction controls linearization (also known as Web optimization) of the PDF output.
The following are possible values:
-
true - PDF is linearized. This options is used to prepare documents for HTML output.
-
false - PDF is not linearized.
Default: false
This feature can also be controlled by the LINEARIZE option in the configuration file for the PDF generator.
The following processing instructions control PDF security settings.
<?xep-pdf-ownerpassword value?>
This processing instruction sets an owner password for the PDF document to value. Owner password gives its holder full control over the PDF document. This unlimited access includes the ability to change the document's passwords and access privilegies.
Note:
Adobe Acrobat by default applies user's access restrictions to owners too. To remove some of these restrictions, go to 'Document Properties -> Security' and choose 'Change Settings' option.
<?xep-pdf-userpassword value?>
This processing instruction sets a user password for the PDF document to value. Holders of user password are subject to access restrictions; only operations included in the privilege list are authorized.
<?xep-pdf-userprivileges value?>
Sets the default privilege list for users accessing the rendered document with user password. XEP supports permission flags from PDF Document Security, revision 3. The value must be a sequence composed of the following tokens:
-
print - Enables printing the document.
-
modify - Enables editing the document.
-
copy - Enables copying text and images from the document to the clipboard.
-
annotate - Enables adding notations to the document and changing the field values.
-
degraded-printing - Enables printing the document in a degraded format.
-
fill-in - Enables filling in interactive forms.
-
assemble - Enables the user to insert/rotate/delete pages.
-
accessibility - Serves for 'copying content for Accessibility' or for 'Extract text and graphics (in support of accessibility to disabled users or for other purposes),' as it stated in PDF specification.
Tokens can be specified in any order, separated by commas and/or spaces.
Note:
If neither user password nor owner password is set, security is disabled and the rendered PDF is not encrypted.
If the user password is set and the owner password is not set, then the latter is set equal to the former. This enables password protection on the PDF file, but gives password holder full control over the document: no distinction is made between user and owner.
If the owner password is set and the user password is not set, the rendered PDF document can be viewed by anyone without entering a password. However, operations on this file will be restricted to privileges specified in the user privilege list; other operations will require authentication with the owner password.
Default: Security disabled (neither of the passwords are set). Default privilege list is annotate.
These features can also be controlled by the USERPASSWORD, OWNERPASSWORD, and USERPRIVILEGES options in the configuration file for the PDF generator.
Note:
Setting passwords through a configuration file poses obvious security risks, and is not recommended. Use processing instructions to enable file protection.
Note:
The document encryption always uses 40-bit RC4 encryption algorithm (V value 2: "Algorithm 1: Encryption of data using the RC4 or AES algorithms").
<?xep-postscript-language-level value?>
This processing instruction sets target PostScript language level.
The following are possible values:
-
2
-
3
Note:
When the language level is set to 2, some advanced features and font flavours are not available.
Default: 3
This feature can also be controlled by the LANGUAGE_LEVEL option in the configuration file for the PostScript generator.
<?xep-postscript-clone-eps value?>
This processing instruction controls whether EPS graphics are included in the PostScript output using forms mechanism, or by pasting their contents at each occurrence.
The following are possible values:
-
true - EPS graphics are pasted into the output stream at each occurrence. This may lead to a substantial growth of the resulting file size.
-
false - EPS graphics are in PostScript form. This minimizes the file size, however, some EPS images cannot be processed this way and it may corrupt the PostScript code.
Default: true
This feature can also be controlled by CLONE_EPS option in the configuration file for the PostScript generator.
<?xep-postscript-page-deviceentrynameentryvalue?>
This processing instruction sets a single entry
entryname in the page device dictionary to
value entryvalue. Entry name must be a
valid PostScript name (with or without leading slash). The value is
specified as an arbitrary PostScript expression. Entry name and value
must be separated by whitespace. There can be more than one such
instruction, each setting its entry.
Warning
XEP does not check the spelling of either the entry name or the value supplied in this instruction. Wrong code passed with this option can invalidate the whole output file.
To set page device options for the whole document, the
respective instructions should appear at the top of the document,
before the <fo:root> element. Such
entries are set in the document setup section and cleaned up in the
document trailer.
To control page device settings for a single page, the
instructions should be specified inside the <fo:simple-page-master> object used to
generate the page. In this case, page setup parameters are modified in
the page setup section and reset in the page trailer.
<?xep-afp-invoke-medium-mapname="map-name" [force="true"]?>
This processing instruction defines the page to be associated with
medium-map by adding IMM instruction before the page's BPG.
See the section called “Other FORMDEF Instructions” for more information on its usage and syntax.
See also the section called “Page Device Control (PostScript)”.
<?xep-postscript-page-label value?>
This processing instruction changes the label argument of %%Page PostScript command. This PI should be inserted to fo:simple-page-master element.
The following are possible values:
-
value - Any text. The text may contain an optional token %d that will be automatically replaced with incrementing integer values, starting with 1.
Note:
Any time the document page contains xep-postscript-custom-comment Processing Instruction with value different to the previous one, the incrementing counter will be automatically reset to 1.
Default: blank
<?xep-postscript-custom-comment value?>
This processing instruction allows inserting custom comments into PostScript document.
The following are possible values:
-
value - Any valid PostScript comment.
Note:
If the PI is inserted into fo:root element or before it, the value is placed
in the document header, before %%EndComments. If the PI is inserted into
<fo:simple-page-master> element,
the value is placed in every page which uses this
<fo:simple-page-master> as a template,
after %%EndPageSetup comment.
If the PI is inserted into <fo:page-sequence> element,
the value will be placed for each page of the sequence,
after %%EndPageSetup comment.
The value will be validated before inserting to document,
all "%" symbols will be removed, the first symbol will be
capitalized and the value will be prepended with one (for page level comments)
or
two (for document level comments) "%" symbols.
Default: no comment.
<?xep-postscript-image-inline-threshold value?>
This processing instruction controls the placement of images in PostScript document. Images that appear just a few times in a PostScript document are placed in Page Setup section of the pages where they are used, and not in Document Setup. This allows the printers to read image data when required, keep in memory for a short time, and safely flush it after the page is printed. In general, this feature allows to print larger documents.
The following are possible values:
-
value - An integer value greater or equal to -1.
Assuming the value is n, the behaviour of the PostScript backend is defined by the following rules:
-
If an image appears in the document more than n times, it goes to Document Setup.
-
If an image appears n times or less, it is placed in Page Setup on the page(s) where it is used.
-
The default value 0 makes all images be in Document Setup section. This is the old behaviour, equivalent to the absence of this option.
-
The value -1 makes all images be in Page Setup section.
Default: 0.
This feature can also be controlled by
IMAGE_INLINE_THRESHOLD option
in the configuration file for PostScript generator.
<?xep-out-embed-imagesvalue?> <?xep-svg-embed-imagesvalue?> <?xep-html-embed-imagesvalue?>
This processing instruction controls whether the XML (SVG, XHTML) output generator embeds external images referenced in the document in the resulting document instance as Base64 strings.
The following are possible values:
-
true - All images are stored inside the resulting file using the
data:URL scheme. -
false - Images are not embedded. In the generated XML file, images are referenced by their original URLs.
Default: false
This feature can also be controlled by the
EMBED_IMAGES option in the configuration file for
the XML output generator.
<?xep-svg-break-pagesvalue?> <?xep-html-break-pagesvalue?>
This processing instruction controls whether the SVG/XHTML output generator produces output document as a zip-file with collection of separate pages.
The following are possible values:
-
true - The output document is a zip-file with collection of SVG/XHTML files, where each file represents a separate page. The archive with XHTML pages does also contain pages index.
-
false - The output document is one SVG/XHTML document. All pages will be represented with appropriate SVG/XHTML elements.
Default: false
This feature can also be controlled by the
BREAK_PAGES option in the configuration file for
the SVG/XHTML output generator.
<?xep-svg-generate-first-n-pagesvalue?> <?xep-html-generate-first-n-pagesvalue?>
This processing instruction specifies number of pages from begining to be generated (0 means all pages).
Default: 0
This feature can also be controlled by the
GENERATE_FIRST_N_PAGES option in the configuration file for
the SVG/XHTML output generator.
This feature is only available in SVG and XHTML backends.
<fo:page-sequence
   rx:insert-document="url(documentname.pdf)">
This attribute allows inserting the entire document into the output stream. At the moment, injection is supported in PDF generator only, and only PDF documents can be injected.
The following are possible values:
-
value - Any valid URL to a PDF document.
The optional rx:insert-document-position
attribute on <fo:page-sequence> elements
can be used to control whether the injected document is placed
before or after the
<fo:page-sequence> where it is defined.
Possible values are:
-
before (default) - The injected document goes before the
<fo:page-sequence>where it is defined. -
after - The injected document goes after.
The <fo:page-sequence> itself is not suppressed, e.g. its content will appear
in the result document normally, immediately after (or immediately before) the
pages taken from the injected PDF.
Note:
Current version only supports injection of entire PDF documents. If only certain pages are to be injected, consider injecting individual pages, as described in Section E.2.2 section, or use external tools to extract a range of pages from a larger PDF document.
The optional rx:document-content-type attribute on
<fo:page-sequence> elements can be used to override how XEP
processes the content of injected document. The only possible value is application/pdf.
If the attribute is omitted (default), the content-type will be detected automatically.
Injected documents, even if they are fully accessible, lose their Accessibility features as they are marked up as images.
Note:
The injected PDF inherently changes page numbering. Consider the following example:
Say, we have a document that contains following:
-
An
<fo:page-sequence>that produces pages 1..41; -
<fo:page-sequence rx:insert-document="
url(documentname.pdf)">where
documentname.pdfcontains three pages (42..44); -
The
<fo:page-sequence>generates a single page that should be number 45.
Since the entire XSL-FO formatting, including calculation of page numbers,
occurs before the PDF injection,
the second <fo:page-sequence>
will get page number 42,
while it should be 45.
The further pages will also contain wrong links.
To mitigate this, a special post-formatting run is applied just before the XEPOUT is sent to the output stream. During this run, the page references are adjusted, e.g. the page numbers are incremented by 3 (number of pages in an injected PDF) to match the actual numbering.
XEP versions prior to 4.22 have not marked page numbers in any way,
so it was impossible to distinguish blocks containing page numbers
from regular text block.
To be able to adjust page numbers,  Starting from version 4.19, XEP introduces
a core option
Starting from version 4.19, XEP introduces
a core option ENABLE_PAGE_NUMBERS
that enables marking such text elements with
<xep:page-numbers> tag
and thus makes it possible to adjust the values when necessary.
One doesn't need to enable this option if no page number calculation
occurs in the document.
However, if page numbers are calculated, and any PDF injection occurs,
this option must be turned to true,
and any post-processing scripts must be adjusted to recognize
<xep:page-numbers>
along with the usual <xep:text>.
If the entire document has fixed page numbers, the simplest way to adjust the
second
<fo:page-sequence>'s page numbering is by adding the
attribute initial-page-number with the correct page number
as its value:
<fo:page-sequence
  rx:insert-document="url(documentname.pdf)"
  initial-page-number="45" >
Also, when injecting documents, keep in mind that XSL-FO specification contains
force-page-count attribute which governs the creation
of extra blank pages at the end of sections that need to end on odd-page. The
default value
for this attribute is auto. To mitigate this, one should specify
force-page-count="no-force".
Fonts can be configured inside the <fonts> element. It contains descriptors for
font families, font groups, and font aliases. The formatter uses them to
map XSL-FO font properties to actual fonts.
Fonts are categorized into families, which is the basic
configuration unit in XEP, and then further into groups. A font family
is a set of fonts that share a common design but differ in stylistic
attributes, such as upright or italic, light or bold. All data
pertinent to one font family is contained inside a <font-family> element.
The <font-family> element contains the attribute
described in the following table:
Table 5.12. Font-Family Attributes
| Attribute | Possible Values | Description |
|---|---|---|
| name | free textNote:Family names must be unique within the configuration file. They are matched against the respective XSL-FO property value. |
Identifies the font family. |
When no font family is specified in the input file, the default
is defined by default-family
attribute of the <font> element. Its
value is a family name that must be present in the file, otherwise a
configuration error occurs.
The following is an example of a font family descriptor:
<font-family name="Courier">
    <font>
        <font-data afm="Courier.afm"/>
    </font>
    <font style="oblique">
        <font-data afm="Courier-Oblique.afm"/>
    </font>
    <font weight="bold">
        <font-data afm="Courier-Bold.afm"/>
    </font>
    <font weight="bold" style="oblique">
        <font-data afm="Courier-BoldOblique.afm"/>
    </font>
</font-family>
Inside the family descriptor, there are one or more entries for
individual fonts that belong to the family. A font entry is specified
by a <font> element. It has
attributes to specify features of the font within the family, such as
weight, style, and variant. For a font to be selected by a
formatter, these attributes should match font-weight, font-style, and font-variant specified in the XSL-FO
document.
Most fonts can be either embedded into
the resulting PDF or PostScript document or specified as fonts
external to the file. If the font is external, the rendered file can
only be viewed on systems that have the font configured for use with
viewing or printing the application. Typically, all fonts are
embedded except for 14 standard Adobe PDF fonts. For some
applications, embedding basic fonts may also be required. Embedding
of a font is controlled by the embed attribute of the <font> element describing the font.
An embedded font can be subsetted, which
means that instead of storing the entire font in the document, XEP leaves
only those glyphs that are actually used in the
text. This option reduces the document size but makes it unsuitable
for subsequent editing. Subsetting is governed by the subset attribute of the <font> element.
To provide a more compact notation, the embed and subset properties are
inheritable down the configuration tree: when
specified on a node in the configuration file, they affect all
<font> descendants of that node.
For example, embed/subset attributes specified in <font-family> will affect all fonts in that
family; placing them on <font-group> will set the respective
parameters for all fonts in all families in the group (unless
overridden on some descendant node), etc.
XEP does not support embedding and subsetting of native AFP fonts in AFP documents so far.
Note:
TrueType and OpenType fonts may contain internal flags that prohibit their embedding or subsetting. XEP honors these flags and may refuse to embed or subset your font if the respective action is not authorized by the flags inside it.
To use an AFP font with XEP, it is necessary to obtain AFP font files containing
Codepage and Charsets. An URL location to the Codepage file should be specified in
the codepage-file attribute of <font-family> element and attribute codepage-name should contain the name of corresponding Codepage. Font encoding can be specified
in encoding attribute of <font-family> element (default value is Cp500).
The size (for raster AFP fonts) should be specified in the size attribute of the <font> element. URL to Charset file should be specified in charset-file attribute of <font-data> element and attribute charset-name should contain the name of Charset respectively.
Example: suppose we have a raster AFP font with Codepage file T1EDO500.CDP and Charset file C0V08000.CHS containing metrics for characters (size 10, italic). Its descriptor in the configuration
file can look like this:
<font-family name="AfpFont"
  codepage-name="T1EDO500"
  codepage-file="T1EDO500.CDP"
  encoding="Cp1146">
  <font size="10" style="italic">
    <font-data charset-name="C0V08000" charset-file="C0V08000.CHS"/>
  </font>
  ...
</font-family>
Algorithmic slanting can be applied to fonts in order to
produce oblique or backslanted versions of fonts that do not have
separate outlines for these styles. This is done by placing a
<transform> element inside the
<font> descriptor. The slant angle
is specified in the slant-angle
attribute on the <transform> node.
Its value sets the angle in degrees. Positive angles slant the text
clockwise, producing oblique versions; negative ones rotate it
counterclockwise, producing backslanted font styles.
XEP does not support algorithmic slanting of AFP fonts so far.
If a font family contains no entry for oblique or italic font style, the oblique font is produced algorithmically by applying a default slanting of 12°. Similarly, a missing backslant font is synthesized from the nearest upright version, slanting it by -12°.
Fonts can be instructed to contract certain sequences of
characters into ligatures. A set of ligature characters is specified
in the ligatures attribute of
the <font> element, as a space- or
comma-separated list of ligature characters. The characters must be
Unicode ligature codepoints.
Note:
In XEP, ligaturization support is basic: only ligatures registered in Unicode can be used. Moreover, ligaturization does not work for characters that undergo contextual shaping: this excludes all Arabic ligatures from consideration. Further versions of XEP are expected to improve ligaturization support.
Type 1 fonts may have different encoding tables. (Encoding table is an essential part of a Type 1 font and matches character codes to glyph names). According to PDF Spec, there are 3 predefined encodings: WinAnsi, MacRoman, and MacExpert. There is also the built-in font's encoding. All other encodings are treated as custom ones.
In Adobe Acrobat it is possible to see each Type 1 font encoding used in a document (Document Properties panel -> Fonts tab -> Encoding field for each Type 1 font). The value of this field may be one of:
-
Standard - The font's built-in encoding
-
Ansi - Windows Code Page 1252 (Windows ANSI)
-
Roman - Mac OS standard encoding for Latin text in Western writing systems
-
Expert - An encoding for use with expert fonts
-
Custom - A custom encoding
initial-encoding.
To provide a more compact notation, the initial-encoding is
inheritable down the configuration tree: when
specified on a node in the configuration file, it affects all
<font> descendants of that node.
For example, initial-encoding
attribute specified on <font-family>
will affect all fonts in that family; placing it on <font-group> will set the respective
parameter for all fonts in all families in the group (unless
overridden on some descendant node), etc.
Note:
This attribute only affects the first encoding table for a Type 1 font it is specified on. If the document contains glyps (from this font) that do not belong to the specified first encoding table, XEP will add more encoding tables which will all be treated as Custom.
Several font families can be wrapped into a <font-group> container element. Groups can be
nested, forming complex font hierarchies. This element does not affect
font mapping and serves only for logical grouping of font families.
In particular, it is often convenient to use it as a host for the xml:base property, to specify a common
base directory for a group of font families that form a package.
Another suggested use of <font-group> is for remoting: contents of the
font group can be placed into a separate file and reused across
multiple font configurations.
The only attribute specific to <font-group> is label, which assigns a name to the group.
The name serves only for record keeping, no constraints are imposed on
it.
XEP uses font aliases to provide alternate
names for font families and group several families into one “logical”
family. A font alias is defined by a <font-alias> element. The element has two
attributes, both required: name
is the name of the “logical” font family, and value is a comma-separated list of font
family names to which it should resolve. The list may contain a single
font family; in this case, the alias merely provides an alternate name
for it.
Note:
Aliases always resolve to “real” families and not to the other aliases. Chained alias resolution is not possible in XEP.
Language-specific configuration parameters
are stored in the third major section of the configuration file,
inside a <languages> element.
The <languages> element contains
one or more <language> elements,
and each <language> element
stores information pertaining to a single language.
The language is identified by two attributes:
-
name - The name of the language.
-
code - A list of codes used to refer to the language in the XSL-FO input data. Multiple codes are separated by spaces.
In XEP, two kinds of data are configurable in this section of the configuration files:
-
Hyphenation patterns
-
Language-specific font aliases
XEP uses TEX hyphenation patterns for hyphenation data. Details on hyphenation algorithm are described in Appendix C.
A hyphenation pattern file is associated with a language by
placing a <hyphenation> element into
the language section in the configuration file.
Its pattern attribute specifies
the URL to the TEX pattern file.
An optional encoding attribute
specifies the encoding of the pattern file;
if it is missing, ISO-8859-1 is assumed.
Language sections may also contain
<font-alias> elements, described above in
the section called “Font Aliases”. These aliases are activated when the
language is selected in the input XSL-FO document; they take
precedence over aliases specified in the <fonts> section of the configuration file
and may mask them.
XEP can be configured to use a specific entity resolver
for all SAX parsing calls inside it.
The resolver class is specified by a Java system
property com.renderx.sax.entityresolver.
It must have a public constructor with no arguments,
and implement org.xml.sax.EntityResolver
interface.
Similarly, XEP can assign a user-defined class to resolve URIs
in calls to document() function,
<xsl:import>, and
<xsl:include> XSLT directives.
The class name is specified in com.renderx.jaxp.uriresolver
system property; it must provide a public default constructor, and implement
javax.xml.transform.URIResolver interface.
The principal use of these features is to add support for XML catalogs to XEP, to avoid repeated loading of common DTDs and stylesheets from the internet. For example, the following setting configures XEP to use XML entity and URI resolver from Apache project (provided that you have included resolver classes in the classpath, and properly configured it):
java
-Dcom.renderx.sax.entityresolver=org.apache.xml.resolver.tools.CatalogResolver
-Dcom.renderx.jaxp.uriresolver=org.apache.xml.resolver.tools.CatalogResolver
…
XML catalogs resolver is included into xml-commons tools available as a part of Apache project. For further information about catalogs and entity resolution, and for resolver download please proceed to Apache website: http://xml.apache.org/commons/components/resolver/index.html.
A more detailed example of practical usage of XML Catalog for improving the performance of DocBook processing is discussed in Section J.2.
AFP documents can be generated through the following:
XEP Assistant - When formatting the XML file using the XEP Assistant, select AFP as the format, as described in Chapter 3.
Command Line - Using the command line, AFP documents as well as AFP resource files can be generated.
-
To generate an AFP document, use the parameter -afp:
-afp <afp document file name>
For more information, please refer to Chapter 4.
-
To generate an AFP resource file, use the parameter -DH4AFP.RESOURCE:
-DH4AFP.RESOURCE=<afp resource file name>
Note:
Since -DH4AFP.RESOURCE is a generator option parameter, it must precede all other parameters like -xml, -xsl, -fo, -xep, -pdf, -ps, -afp, -svg.
Alternatively, you can use the configuration file variable. For more details, refer to Section 6.8.
-
Non-CID OTF fonts are currently supported which allows for higher AFP standard conformance. Fonts larger than 36 pt can be processed as well, which produces better AFP documents.
XEP supports two different ways using fonts in AFP generator:
-
The first variant is based on native Non-CID Open Type Fonts (OTF) that correspond F:OCA specifications. It is described in section Section D.1.4. This variant requires a set of native AFP font files and allows using native AFP fonts metrics.
You may also find useful information on the section called “AFP Fonts”.
-
Another variant of configuration lets to map AFP native fonts to non-AFP fonts supported by XEP to obtain font metrics. In this case, the metrics of TrueType/OpenType fonts are used for formatting; after that, when generating AFPDS stream, XEP uses mapped font values to refer in result document.
Therefore, AFP generator for XEP supports all kinds of fonts supported by XEP.
Mapping FO fonts and native AFP fonts can be configured in the XEP configuration file, in the AFP generator configuration section. Please refer to Section 5.1.4 for details.
Raster image handling in AFP generator for XEP is based on target printer's capability of supported image formats. If certain image format is supported by target AFP printer, the AFP generator for XEP puts the unchanged image into the AFP data stream. Otherwise, it reads entire image raster and compresses it into one of known native image formats.
| Image | Compression Algorithm | Properties |
|---|---|---|
| Bi-level images | 0x82 | G4 MMR—Modified, 1 bit per pixel, RLE-compressed |
| Grayscale images | 0x03 | 8 bits per pixel, uncompressed |
Note:
Modern AFP printers support advanced raster image formats such as JPEG. It is highly recommended to use native images if your printer supports it because XEP does not need to decompress entire raster. This provides with fewer memory consumption, gives significant performance boost (up to 10 times), and allows for producing smaller output files.
By default, no native image formats are allowed.
To find out whether your printer supports certain data formats, refer your printer's manual.
The following formats are used for raster compression:
You may refer Section 6.8.5 section to find how to configure native image formats.
Note:
In AFP, bi-level images are mixed with their background. Therefore, white points appear transparent.
Images can be included once and referenced multiple times. This allows for reduced output size and improved performance. This feature is very useful for repeating images, like corporate logos, headers, footers, etc.
In order to set the image to be included in a separate resource file, the resource file name should be specified as a RESOURCE formatting option and also the image should be given an unique Object Token (via the AFPObjectToken pinpoint instruction). If an Object Token is not set, the image is not included for relocation to the resource file. If an Object Token is not unique, all subsequent images with the same Object Token are ignored.
For example:
<rx:pinpoint value="AFPObjectToken=CAT00001,embed"/>
<fo:external-graphic src="url(cat.jpg)" />
Alternatively, the ALL_IMAGES_TO_RESOURCE configuration option forces all images to be placed in the resource file, assigning them with automatic Object Tokens.
Further configuration options are described in Section 6.8.6.
Note:
Pinpoints are an experimental feature and may be changed at next release. Please contact RenderX support before use for other purposes.
If a source document refers to an image, and the image is bigger than the containing block, normally it should be clipped. AFP Backend correctly clips only those images having resolution equal to (or higher than) the AFP document's resolution. Otherwise, the entire image appears, probably overlapping with other page elements positioned to the right or below the image container.
Highlight color is a special case of color encoding, when a solid colorant used (contrary to other schemes like RGB, CMYK, etc). In XSL-FO, this kind of encoding is called Spot Color. XEP AFP Backend treats spot color in source document and produces AFP Highlight Color instructions within the MO:DCA-P stream.
Highlight Color has the following major attributes:
-
Colorant name - usually, includes colorant vendor name and catalogue ID of the color. For example, "PANTONE Orange 021 M".
-
Tint - percentage of colorant covering target area. AFP printers are capable to cover certain percentage of target area, making the color opaque.
Each value must be given either in percents (from 0% to 100%) or as a number in the interval from 0 to 1.
Note:
When the Highlight Color space is specified in a target repeating group, the percent coverage parameter is normally supported only for areas such as object areas and graphic fill areas. For other data types this parameter is normally simulated with 100% coverage.
-
Shading - besides tint, AFP devices are capable to cover certain percentage with main color (usually Black). This attribute defines which percentage will be covered with main color.
-
Alt (alternative) color - used in XSL-FO to define most-close analogue to Spot Color. This can be either CMYK, RGB, or Grayscale value.
AFP Generator uses the following algorithm of Spot Colors identification:
-
AFP Backend for XEP finds spot-color in source document. It looks up the configuration file for Highlight Color Index defined within.
-
If Colorant ID found, AFP Backend uses the ID associated.
-
Otherwise (Colorant ID not found), AFP Backend registers the Highlight Color within the range of Custom Colors defined in MO:DCA (ID 0x0100-0xFF00).
-
Next time spot-color with same colorant used within the same document, it will obtain the same ID. Automatically obtained ID's are not saved for further use after the operation is completed.
Scalable Vector Graphics (SVG) is a language for describing two-dimensional vector graphics in XML.
AFP Backend 4.31.1348 has limited support of SVG primitives. They are rendered as instructions listed within G:OCA command set.
The following G:OCA objects are currently supported:
-
Lines (
<svg:line>).Lines are considered to be strokes of a pen that draws on the canvas.
The size, color, and style of the pen stroke are part of the line's presentation. These characteristics are in the style attribute.
Currently
"stroke"(color of line) and"stroke-width"(width of line) characteristics of Style attribute are supported.For example:
<svg:line x1="20" x2="20" y1="62" y2="8"
  style="stroke-width:6; stroke: blue;"/>
-
Rectangles.
The interior of the rectangle can be filled with the specified fill color.
If a fill color was not specified, the interior of the shape will be filled with white.
The outline of the rectangle is drawn with strokes, whose characteristics can be specified by the same way as for lines.
"fill"(fill color),"stroke"(outline color) and"stroke-width"(width of outline) attributes are supported.If the fill color specified as "none", then only outline of the rectangle will be drawn with color specified in "stroke" attribute.
For example:
<rect x="60" y="60" width="80" height="70"
  fill="none" stroke="yellow" stroke-width="5"/>
-
Paths.
Paths represent the geometry of the outline of an object, defined in terms of
<moveto>(set a new current point), lineto (draw a straight line), curveto (draw a curve using a cubic B?zier), arc (elliptical or circular arc), and closepath (close the current shape by drawing a line to the last moveto) elements.Full implementation of Path processing has been made.
Supported commands:
-
The
"moveto"command.The "moveto" commands (M or m) establish a new current point.
-
The
"closepath"command.The "closepath" (Z or z) ends the current subpath and causes an automatic straight line to be drawn from the current point to the initial point of the current subpath.
-
The
"lineto"commands.The various "lineto" commands (L, l, H, h, V, v) draw straight lines from the current point to a new point.
-
Cubic B?zier curves (C, c, S and s).
A cubic B?zier segment is defined by a start point, an end point, and two control points.
Also includes filled areas with border in form of B?zier curve.
-
Quadratic B?zier curves (Q, q, T and t).
A quadratic B?zier segment is defined by a start point, an end point, and one control point.
Also includes filled areas with border in form of B?zier curve.
-
Ellipstical arcs (A and a).
An elliptical arc segment draws a segment of an ellipse. Various kinds of elliptical arcs are supported.
Note:
Internally, XEP transforms all arcs to B?zier curves.Also includes filled areas with border in form of arc.
-
Filled areas may be formed by any combination of lines, arcs, and B?zier curves. AFP
Generator correctly processes such case of svg:path and makes areas filled correctly.
Coordinate system transformations are also supported.
A new user space can be established by specifying transformations in the form of a
"transform" attribute on a container element or graphics element or "viewBox" attribute on an "svg", "symbol", "marker", "pattern" and the "view" element.
The "transform" and "viewBox" attributes transform user space coordinates and lengths on sibling attributes on the given element and all of its descendants.
The following logic elements are currently supported:
-
Groups (
<svg:g>). -
Rotation of SVG block.
<fo:block-container reference-orientation="270">
Possible values are:
"0","90","180", and"270". -
Nested SVG (
svg:svg) and Viewbox (svg:viewbox) are supported.Partial implementation of
"transform"and"viewBox"attributes processing has been made.Transformations can be nested, in which case the effect of the transformations are cumulative.
-
SVG text.
XEP has limited support of SVG text. Only raster fonts are supported.
If SVG text is enclosed into viewbox, the actual font size is calculated accordingly.
In the following sample, SVG block is stretched 2 times by X and Y axis, and font of size 10 is used.
<svg:svg width="400" height="100" viewBox="0 0 200 50">
  <svg:text style="font-family:Helvetica; font-size:10; font-weight:bold"
  text-anchor="middle" x="100" y="25">
  Sample
  </svg:text>
</svg:svg>
The actual font size will be equal to 20.
If viewbox zoom factors by X and Y axis are different, root-mean-square value for font size is used.
In the following sample, SVG block is stretched 3 times by X axis and remain the same by Y axis.
<svg:svg width="600" height="50" viewBox="0 0 200 50">
  <svg:text style="font-family:Helvetica; font-size:10; font-weight:bold"
  text-anchor="middle" x="100" y="25">
  Sample
  </svg:text>
</svg:svg>
The actual font size will be calculated as original_size * square_root((zoomX^2 + zoomY^2)/2) and equal to 22.
For SVG text, only the following rotation values are possible:
"0","90","180", and"270". Nested rotations of SVG blocks and viewbox are supported. -
Markers.
The "marker" element defines the graphics that is to be used for drawing arrowheads or polymarkers on a given "path", "line", "polyline" or "polygon" element.
Not supported or limited support:
-
Gradient fill for rectangles is not supported: solid fill color used.
-
Other primitives not listed above are not supported by current version.
A barcode is a machine-readable representation of information in a visual format.
Most types of barcodes stores data in the width and spacings of printed parallel lines.
Barcodes are simple to represent as black rectangles separated by white spaces, but they have proved to be difficult to generate accurately. Bar and space widths are often computed in a complex manner and checking digits additionally complicates the process.
AFP Backend uses XSLT stylesheets to implement the computational part and SVG to draw the image and text. These stylesheets are available for free download from RenderX site:
http://www.renderx.com/demos/barcodes.html
As soon as XSL-FO 1.0 does not have native support of barcodes, technical implementation
of them is based on SVG. These stylesheets render barcodes as SVG primitives, including
additional <desc> tag containing the value and parameters of barcode rendered.
Starting from version 4.29, XEP contains its own extension
<rx:barcode> to XSL-FO for Barcode support.
Please refer Section B.24 for more details about its implementation.
AFP Backend processes this tag and decides whether it is barcode or another SVG graphic.
If barcode tag is found, the barcode is rendered with BC:OCA or G:OCA, depending on
which is enabled. This is done with USE_BCOCA_LEVEL and USE_GOCA_LEVEL configuration parameters. If both BC:OCA and G:OCA are enabled, BC:OCA overrides. Please refer configuration parameters section about configuring BC:OCA and G:OCA.
Please refer Section 6.5 section for more information about G:OCA implementation.
Note:
AFP Barcodes (BC:OCA) are verified to be compatible with barcodes generated by WordML2FO stylesheets (the latest version). RenderX WordML2FO stylesheets are available for free download from RenderX site:
Currently, the following types of Barcodes are supported by AFP Backend:
-
EAN-13
-
EAN-8
-
UPC-A
-
Codabar
-
Code2of5
-
Code3of9 (with limitations)
-
Code128 (with limitations)
-
4state-AU (with limitations)
Please refer Section 6.11 for more details about AFP Backend limitations.
For example:
<svg:svg xmlns:svg="http://www.w3.org/2000/svg"
  width="34.98mm" height="27.39mm">
  <desc xmlns:mydoc="http://example.org/mydoc">
    <barcode value="9780444505156" type="EAN-13"/>
  </desc>
  <svg:rect y="0" height="24.915mm" x="3.63mm"
    width="0.33mm" style="fill: black;"/>
  <svg:rect y="0" height="24.915mm" x="4.29mm"
    width="0.33mm" style="fill: black;"/>
  ...
  <svg:rect y="0" height="23.1mm" x="4.95mm"
    width="0.99mm" style="fill: black;"/>
</svg:svg>
desc tag must have single child node <barcode/>. The following attributes are available for <barcode/> tag:
-
value contains string value of the barcode
-
type one of the values listed in supported types:
-
EAN-13
-
EAN-8
-
UPC-A
-
Codabar
-
Code2of5
-
Code3of9
-
Code128
-
4state-AU
-
Note:
If you develop custom stylesheets implementing Barcodes, please note that barcode
MUST be alone item within SVG block if barcodes are generated with BC:OCA. That is,
AFP Generator skips SVG content after <desc> tag.
FORMDEF is the AFP 'forms definition.' It defines the parameters of the physical page environment. The parameters including the following:
-
Paper size and rotation.
-
Simplex or duplex printing mode.
-
Printing several logical document pages on the same sheet.
-
Number of copies.
-
Paper cutting, punching, etc.
-
Paper source selection.
-
Overlays for physical and logical pages.
-
Finishing documents.
FORMDEF can be attached to a single document, or to multiple documents. It is contained in the resource section of a printfile.
Note:
The XEP AFP Generator has limited support for generation of FORMDEF resources. In general, complex features like overlays and page segments are not supported.
FORMDEF is a MO:DCA resource. Therefore, two steps are required in order to generate a document with FORMDEF.
-
You must specify the resource file on the XEP command line.
-
You must concatenate the resource file and the document file or files, in order to form a print file.
Note:
If a resource file is not specified, the FORMDEF instructions are processed but not generated in the resulting AFP file.
FORMDEF resource is described in the source document as a set of special processing instructions. These instructions may appear at the top of the XSL-FO document before or after the <fo:root> element, or within page masters. Each processing instruction has a pseudo-element which is commonly used in XML similar to an <?xml ?> instruction.
FORMDEF processing instructions are divided into two main groups:
-
Non-repeating instructions - They may only have one instance within a document.
The following are non-repeating instructions:
-
xep-afp-form-definition
-
-
Repeating instructions - They may appear in a document multiple times.
The following are repeating instructions:
-
xep-afp-page-definition
-
xep-afp-copy-group
Repeating instructions contain a pseudo-element "id," which uniquely identifies each instance of an instruction of the same type within a document. When XEP processes repeating instructions, only the first instance of an instruction of the id is processed. All other instructions with the same id are ignored. If an instruction is inside a page master, it is reproduced on each page generated by this page master, but XEP processes only the first occurrence of this instruction, as instruction ids are same.
-
The syntax and semantics of FORMDEF processing instructions are as follows:
-
xep-afp-form-definition - Defines the FORMDEF resource.
Format:
<?xep-afp-form-definition
  sheet-height="size-value" sheet-width="size-value"?>
Attributes:
-
sheet-height - Defines the sheet height. Values may contain simple size expressions such as, "3in" or "10pt."
-
sheet-width - Defines the sheet width. Values may contain simple size expressions such as, "3in" or "10pt."
Both sheet-height and sheet-width are mandatory attributes.
-
-
xep-afp-page-definition - Defines a logical page on a sheet of paper or other medium.
Format:
<?xep-afp-page-definition id="id-number" x0=" size-value" y0="size-value"
  orientation="ori-value" type="type-value"?>
Attributes:
-
id - Instruction identifier. The value must be a decimal number.
-
x0, y0 - The coordinates of the logical page presentation on a physical sheet. Values may contain simple size expressions.
-
orientation - The orientation of the logical page on a physical sheet. Possible values are 0, 90, 180, or 270.
-
type - The type of logical page which defines the common page layout. Possible values are the following:
default-front-page, default-back-page, p1-front-page, p1-back-page, p2-front-page, p2-back-page, p3-front-page, p3-back-page, p4-front-page, p4-back-page, default-front, default-back, p1-front, p1-back, p2-front, p2-back, p3-front, p3-back, p4-front, p4-back
-
-
xep-afp-copy-group - Defines a copy group as well as its attributes and keywords.
Format:
<?xep-afp-copy-group id="id-number" copy-count="number"
  mode="mode-val" [key="value"]* ?>
Attributes:
-
id - Instruction identifier. The value must be a decimal number.
-
copy-count - The number of copies in the copy group. The value must be a decimal number.
-
mode - Printing mode. Possible values are simplex, duplex, and tumble-duplex.
id, copy-count and bold are mandatory attributes.
xep-afp-copy-group may contain several optional pairs of keywords and values. Each keyword-value pair must conform to the following rules:
Format of key-value pair:
key-value-pair = key, '=', '"', value, '"';
key = ( 'x' | 'X' ) ,
      ('0' | '1' | '2' | '3' | '4' | '5' | '6' | '7'
           | '8' | '9' | 'A' | 'B' | 'C' | 'D' | 'E' | 'F'),
      ('0' | '1' | '2' | '3' | '4' | '5' | '6' | '7'
           | '8' | '9' | 'A' | 'B' | 'C' | 'D' | 'E' | 'F');
value = ('0' | '1' | '2' | '3' | '4' | '5' | '6' | '7' | '8' | '9' | 'A' | 'B' | 'C' | 'D' | 'E' | 'F'), ('0' | '1' | '2' | '3' | '4' | '5' | '6' | '7' | '8' | '9' | 'A' | 'B' | 'C' | 'D' | 'E' | 'F');Examples of valid keys: "x12", "XFF", "xA1".
Examples of valid values: "AF", "15", "FD".
Each key-value pair adds a keyword with value to MO:DCA MMC structured field content.
Note:
Printing mode such as simplex, duplex or tumble duplex is controlled separately by the mode attribute which effectively generates XF4 MMC keyword. If the mode of printing is duplex, the copy group is generated twice in MCC automatically, and you do not need to repeat the group twice. You need not use XF4 MMC keyword explicitly.
-
Other FORMDEF instructions include:
-
xep-afp-invoke-medium-map - puts IMM (Invoke Medium Map) instruction before page's BPG.
This instruction is used in order to invoke Medium Maps that are already uploaded into target printer environment. If two sequential pages invoke the same Medium Map, only the first page's BPG will be preceded with corresponding IMM. To override this behaviour and make XEP put IMM before each BPG, regardless of this check, use
forceattribute.If
nameexceeds 8 characters, AFP backend trims it to this length and automatically adds 0x02 (Fully Qualified Name) triplet.Note:
XEP is unable to ensure validity of Medium Maps uploaded into the printer so it does not check if
map-nameis valid.Format:
<?xep-afp-invoke-medium-map name="map-name" [force="true"]?>
Attributes:
-
name - name of the map to be invoked.
-
force - whether to force IMM instruction on each page applied.
Note:
xep-afp-invoke-medium-map is put into the main output stream only and thus it does not require resource file specified.
-
Configuration of the AFP generator is performed in a usual way all XEP generators are configured.
Note:
Rendering to AFP requires that some "pretty-print" features were disabled
in the core of XEP. Starting from version 4.19, AFP generator users are encouraged
to set the following XEP core options:
<option name="MERGE_WHITE_SPACE" value="false"/>
<option name="LTF" value="1000"/>
This is especially true if the local fonts XEP uses for formatting have somewhat different metrics for certain glyphs than the fonts residing on AFP device. The MERGE_WHITE_SPACE would prohibit XEP from introducing variable inline progression for white space character, while LTF (Line Thickness Factor) controls handling minor overflows. Whenever the content exceeds its container by less than (1/LTF), it will get "squeezed" by manually displacing glyphs, avioding unnecessary line wraps and long holes on preceding lines. However, with AFP such processing often produces unnecessary side effects, so it is recommended to disable this feature. The default is 20, which makes 1/20th (5%) of line width gets squeezed. Setting it to 1000 makes it 1/1000th, which is virtually zero.
<option name="OPTION_NAME" value="OPTION_VALUE"/>.
Note:
AFP parameters can be set in three different ways, depending on your specific needs:
-
Configuration file - in this case, the parameter value applies to all documents processed with this configuration file.
-
Environment variable (Generator option) - passed within command line and applies for current run of XEP. Generator option value overrides Configuration file values.
-
Processing Instruction - passed within Processing Instruction (PI) inside XSL:FO document. Please refer Output Format Settings section for more details on processing instructions. Processing Instruction value overrides Generator option and Configuration file values.
In this section, all parameters will be described in Configuration file format.
AFP generator's prefix for Generator options is H4AFP. So, RESOLUTION parameter will look like this:
-DH4AFP.RESOLUTION=1440
AFP generator's prefix for Processing instructions is xep-afp-. So, RESOLUTION parameter will look like this:
<?xep-afp-resolution 1440?>
Processing Instruction may appear at document level or page level. Every time the page level parameter is set, it applies until the same parameter is set to another value. For example, if RESOLUTION option is set to: 1440 in config file; to 720 for page #5; and to 1440 for page #10 - the value of 720 will apply for ALL pages ##5 till 9.
AFP generator for XEP has extended support for international Character sets. The following chapter describes how to configure the necessary character sets and corresponding Codepages.
One should configure only those Character sets and Codepages supported by the fonts residing in target AFP device.
Note:
Even if the printer is configured to support various Codepages, it is still reasonable to remove from XEP configuration file these Character sets not used in the documents to improve performance.
The element <charsets> is a container for Character sets configuration.
Each Character set is configured within <charset> element. It has the attribute name describing the name of Character set. The attribute name must be unique.
Character set definition contains the following child elements:
-
List of Unicode character ranges applying the Character set, represented
<code-ranges>element; -
List of specially mapped characters, represented by
<character-mapping>element; -
Single
<codepage>element defining the Unicode to Codepage mapping;
Unicode character range is defined by <code-range> element. It has the following attributes:
-
fromandtodefining beginning and ending values of Unicode characters belonging to the character range; Must be hexadecimal value; Required;
Codepages are defined by <codepage> element. It has the following attributes:
-
namestring value defining Java standard name of Codepage; In Java environment, there must be a registered charset provider with the given name; Required; -
ibm-namestring value defining AFP codepage specification ("Txxxxxxx"); Required; -
forcelatina boolean (true or false) value defining whether the codepage contain Base Latin characters in lower half of code bytes (0x00..0x7F); Optional; Default=true; -
descproviding text description of the code page; Optional;
Specially mapped characters are defined by <character> element. It has the following attributes:
-
unicodedefining two-byte hexadecimal value of specially mapped character; Required; -
afpdefining one-byte hexadecimal value of mapped character within target Codepage; Required; -
descproviding text description of the character; Optional;
Note:
All the remaining characters belonging to Unicode character ranges and not listed
with <character> elements, are translated to target Codepage using Java standard mechanisms of string
translations;
Please refer Section 6.10 section to find more details on how the AFP generator works with Unicode ranges and Codepages.
The following example demonstrates how to configure necessary Character sets for AFP generator:
<generator-options format="AFP">
  <charsets>
  <!--languages-->
  <charset name="Latin">
    <code-range from="0x0000" to="0x007F"/>
    <codepage name="Cp500" ibm-name="T1V10500" forcelatin="true"
      desc="Base Latin"/>
  </charset>
  <charset name="Latin_1">
    <code-range from="0x0080" to="0x00FF"/>
    <codepage name="Cp819" ibm-name="T1000819" forcelatin="true"
      desc="Latin_1"/>
  </charset>
  <charset name="Cyrillic">
    <code-range from="0x0400" to="0x04FF"/>
    <codepage name="Cp866" ibm-name="T1000866" forcelatin="true"
      desc="ANSI Cyrillic"/>
  </charset>
  <charset name="Chinese">
    <code-range from="0x4E00" to="0x9FFF"/>
    <codepage name="Cp950" ibm-name="T1094700" forcelatin="false"
      desc="Chinese"/>
  </charset>
  <charset name="Hebrew">
    <code-ranges>
      <code-range from="0x0590" to="0x05FF"/>
    </code-ranges>
    <codepage name="Cp424" ibm-name="T1000424" forcelatin="true"
      desc="Hebrew"/>
  </charset>
  <charset name="Greek">
    <code-ranges>
      <code-range from="0x0370" to="0x03ff"/>
    </code-ranges>
    <codepage name="Cp875" ibm-name="T1000875" forcelatin="false"/>
  </charset>
  <!--symbol-->
  <charset name="Symbols00259">
    <code-ranges>
      <code-range from="0x03C0" to="0x03C0"/>
      <code-range from="0x2020" to="0x2020"/>
      <code-range from="0x003C" to="0x003C"/>
      <code-range from="0x02C6" to="0x02C6"/>
      <code-range from="0x00B0" to="0x00B0"/>
      <code-range from="0x25CF" to="0x25CF"/>
      <code-range from="0x25C6" to="0x25C6"/>
      <code-range from="0x25A1" to="0x25A1"/>
      <code-range from="0x2341" to="0x2341"/>
      <code-range from="0x25BA" to="0x25BA"/>
    </code-ranges>
    <character-mapping>
      <character unicode="0x03C0" afp="0x46" desc="pi small"/>
      <character unicode="0x2020" afp="0x4b" desc="dagger"/>
      <character unicode="0x003C" afp="0x4c" desc="less"/>
      <character unicode="0x02C6" afp="0x5f" desc="circumflex accent"/>
      <character unicode="0x00B0" afp="0x7c" desc="degree symbol"/>
      <character unicode="0x25CF" afp="0xbc" desc="large bullet"/>
      <character unicode="0x25A1" afp="0xda" desc="open square"/>
    </character-mapping>
    <codepage name="Cp259" ibm-name="T1000259" forcelatin="false"/>
  </charset>
  <charset name="Cp437">
    <code-ranges>
      <code-range from="0x2022" to="0x2022"/>
      <code-range from="0x266A" to="0x266A"/>
    </code-ranges>
    <character-mapping>
      <character unicode="0x266a" afp="0x0d" desc="musical note"/>
      <character unicode="0x2022" afp="0x07" desc="bullet"/>
    </character-mapping>
    <codepage name="Cp437" ibm-name="T1000437" forcelatin="false"/>
  </charset>
  <charset name="Cp423">
    <code-ranges>
      <code-range from="0x03CA" to="0x03CA"/>
    </code-ranges>
    <character-mapping>
      <character unicode="0x03CA" afp="0xb4" desc="acute accent"/>
    </character-mapping>
    <codepage name="Cp423" ibm-name="T1000423" forcelatin="false"/>
  </charset>
  <charset name="APL Graphic Escape">
    <code-ranges>
      <code-range from="0x25CA" to="0x25CA"/>
      <code-range from="0x25A0" to="0x25A0"/>
      <code-range from="0x203E" to="0x203E"/>
    </code-ranges>
    <character-mapping>
      <character unicode="0x25CA" afp="0x70" desc="acute accent"/>
      <character unicode="0x25A0" afp="0xC3" desc="down caret"/>
      <character unicode="0x203E" afp="0xA0" desc="overbar"/>
    </character-mapping>
    <codepage name="Cp310" ibm-name="T1000310" forcelatin="true"/>
  </charset>
  </charsets>
</generator-options>
Note:
Due to the nature of Character set configuration, it must be specified in xep.xml configuration file only and cannot be specified or overridden neither in command
line parameters nor processing instructions within the XSL-FO document.
-
AFPFont options are used for mapping XSL FO fonts to AFP fonts.
Each AFPFont option name starts with "AFPFont" and after a comma contains face name of a XSL FO font. Each AFPFont option value contains a list of nine subvalues separated with commas.
Example:
<option name="AFPFont,Helvetica"
  value="C0H200.0, C0H300.0, C0H400.0, C0H500.0,
  C0H201.0, C0H301.0, C0H401.0, C0H501.0, 278"/>
Subvalues in the list have following meaning:
-
AFP substitution font for font-weight="normal" font-style="normal"
-
AFP substitution font for font-weight="normal" font-style="italic"
-
AFP substitution font for font-weight="bold" font-style="normal"
-
AFP substitution font for font-weight="bold" font-style="italic"
-
AFP substitution font for symbolic subset and font-weight="normal" font-style="normal"
-
AFP substitution font for symbolic subset and font-weight="normal" font-style="italic"
-
AFP substitution font for symbolic subset and font-weight="bold" font-style="normal"
-
AFP substitution font for symbolic subset and font-weight="bold" font-style="italic"
-
Word spacing value in font relative units (please reference AFP FOCA reference for details)
Note:
If the font is not found within the table above, AFP Generator uses Helvetica to substitute. -
HighlightColor option is used for configuring mapping of colorant to Highlight Color ID within the target AFP device.
Each HighlightColor option starts with "HighlightColor" prefix and after comma should contain Color ID (hex or decimal). Value contains symbolic name of colorant.
Example:
<option name="highlightcolor,0x301" value="PANTONE Orange 021 M" />
or (the same)
<option name="highlightcolor,769" value="PANTONE Orange 021 M" />
-
USE_SHADING_PATTERNS specifies whether grayscale-filled areas should be filled with bi-level pattern. Percentage rate of containing black points will be close to required grayscale value.
-
1ortrueoryes- Shading patterns will be used -
0orfalseorno- Shading patterns will not be used (default)
Example:
<option name="USE_SHADING_PATTERNS" value="yes"/>
Shading patterns work for rectangular areas only.
Shading patterns are limited for only those areas filled with grayscale color.
There are several patterns hard-coded into AFP backend: 0%, 3.125%, 6.25%, 10%, 12.5%, 20%, 25%, 30%, 37.5%, 40%, 50%, 60%, 62.5%, 70%, 75%, 80%, 87.5%, 90%, 95%, and 100%. If greyscale value does not exactly match any of listed values, the closest match will be used.
Shading patterns, as all bilevel images, are mixed with their background. Their white points appear transparent.
-
-
USE_REPLICATE_AND_TRIM specifies if "replicate-and-trim" feature will be used for shading patterns.
-
1ortrueoryes- "replicate-and-trim" is used -
0orfalseorno- "replicate-and-trim" is not used (default)
If set to "
no", shading pattern raster image will be created for entire dimensions of rectangle. If set to "yes", only 8x8 pixels image will be created. Thus, this feature significantly reduces size of documents with shading patterns enabled, and produces best quality.Example:
<option name="USE_REPLICATE_AND_TRIM" value="yes"/>
This option applies only if USE_SHADING_PATTERNS equals to
true."Replicate-and-trim" feature is not supported by every AFP device, so it should be turned
offfor older printers without support of this feature. -
-
SHADING_PATTERN_RESOLUTION defines zoom factor for shading pattern raster.
(Default: 1.0)
Can contain any positive decimal value greater than
0and no greater than1Example:
<option name="SHADING_PATTERN_RESOLUTION" value="0.25"/>
Shading pattern raster image size is limited to 32kbytes. Thus, if the resolution is set high, it may exceed this limit. To avoid this, SHADING_PATTERN_RESOLUTION defines divider for actual raster size. For example, if rectangle area size is 1000x1000 px and SHADING_PATTERN_RESOLUTION is set to
0.25(25%), AFP Backend will produce raster image of size 250*250, and command AFP to stretch it to required dimensions. Note that quality of0.25(1/4) will produce raster image 16 times smaller.This option applies only if USE_SHADING_PATTERNS equals to
trueand USE_REPLICATE_AND_TRIM equals tofalse. -
TRY_USING_TIFF_COMPRESSION option allows the user to specify whether AFP backend attempts to compress shading patterns raster images with TIFF encoding.
-
1ortrueoryes- AFP Backend attempts to compress shading pattern rasters (default) -
0orfalseorno- AFP Backend does not attempt to compress shading pattern rasters
Example:
<option name="TRY_USING_TIFF_COMPRESSION" value="yes"/>
Some rasters cannot be compressed with TIFF. In this case, uncompressed raster image is sent to output. Hard-coded rasters are known to be compressible or not, so AFP Backend does not try to compress uncompressible ones.
The only reason to set this value to "
no" is when your AFP device does not support TIFF compression.This option applies only if USE_SHADING_PATTERNS equals to
trueand USE_REPLICATE_AND_TRIM equals tofalse. -
XEP allows configuring which Native data types will be put to AFP data stream without recompressing the raster.
The element <data-types> is a container for Native data types configuration. Its attribute default-name defines which algorithm will be used for thos formats that are not configured as native.
Each Data type is configured within <data-type> element. It has the following attributes:
-
name- verbose name of data type. The attributenamecontains any string value and must be unique. -
allow-instream- whether the data type is allowed in AFP data stream.1ortrueoryes- Data type is allowed (default)0orfalseorno- Data type is not allowed
-
compression-codedefining one-byte numeric value of AFP compression code; may be decimal or hexadecimal; Required; -
recording-codedefining one-byte numeric value of AFP recording code; may be decimal or hexadecimal; Required;
Data type definition contains the following child elements:
-
List of MIME-types associated with the Data type, represented
<mime-type>element;
Each MIME-type is configured within <mime-type> element. It has the following attributes:
-
code- verbose code of MIME-type. The attributecodecontains any string value and must be unique across all<data-type>elements.
The following example demonstrates how to configure necessary Data types for AFP generator:
<data-types default-name="G4 MMR">
  <data-type name="Uncompressed" allow-instream="true"
    compression-code="0x03" recording-code="0x01">
  </data-type>
  <data-type name="G4 MMR" allow-instream="true"
    compression-code="0x82" recording-code="0x01">
  </data-type>
  <data-type name="JPEG" allow-instream="true"
    compression-code="0x83" recording-code="0x01">
    <mime-type code="image/jpeg" />
    <mime-type code="jpeg" />
  </data-type>
</data-types>
See Image Encoding section of I:OCA Reference (Chapter 5, page 35) for list of compatible AFP image formats.
See Section 6.3.1 section for more information about native image formats.
-
AFPLogLevel option lets users turn on output of additional information related to internal details of processing document elements in AFP generator. This information has various levels of detail, from 0 to 2.
-
0- AFP logging is turned off (default) -
1- AFP generator prints only warnings -
2- AFP generator prints warnings and information messages
Example:
<option name="AFPLogLevel" value="0"/>
-
-
RESOURCE option lets users turn on generating AFP resources (images, graphics, etc.) into separate resource file. If specified, this option should target to particular file name. If omitted, all resources are put within the main AFP output document
Default: (empty string)
Example:
<option name="RESOURCE" value="myresourcefile.afp.res"/>
Resource file is always rewritten, never appended.
-
RESOLUTION defines which document resolution will be output within the document. It must be positive integer value supported by target AFP device.
Default: 1440
Example:
<option name="RESOLUTION" value="1440"/>
-
AFPGrayImage option is obsolete. Use
default-nameattribute of<data-types>element to define default compression algorithm. -
USE_PTOCA_LEVEL defines maximal level of PT:OCA commands subset.
-
1- Use PT1 only (default) -
2- Use PT1 and PT2 only -
3- Use PT1, PT2, and PT3 subsets
Example:
<option name="USE_PTOCA_LEVEL" value="3"/>
Different AFP-capable devices support different command subsets. In order to comply with this difference and provide maximum compatibility while keeping highest quality and performance, this option must be set according current printer capabilities.
Please refer Presentation Text Object Content Architecture Reference for more details on specific commands belonging to various PT:OCA subsets.
-
-
USE_GOCA_LEVEL defines maximal level of G:OCA commands subset.
-
0- Do not use G:OCA commands (default) -
1- Use Level 1 only -
3- Use Levels 1 and 3
Example:
<option name="USE_GOCA_LEVEL" value="1"/>
Different AFP-capable devices may or may not support G:OCA command subsets. In order to provide maximum compatibility, this option must be set according current printer capabilities.
Please refer Section 6.5 for more details on G:OCA implementation in XEP AFP Generator.
-
-
USE_BCOCA_LEVEL defines maximal level of BC:OCA commands subset.
-
0- Do not use BC:OCA commands (default) -
1- Use Level 1 only
Example:
<option name="USE_BCOCA_LEVEL" value="1"/>
Set this parameter to
1in order to enable generating BC:OCA data within output stream.Please refer Section 6.6 for more details on supported barcode types and barcodes implementation notes in XEP AFP Generator.
-
AFP Backend supports several ways to produce bulleted text.
-
Using external image
In order to use image approach, you should define <fo:list-item-label> section as in sample below (assuming you have bullet.png file in the same folder with FO file):
<fo:list-item-label end-indent="label-end()"> <fo:block> <fo:external-graphic src="url(bullet.png)" content-height="100%" content-width="100%"/> </fo:block> </fo:list-item-label> -
Using special Unicode symbol.
A special symbol can be used, like in sample below:
<fo:list-item-label end-indent="label-end()"> <fo:block>°</fo:block> </fo:list-item-label>
Note:
Unicode character used for text bullets must belong to any of Character Sets configured. The most common Unicode characters
0x2022and0x2023used for circle and triangle bullets belong to General Punctuation Unicode Character Set. -
Using SVG primitive
SVG opens bigger variety of possible bullets. This may include circles, diamonds, stars, and other shapes (filled and not filled ones). They also can be enchanced with effects like shadows, outline, and more.
Here is an example of plain filled square bullet using SVG:
<fo:list-item-label start-indent="18pt" text-indent="0pt">
  <fo:block>
    <fo:instream-foreign-object display-align="center">
      <svg:svg width="6pt" height="6pt">
        <svg:rect x="1" y="1" width="5pt" height="5pt"
                fill="black"/>
      </svg:svg>
    </fo:instream-foreign-object>
  </fo:block>
</fo:list-item-label>
Other approaches have not been tested and are not supported. Please refer Section 6.11 for more details.
AFP Generator for XEP has multilanguage support. For each character in text blocks, it detects Character Set the character belongs to (out of character sets listed in configuration file). After that, it uses conversion table to convert the character to the CodePage that AFP device is capable to process.
Here is the description how AFP generator for XEP finds out which Codepage to use.
The source Unicode string is analyzed by characters.
For each of them, AFP generator determines Character Set (<character> element in config file) the character belongs to
(using the Code Ranges listed in configuration file specified in <code-range> elements).
If the range not found, the first configured range is assumed (normally, Base Latin).
After the range is found, AFP generator checks whether the character is specified
within the list of specially translated characters (<character-mapping> element).
If so, the character is translated according to the mapping table (afp attribute).
If not, AFP generator uses Java libraries to map the character to the corresponding
code page (<codepage> element, (name attribute).
After that, it determines if the character belongs the same code page as the previous
one in the same text block. For instance, Chinese and Cyrillic characters cannot reside
in the same AFP tect block due to different encodings.
However, Base Latin may follow the Cyrillic character since Cyrillic code pages usually
contain Latin characters in lower half of codes (0x00-0x7F).
This approach is determined by forcelatin attribute.
Finally, after the string of the same code page is composed, it becomes assigned with
IBM encoded name (ibm-name attribute) and placed to AFPDS stream.
Note:
The number of Character ranges makes significant impact on the above logic performance.
Moreover, even if some characters of the documents will fall into wrong Character Set, they may not be printed in case if the AFP device does not support corresponding code pages.
So, it is strongly recommended to remove unused Character Sets from configuration file in order to obtain best results and productivity.
Note:
PT:OCA bullets seem to be very fast and effective solution, however it strongly depends on the fonts uploaded to the AFP device. So it requires careful attention configuring PT:OCA bullets against the particular target device.
The complete list of Unicode character sets can be found at W3C Web site. Here is the list of most common Unicode Character sets:
| Name | AFP CodePage | Text CodePage | Unicode Characters Range | Comment |
|---|---|---|---|---|
| Basic Latin | T1V10500 | Cp500 | 0x0000-0x007F | Basic Latin is automatically included into all character sets |
| Latin-1 | T1000819 | Cp819 | 0x0080-0x00FF | Contains umlaut characters for Western-European languages |
| Hebrew | T1000424 | Cp424 | 0x0590-0x05FF | Contains characters for Hebrew |
| Greek/Coptic | T1000875 | Cp875 | 0x0370-0x03FF | Contains characters for Greek language |
| Cyrillic | T1000866 | Cp866 | 0x0400-0x04FF | Contains characters for Cyrillic languages |
| Chinese | T1094700 | Cp950 | 0x4E00-0x9FFF | Contains characters for Chinese language (simplified) |
Please refer Section 6.8.1 for more details.
-
AFP generator uses precision of 1/20 of point so its precision is 50 times worse than in other XEP backends.
-
AFP generator has limited support of SVG images. For more information about G:OCA implementation please refer Section 6.5.
-
AFP generator does not support lines with styles other than
solid,dashed, anddotted; all other lines looksolidin generated AFP documents. -
AFP generator does not support SVG/G:OCA lines with style other than
solid; all lines looksolidin generated AFP documents. -
AFP generator does not support all styles of XSL FO borders (see above limitation on lines). All other borders are drawn as
solidlines. -
AFP generator does not support some of XEPOUT elments.
-
AFP generator does not support colors other than RGB, Greyscale, CMYK, and Spot (Highlight).
-
Shading option is not supported for Highight color. More details in Highlight Color Support.
-
Image clipping works only for images having the same (or higher) resolution as AFP document.
-
Shading patterns work for rectangular areas only.
-
Shading patterns are limited for only those areas filled with grayscale color.
-
Bilevel images (including shading patterns) are mixed with their background. Their white points appear transparent.
-
AFP backend cannot process strip TIFF images with absent 'RowsPerStrip' tag. 'RowsPerStrip' tag may be absent in TIFF image, although this is not recommended by TIFF Specification (Revision 6.0). This is a limitation of used library, AWT.
-
Custom stylesheets implementing Barcodes MUST produce Barcode alone item within SVG block if barcodes are generated with BC:OCA. For example:
<svg>
  <!-- nothing before desc -->
  <desc />
  <svg:line />      <!-- only lines displaying barcodes -->
  …
  <svg:line />
  <!-- nothing after barcodes’ lines -->
</svg>
-
Ligatures are not supported yet; they are displayed as question marks ("?"). In order to avoid this, ligatures must be disabled for each font used.
-
Code3of9 barcode does not correctly produce characters: dollar sign ($), slash (/), plus (+), and percent (%).
-
Code128 and 4state-AU barcodes may display wrongly in some cases.
-
SVG text support only the following rotation values (in degrees): 0, 90, 180, 270.
-
SVG text enclosed into viewbox may be distorted if zoom factors by X and Y axis are different; In this case, root-mean-square value is used.
-
International Character Set support: Currently, each Character Set has single CodePage and AFP CodePage assigned, and this cannot be configured. More details in International Character Set Support section.
-
Unicode character used for text bullets must belong to any of supported Character Sets. The most common Unicode characters
0x2022and0x2023belonging to General Punctuation Character Set are not supported. -
Currently, XEP does not support outline AFP fonts.
-
Embedding, subsetting and algorithmic slanting of native AFP fonts are not supported.
-
Q: Upon every file I'm trying to process with XEP, the following error is displayed:
"UnsupportedEncodingException: Cp037"
A: By default, JRE is installed without charsets.jar file. This file is required for XEP. Please run JRE installer and check "additional languages support" checkbox.
Note:
Actual checkbox name may vary for different versions of JRE.
-
Q: After upgrading to XEP 4.19, text in AFP seems garbled; white spaces appear in the middle of words. What's wrong?
A: Briefly, you have to set MERGE_WHITE_SPACE option to the value of
false. See Section 6.8XEP Formatter employs "White Space Tracking" feature in order to produce better printing results.
Effectively, the Formatter splits text into chunks (inside or between the words which stands for Character, Word, and Sentence tracking) and set arbitrary alignment for each chunk individually.
This is quite effective for those formats that are displayed on screen or printed, using exactly the same fonts as those been used for formatting.
It does not work with AFP fonts, however. The fonts used for formatting are TrueType or OpenType, while those residing in AFP printer memory have slightly different metrics.
In case of AFP Viewers, such a problem is also a case due to rounding errors.
XEP 4.18 and earlier purposefully disabled White Space Tracking if they noticed AFP key in the license. This helped AFP printing, but did not work for the customers who print both to AFP and other formats.
Starting from version 4.19, White Space Tracking option is independent on the licenses used.
SVG documents can be generated through the following:
-
XEP Assistant - When formatting the XML file using the XEP Assistant, select SVG as the format, as described in Chapter 3.
-
Command Line - Using the command line, SVG documents can be generated.
-
To generate an SVG document, use the parameter -svg:
-svg <svg document file name>
For more information, please refer to Chapter 4.
-
SVG generator supports PNG, JPEG, GIF, SVG/SVGZ and XEPOUT images.
Notes on SVG support in SVG generator:
-
For an SVG image to be processed, it must have an intrinsic size. If
heightorwidthare expressed in unsupported units or missing, aviewBoxattribute must be present: the intrinsic size is determined by the viewBox, assuming 1 user space unit = 1 pixel. If SVG image has no phisical size specified the result is undefined. -
SVG image
heightandwidthcan be expressed in the following units:px, pc, pt, cm, mm, in. Other unit identifiers are not supported.
CMYK, grayscale, spot and registration colors will be rendered into RGB equivalent
Configuration of the SVG generator is performed in a usual way all XEP generators are configured. All configuration options for SVG generator are child elements of XEP configuration file element <generator-options format="SVG">. Each SVG generator configuration option is an element option and looks like
<option name="OPTION_NAME" value="OPTION_VALUE"/>.
EMBED_IMAGES, BREAK_PAGES and GENERATE_FIRST_N_PAGES options can be passed to SVG generator.
Note:
SVG parameters can be set in three different ways, depending on your specific needs:
-
Configuration file - in this case, the parameter value applies to all documents processed with this configuration file.
-
Environment variable (Generator option) - passed within command line and applies for current run of XEP. Generator option value overrides Configuration file values.
-
Processing Instruction - passed within Processing Instruction (PI) inside XSL:FO document. Please refer Output Format Settings section for more details on processing instructions. Processing Instruction value overrides Generator option and Configuration file values.
SVG generator's prefix for Generator options is H4SVG. So, EMBED_IMAGES parameter will look like this:
-DH4SVG.EMBED_IMAGES=true
SVG generator's prefix for Processing instructions is xep-svg-. So, EMBED_IMAGES parameter will look like this:
<?xep-svg-embed-images true?>
Processing Instruction may appear at document level or page level.
-
SVG generator does not support lines with styles other than
solid,dashed, anddotted; all other lines looksolidin generated SVG documents. -
SVG generator does not support all styles of XSL FO borders (see above limitation on lines). All other borders are drawn as
solidlines. -
SVG generator does not support internal and external bookmarks.
-
SVG generator does not support font embedding and subsetting, so if the specified font is not present in the system, the text may look different.
XPS documents can be generated through the following:
-
XEP Assistant - When formatting the XML file using the XEP Assistant, select XPS as the format, as described in Chapter 3.
-
Command Line - XPS documents can be generated using the command line.
-
To generate an XPS document, use the parameter -xps:
-xps <xps document file name>
For more information, please refer to Chapter 4.
-
CMYK, grayscale, spot and registration colors will be rendered into RGB equivalents
-
XPS generator does not support GIF images
-
XPS generator does not support Type1 fonts embedding.
-
If a CID OpenType font is embedded into an XPS document, the Microsoft standalone XPS viewer reports an error, and refuses to show it. But Internet Explorer XPS viewer plugin shows the document correctly.
-
XPS generator does not support letter spacing and word spacing.
-
XPS generator does not support show-destination attribute for links.
-
XPS specification requires that all fonts used in document must be embedded, thus the files containing font outlines must be specified in XEP configuration file.
XHTML documents can be generated through the following:
-
XEP Assistant - When formatting the XML file using the XEP Assistant, select HTML as the format, as described in Chapter 3.
-
Command Line - Using the command line, XHTML documents can be generated.
-
To generate an XHTML document, use the parameter -html:
-html <xhtml document file name>
For more information, please refer to Chapter 4.
-
XHTML generator supports PNG, JPEG, GIF, SVG/SVGZ, XEPOUT images.
Notes on SVG/SVGZ support in XHTML generator:
-
For an SVG image to be processed, it must have an intrinsic size.
-
SVG image
heightandwidthcan be expressed in the following units:px, pc, pt, cm, mm, in. Other unit identifiers are not supported. Unspecified units also are not supported.
CMYK, grayscale, spot and registration colors will be rendered into RGB equivalent.
Starting from version 4.19, XEP is able to produce XHTML with XForms 1.1. This feature is
controlled by a special license key file.
The <pdf-form-field> extension element with it's
descendants describes a single field in the XForm. See the Section B.18
part for more information.
In case of XForms value of js-* attributes is
required to match the value of its related properties in XForm specification
(i.e. XPath expression). Input attributes js-format and
js-keystroke correspond to the property type
in the field's binding element of the output XForm model. The attribute js-validate
corresponds to the property constraint, and the attribute
js-calculate - to the property calculate
in the field's binding element of the output XForm model.
Since all form fields are collected in fields root element at output XForm
model, addressing to the form's field should be /fields/user_field_name
or ../user_field_name in XPath expressions.
Note:
For XForms to work properly, file extension should be .xhtml
Configuration of the XHTML generator is performed in a usual way all XEP generators are configured. All configuration options for XHTML generator are child elements of XEP configuration file element <generator-options format="HTML">. Each XHTML generator configuration option is an element option and looks like
<option name="OPTION_NAME" value="OPTION_VALUE"/>.
EMBED_IMAGES, BREAK_PAGES, GENERATE_FIRST_N_PAGES and XFORMS options can be passed to XHTML generator.
Note:
XHTML parameters can be set in three different ways, depending on your specific needs:
-
Configuration file - in this case, the parameter value applies to all documents processed with this configuration file.
-
Environment variable (Generator option) - passed within command line and applies for current run of XEP. Generator option value overrides Configuration file values.
-
Processing Instruction - passed within Processing Instruction (PI) inside XSL:FO document. Please refer Output Format Settings section for more details on processing instructions. Processing Instruction value overrides Generator option and Configuration file values.
XHTML generator's prefix for Generator options is H4HTML. So, EMBED_IMAGES parameter will look like this:
-DH4HTML.EMBED_IMAGES=true
XHTML generator's prefix for Processing instructions is xep-html-. So, EMBED_IMAGES parameter will look like this:
<?xep-html-embed-images true?>
Processing Instruction may appear at document level or page level.
-
XHTML generator supports only vertical and horizontal lines.
-
XHTML generator does not support
rotate,polygon,internal-bookmarkandexternal-bookmarkXEPOUT elments. Therefore the following XSL FO features are unavailable: borders, reference orientation and bookmarks. -
XHTML generator does not support font embedding and subsetting, so if the specified font is not present in the system, the text may look different.
-
If BREAK_PAGES option value is true, XForms output is not produced.
-
XForms producer does not support
<pdf-javascript>extension element. -
XForms producer does not support
noexportextension attribute. -
XForms producer supports only
js-format,js-keystroke,js-validateandjs-calculateJavaScript attributes.
XEP PPML Generator produces compressed (zipped) stream, which contains the PPML file itself (ppml.ppml), single-page documents of selected target format, and resources (images). A typical structure of the output looks likes the following:
Archive:  examples/hammer/hammer.ppml.zip
  Length      Date    Time    Name
---------  ---------- -----   ----
    13859  2010-03-20 19:58   p-1.ps
    10559  2010-03-20 19:58   p-2.ps
    13178  2010-03-20 19:58   resources/3C930583962468B4D703279B9434B040
    11324  2010-03-20 19:58   resources/EF7F83D0E38E530AA594BE2F0481A979
    30007  2010-03-20 19:58   p-3.ps
     3440  2010-03-20 19:58   resources/72B960DC67902BA55E8AE7CEFD38EE55
     4050  2010-03-20 19:58   resources/2B1239042024CB27DD37A5072BE22AC5
     5086  2010-03-20 19:58   resources/147B5BE21F3BED972AFD492D9FC104DC
     5352  2010-03-20 19:58   resources/6ABEBDF9A745C573723CF368BC4C782D
     6872  2010-03-20 19:58   resources/5EECE4084815E05A11D8055F672846EC
    37873  2010-03-20 19:58   p-4.ps
    21729  2010-03-20 19:58   p-5.ps
     4912  2010-03-20 19:58   ppml.ppml
---------                     -------
   168241                     13 files
Note that the default file naming scheme in command-line xep script is that the output file name extension matches the output format. In case of PPML generator, the command line invocation
$ ./xep -fo examples/basic/color.fo -ppmlwill create a file "examples/basic/color.ppml", which in fact is a zip file of the structure similar to the one shown above. For clarity users are encouraged to specify the ouput file name explicitly:
$ ./xep -fo examples/basic/color.fo -ppml examples/basic/color.ppml.zip
The file "ppml.ppml" complies with the PPML 2.2 specification ( http://ppml.podi.org/component/option,com_docman/Itemid,81/task,doc_download/gid,4/) and the DTD ( http://www.podi.org/ppml/ppml220.dtd).
PPML documents can be generated through the following:
-
XEP Assistant - When formatting the XML file using the XEP Assistant, select PPML as the format, as described in Chapter 3.
-
Command Line - Using the command line, PPML documents can be generated.
-
To generate an PPML document, use the parameter -ppml:
-ppml <ppml document file name>
For more information, please refer to Chapter 4.
-
To set PPML document internal pages format use the parameter -DH4PPML.TARGET_FORMAT:
-DH4PPML.TARGET_FORMAT=<PS or PDF>
-
To generate PPML document, compatible with the Graphic Arts Conformance Specification (Level 1 or 2), use the parameter -DH4PPML.GA_LEVEL:
-DH4PPML.GA_LEVEL=<1 or 2>
Note:
You can set -1 as the value of -DH4PPML.GA_LEVEL to avoid processing images as resources entirely: all images will be passed to the target format generators and appear in pages rather than resources.
Alternatively, you can use the configuration file entries. For more details, refer to Section 10.3.
-
PPML generator supports all image formats, which are supported by the chosen target format generator.
Notes on Graphic Arts Level:
-
An image may be included in PPML zip stream as a resource only once, and referenced from the ppml.ppml file multiple times. This allows for reduced output size and improved performance. This feature is very useful for repeating images, like corporate logos, headers, footers, etc.
Note:
In PDF or PS backend you can generate a text/image mixed context (for example, text written on top of image). PPML, however, does not support such behaviour Use GA_LEVEL=-1 as noted above if you need complex overlayed design, but you will lose the benefits of reusable resources. -
If GA_LEVEL not set or set to zero, then all images are included in PPML document as zip-entrees in internal resources folder.
-
If GA_LEVEL is set to 1 or 2, then only JPEG and TIFF images are included in PPML zip stream as resources. All other images are processed by selected target format generator.
Configuration of the PPML generator is performed in a usual way all XEP generators are configured. All configuration options for PPML generator are child elements of XEP configuration file element <generator-options format="PPML">. Each PPML generator configuration option is an element option and looks like
<option name="OPTION_NAME" value="OPTION_VALUE"/>.
TARGET_FORMAT and GA_LEVEL options can be passed to PPML generator.
Note:
PPML parameters can be set in three different ways, depending on your specific needs:
-
Configuration file - in this case, the parameter value applies to all documents processed with this configuration file.
-
System property - passed within command line and applies for current run of XEP. System property value overrides Configuration file values.
-
Processing Instruction - passed within Processing Instruction (PI) inside XSL-FO document. Please refer Output Format Settings section for more details on processing instructions. Processing Instruction value overrides System properties and Configuration file values.
PPML generator's prefix for System properties is H4PPML. So, TARGET_FORMAT parameter will look like this:
-DH4PPML.TARGET_FORMAT="PDF"
PPML generator's prefix for processing instructions is xep-ppml-. So, TARGET_FORMAT processing instruction will look like this:
<?xep-ppml-target-format PDF?>
Processing Instruction may appear only at document level, before <fo:root>.
This section contains the following topics:
This appendix describes the implementation of XSL Formatting Objects in XEP — an XSL Engine for PDF developed by RenderX, Inc, version 4.31.1348. It lists all supported formatting objects and their properties, provides information about fallbacks for unsupported objects and discusses details of interpretation of XSL specifications adopted in the engine.
Note:
XEP implements Extensible Stylesheet Language version 1.0 as specified in the XSL 1.0 Recommendation of October 15, 2001.
See also Appendix B.
| § | Object Name | Supported |
|---|---|---|
| 6.4.2 | <fo:root> |
Yes |
| 6.4.3 | <fo:declarations> |
No |
| 6.4.4 | <fo:color-profile> |
No |
| 6.4.5 | <fo:page-sequence> |
Yes |
| 6.4.6 | <fo:layout-master-set> |
Yes |
| 6.4.7 | <fo:page-sequence-master> |
Yes |
| 6.4.8 | <fo:single-page-master-reference> |
Yes |
| 6.4.9 | <fo:repeatable-page-master-reference> |
Yes |
| 6.4.10 | <fo:repeatable-page-master-alternatives> |
Yes |
| 6.4.11 | <fo:conditional-page-master-reference> |
Yes |
| 6.4.12 | <fo:simple-page-master> |
Yes |
| 6.4.13 | <fo:region-body> |
Yes |
| 6.4.14 | <fo:region-before> |
Yes |
| 6.4.15 | <fo:region-after> |
Yes |
| 6.4.16 | <fo:region-start> |
Yes |
| 6.4.17 | <fo:region-end> |
Yes |
| 6.4.18 | <fo:flow> |
Yes |
| 6.4.19 | <fo:static-content> |
Yes |
| 6.4.20 | <fo:title> |
No |
| 6.5.2 | <fo:block> |
Yes |
| 6.5.3 | <fo:block-container> |
Yes |
| 6.6.2 | <fo:bidi-override> |
Yes |
| 6.6.3 | <fo:character> |
Yes |
| 6.6.4 | <fo:initial-property-set> |
Yes |
| 6.6.5 | <fo:external-graphic> |
Yes |
| 6.6.6 | <fo:instream-foreign-object> |
Yes[a] |
| 6.6.7 | <fo:inline> |
Yes |
| 6.6.8 | <fo:inline-container> |
No[b] |
| 6.6.9 | <fo:leader> |
Yes[c] |
| 6.6.10 | <fo:page-number> |
Yes |
| 6.6.11 | <fo:page-number-citation> |
Yes |
| 6.7.2 | <fo:table-and-caption> |
Yes |
| 6.7.3 | <fo:table> |
Yes |
| 6.7.4 | <fo:table-column> |
Yes |
| 6.7.5 | <fo:table-caption> |
Yes |
| 6.7.6 | <fo:table-header> |
Yes |
| 6.7.7 | <fo:table-footer> |
Yes |
| 6.7.8 | <fo:table-body> |
Yes |
| 6.7.9 | <fo:table-row> |
Yes |
| 6.7.10 | <fo:table-cell> |
Yes |
| 6.8.2 | <fo:list-block> |
Yes |
| 6.8.3 | <fo:list-item> |
Yes |
| 6.8.4 | <fo:list-item-body> |
Yes |
| 6.8.5 | <fo:list-item-label> |
Yes |
| 6.9.2 | <fo:basic-link> |
Yes |
| 6.9.3 | <fo:multi-switch> |
- |
| 6.9.4 | <fo:multi-case> |
- |
| 6.9.5 | <fo:multi-toggle> |
- |
| 6.9.6 | <fo:multi-properties> |
- |
| 6.9.7 | <fo:multi-property-set> |
- |
| 6.10.2 | <fo:float> |
Yes[d] |
| 6.10.3 | <fo:footnote> |
Yes |
| 6.10.4 | <fo:footnote-body> |
Yes |
| 6.11.2 | <fo:wrapper> |
Yes |
| 6.11.3 | <fo:marker> |
Yes[e] |
| 6.11.4 | <fo:retrieve-marker> |
Yes |
|
[a] [b] All content is placed inline. [c] In this version, only plain text can be put inside
leaders with [d] Top-floats ( [e] In the current version, markers cannot be specified as
children of |
||
| § | Property Name | Implemented |
|---|---|---|
| 7.4.1 | source-document |
No |
| 7.4.2 | role |
No |
| 7.5.1 | absolute-position |
Yes[a] |
| 7.5.2 | top |
Yes |
| 7.5.3 | right |
Yes |
| 7.5.4 | bottom |
Yes |
| 7.5.5 | left |
Yes |
| 7.6.1 | azimuth |
- |
| 7.6.2 | cue-after |
- |
| 7.6.3 | cue-before |
- |
| 7.6.4 | elevation |
- |
| 7.6.5 | pause-after |
- |
| 7.6.6 | pause-before |
- |
| 7.6.7 | pitch |
- |
| 7.6.8 | pitch-range |
- |
| 7.6.9 | play-during |
- |
| 7.6.10 | richness |
- |
| 7.6.11 | speak |
- |
| 7.6.12 | speak-header |
- |
| 7.6.13 | speak-numeral |
- |
| 7.6.14 | speak-punctuation |
- |
| 7.6.15 | speech-rate |
- |
| 7.6.16 | stress |
- |
| 7.6.17 | voice-family |
- |
| 7.6.18 | volume |
- |
| 7.7.1 | background-attachment |
Yes |
| 7.7.2 | background-color |
Yes |
| 7.7.3 | background-image |
Yes |
| 7.7.4 | background-repeat |
Yes |
| 7.7.5 | background-position-horizontal |
Yes[b] |
| 7.7.6 | background-position-vertical |
Yes[b] |
| 7.7.7 | border-before-color |
Yes |
| 7.7.8 | border-before-style |
Yes |
| 7.7.9 | border-before-width |
Yes |
| 7.7.10 | border-after-color |
Yes |
| 7.7.11 | border-after-style |
Yes |
| 7.7.12 | border-after-width |
Yes |
| 7.7.13 | border-start-color |
Yes |
| 7.7.14 | border-start-style |
Yes |
| 7.7.15 | border-start-width |
Yes |
| 7.7.16 | border-end-color |
Yes |
| 7.7.17 | border-end-style |
Yes |
| 7.7.18 | border-end-width |
Yes |
| 7.7.19 | border-top-color |
Yes |
| 7.7.20 | border-top-style |
Yes |
| 7.7.21 | border-top-width |
Yes |
| 7.7.22 | border-bottom-color |
Yes |
| 7.7.23 | border-bottom-style |
Yes |
| 7.7.24 | border-bottom-width |
Yes |
| 7.7.25 | border-left-color |
Yes |
| 7.7.26 | border-left-style |
Yes |
| 7.7.27 | border-left-width |
Yes |
| 7.7.28 | border-right-color |
Yes |
| 7.7.29 | border-right-style |
Yes |
| 7.7.30 | border-right-width |
Yes |
| 7.7.31 | padding-before |
Yes |
| 7.7.32 | padding-after |
Yes |
| 7.7.33 | padding-start |
Yes |
| 7.7.34 | padding-end |
Yes |
| 7.7.35 | padding-top |
Yes |
| 7.7.36 | padding-bottom |
Yes |
| 7.7.37 | padding-left |
Yes |
| 7.7.38 | padding-right |
Yes |
| 7.8.2 | font-family |
Yes |
| 7.8.3 | font-selection-strategy |
Yes |
| 7.8.4 | font-size |
Yes |
| 7.8.5 | font-stretch |
Yes |
| 7.8.6 | font-size-adjust |
Yes |
| 7.8.7 | font-style |
Yes |
| 7.8.8 | font-variant |
No |
| 7.8.9 | font-weight |
Yes |
| 7.9.1 | country |
No |
| 7.9.2 | language |
Yes |
| 7.9.3 | script |
No |
| 7.9.4 | hyphenate |
Yes |
| 7.9.5 | hyphenation-character |
Yes |
| 7.9.6 | hyphenation-push-character-count |
Yes |
| 7.9.7 | hyphenation-remain-character-count |
Yes |
| 7.10.1 | margin-top |
Yes |
| 7.10.2 | margin-bottom |
Yes |
| 7.10.3 | margin-left |
Yes |
| 7.10.4 | margin-right |
Yes |
| 7.10.5 | space-before |
Yes |
| 7.10.6 | space-after |
Yes[c] |
| 7.10.7 | start-indent |
Yes |
| 7.10.8 | end-indent |
Yes |
| 7.11.1 | space-end |
Yes |
| 7.11.2 | space-start |
Yes |
| 7.12.1 | relative-position |
No |
| 7.13.1 | alignment-adjust |
Yes |
| 7.13.2 | alignment-baseline |
Yes |
| 7.13.3 | baseline-shift |
Yes |
| 7.13.4 | display-align |
Yes |
| 7.13.5 | dominant-baseline |
Yes |
| 7.13.6 | relative-align |
Yes[d] |
| 7.14.1 | block-progression-dimension |
Yes |
| 7.14.2 | content-height |
Yes[e] |
| 7.14.3 | content-width |
Yes[e] |
| 7.14.4 | height |
Yes |
| 7.14.5 | inline-progression-dimension |
Yes |
| 7.14.6 | max-height |
No[f] |
| 7.14.7 | max-width |
No[g] |
| 7.14.8 | min-height |
No[h] |
| 7.14.9 | min-width |
No[i] |
| 7.14.10 | scaling |
Yes |
| 7.14.11 | scaling-method |
No |
| 7.14.12 | width |
Yes |
| 7.15.1 | hyphenation-keep |
No |
| 7.15.2 | hyphenation-ladder-count |
No |
| 7.15.3 | last-line-end-indent |
Yes |
| 7.15.4 | line-height |
Yes |
| 7.15.5 | line-height-shift-adjustment |
Yes |
| 7.15.6 | line-stacking-strategy |
Yes |
| 7.15.7 | linefeed-treatment |
Yes[j] |
| 7.15.8 | white-space-treatment |
Yes |
| 7.15.9 | text-align |
Yes[k] |
| 7.15.10 | text-align-last |
Yes |
| 7.15.11 | text-indent |
Yes |
| 7.15.12 | white-space-collapse |
Yes[l] |
| 7.15.13 | wrap-option |
Yes |
| 7.16.1 | character |
Yes |
| 7.16.2 | letter-spacing |
Yes |
| 7.16.3 | suppress-at-line-break |
No |
| 7.16.4 | text-decoration |
Yes |
| 7.16.5 | text-shadow |
Yes[m] |
| 7.16.6 | text-transform |
Yes[n] |
| 7.16.7 | treat-as-word-space |
No |
| 7.16.8 | word-spacing |
Yes |
| 7.17.1 | color |
Yes |
| 7.17.2 | color-profile-name |
No |
| 7.17.3 | rendering-intent |
No |
| 7.18.1 | clear |
Yes |
| 7.18.2 | float |
Yes[o] |
| 7.18.3 | intrusion-displace |
Yes[p] |
| 7.19.1 | break-after |
Yes |
| 7.19.2 | break-before |
Yes |
| 7.19.3 | keep-together |
Yes[q] |
| 7.19.4 | keep-with-next |
Yes[q] |
| 7.19.5 | keep-with-previous |
Yes[q] |
| 7.19.6 | orphans |
Yes |
| 7.19.7 | widows |
Yes |
| 7.20.1 | clip |
No |
| 7.20.2 | overflow |
Yes[r] |
| 7.20.3 | reference-orientation |
Yes |
| 7.20.4 | span |
Yes |
| 7.21.1 | leader-alignment |
No |
| 7.21.2 | leader-pattern |
Yes |
| 7.21.3 | leader-pattern-width |
Yes |
| 7.21.4 | leader-length |
Yes |
| 7.21.5 | rule-style |
Yes |
| 7.21.6 | rule-thickness |
Yes |
| 7.22.1 | active-state |
- |
| 7.22.2 | auto-restore |
- |
| 7.22.3 | case-name |
- |
| 7.22.4 | case-title |
- |
| 7.22.5 | destination-placement-offset |
No |
| 7.22.6 | external-destination |
Yes[s] |
| 7.22.7 | indicate-destination |
No |
| 7.22.8 | internal-destination |
Yes |
| 7.22.9 | show-destination |
Yes[t] |
| 7.22.10 | starting-state |
- |
| 7.22.11 | switch-to |
- |
| 7.22.12 | target-presentation-context |
- |
| 7.22.13 | target-processing-context |
- |
| 7.22.14 | target-stylesheet |
- |
| 7.23.1 | marker-class-name |
Yes |
| 7.23.2 | retrieve-class-name |
Yes |
| 7.23.3 | retrieve-position |
Yes |
| 7.23.4 | retrieve-boundary |
Yes |
| 7.24.1 | format |
Yes |
| 7.24.2 | grouping-separator |
No |
| 7.24.3 | grouping-size |
No |
| 7.24.4 | letter-value |
No |
| 7.25.1 | blank-or-not-blank |
Yes |
| 7.25.2 | column-count |
Yes |
| 7.25.3 | column-gap |
Yes |
| 7.25.4 | extent |
Yes |
| 7.25.5 | flow-name |
Yes |
| 7.25.6 | force-page-count |
Yes[u] |
| 7.25.7 | initial-page-number |
Yes |
| 7.25.8 | master-name |
Yes |
| 7.25.9 | master-reference |
Yes |
| 7.25.10 | maximum-repeats |
Yes |
| 7.25.11 | media-usage |
No |
| 7.25.12 | odd-or-even |
Yes |
| 7.25.13 | page-height |
Yes |
| 7.25.14 | page-position |
Yes |
| 7.25.15 | page-width |
Yes |
| 7.25.16 | precedence |
Yes |
| 7.25.17 | region-name |
Yes |
| 7.26.1 | border-after-precedence |
Yes |
| 7.26.2 | border-before-precedence |
Yes |
| 7.26.3 | border-collapse |
Yes |
| 7.26.4 | border-end-precedence |
Yes |
| 7.26.5 | border-separation |
Yes |
| 7.26.6 | border-start-precedence |
Yes |
| 7.26.7 | caption-side |
Yes[v] |
| 7.26.8 | column-number |
Yes |
| 7.26.9 | column-width |
Yes |
| 7.26.10 | empty-cells |
No[w] |
| 7.26.11 | ends-row |
Yes |
| 7.26.12 | number-columns-repeated |
Yes |
| 7.26.13 | number-columns-spanned |
Yes |
| 7.26.14 | number-rows-spanned |
Yes |
| 7.26.15 | starts-row |
Yes |
| 7.26.16 | table-layout |
Yes |
| 7.26.17 | table-omit-footer-at-break |
Yes |
| 7.26.18 | table-omit-header-at-break |
Yes |
| 7.27.1 | direction |
Yes |
| 7.27.2 | glyph-orientation-horizontal |
No |
| 7.27.3 | glyph-orientation-vertical |
No |
| 7.27.4 | text-altitude |
Yes |
| 7.27.5 | text-depth |
Yes |
| 7.27.6 | unicode-bidi |
Yes[x] |
| 7.27.7 | writing-mode |
Yes[y] |
| 7.28.1 | content-type |
Yes |
| 7.28.2 | id |
Yes |
| 7.28.3 | provisional-label-separation |
Yes |
| 7.28.4 | provisional-distance-between-starts |
Yes |
| 7.28.5 | ref-id |
Yes |
| 7.28.6 | score-spaces |
No |
| 7.28.7 | src |
Yes[z] |
| 7.28.8 | visibility |
No |
| 7.28.9 | z-index |
Yes[aa] |
| 7.29.1 | background |
Yes |
| 7.29.2 | background-position |
Yes |
| 7.29.3 | border |
Yes |
| 7.29.4 | border-bottom |
Yes |
| 7.29.5 | border-color |
Yes |
| 7.29.6 | border-left |
Yes |
| 7.29.7 | border-right |
Yes |
| 7.29.8 | border-style |
Yes |
| 7.29.9 | border-spacing |
Yes |
| 7.29.10 | border-top |
Yes |
| 7.29.11 | border-width |
Yes |
| 7.29.12 | cue |
- |
| 7.29.13 | font |
Yes |
| 7.29.14 | margin |
Yes |
| 7.29.15 | padding |
Yes |
| 7.29.16 | page-break-after |
Yes |
| 7.29.17 | page-break-before |
Yes |
| 7.29.18 | page-break-inside |
Yes |
| 7.29.19 | pause |
- |
| 7.29.20 | position |
Yes |
| 7.29.21 | size |
Yes |
| 7.29.22 | vertical-align |
Yes |
| 7.29.23 | white-space |
Yes |
| 7.29.24 | xml:lang |
No |
|
[a] [b] When the background image is repeated along an axis, its offset on this axis is ignored. [c] [d] Supported on [e] The values
[f] Maps to [g] Maps to [h] Maps to [i] Maps to [j] Value
[k] [l] This property does not work on inlines. [m] Blurred shadows are not supported; blur radius is ignored. [n] To transform a Unicode character to uppercase/lowercase, XEP uses methods provided by the runtime (Java or .NET). In order for this property to work as expected, you should use correct Unicode values for glyphs in your fonts, and set up local information in your environment properly. [o] Two additional values, [p] [q] .within-page component is
unsupported; it is mapped to
.within-column. Only
[r] Supported on side floats and absolutely positioned and
rotated block-containers with fixed dimensions. When
[s] In PDF and PostScript generators, URLs starting with
explicit [t] [u] Value domain [v] Only [w] In the current implementation, all cells present in the source document are shown regardless of whether their content is empty; cells not presented in the source aren't visible at all. [x] Bidi implementation differs from Unicode Bidi
algorithm: any markup element opens a new level of
embedding. Consequently, [y] Only [z] In addition to protocols provided by the runtime (Java
or .NET), XEP supports [aa] z-index property is supported for block-containers with absolute-position="fixed". |
||
<fo:block>-
According to the specification, an empty block that has a non-null padding and/or border should be visible. XEP suppresses all blocks that have no visible contents regardless of their border or padding attributes.
<fo:bidi-override>-
In the current implementation of bidi algorithm, any markup element opens a new level of embedding. Consequently,
unicode-bidi="normal"is not supported:<fo:bidi-override>behaves as ifunicode-bidi="embed"were specified. <fo:inline-container>-
Unsupported; contents are placed inline.
<fo:multi-switch>,<fo:multi-case>,<fo:multi-toggle>,<fo:multi-properties>,<fo:multi-property-set>-
Unsupported; contents are ignored. These elements deal with interactivity. Since PDF and PostScript are intrinsically static formats, none of them are applicable.
<fo:float>-
The before-float appears at the top of the next page.
<fo:table-caption>-
Only
"before"and"after"captions are implemented. Side captions are treated as follows:caption-side="start"falls back to"before", andcaption-side="end"falls back to"after." <fo:table-footer>-
Table footer repetition is not implemented. The element is drawn once at the end of table.
<fo:table-column>-
In the collapsed border model, only border-start and border-end are supported on
<fo:table-column>elements. <fo:table-row>-
In the collapsed border model, only border-before and border-after are supported on
<fo:table-row>elements. <fo:table-cell>-
If a cell spans multiple rows in a table with a collapsed border model, its border-after is taken from the row where the cell begins.
<fo:leader>-
In this version, leaders with
leader-pattern="use-content"can only contain plain text inside; all formatting is lost. <fo:marker>-
This version cannot process markers specified as children of an
<fo:wrapper>.
XEP implements a subset of XSL algebraic expressions. The following operators and functions are recognized:
-
Arithmetical operators:
+,-,*,div,mod -
floor() -
ceiling() -
round() -
abs() -
max() -
min() -
rgb() -
rgb-icc()(supported partially — see notes below) -
from-nearest-specified-value() -
from-parent() -
from-table-column() -
inherited-property-value() -
proportional-column-width() -
body-start()(standalone use only, cannot be an operand in expressions) -
label-end()(standalone use only, cannot be an operand in expressions)
Function rgb-icc() recognizes four predefined
color profile names: #Grayscale,
#CMYK, #SpotColor, and
#Registration (see details below). For any other
value of the fourth parameter, the function returns the fallback RGB
color. ICC profiles are not supported.
Support for expressions is subject to the following limitations:
-
For compound expressions, the result of evaluation of all intermediate subexpressions must be a valid XSL type. For example, expression
(2in * 2in) div 1inis not supported because its first subexpression yields dimensionality of square inches, which is not a valid XSL unit; while2in * (2in div 1in)works. -
Expressions that require knowledge of layout to evaluate (e.g. Block widths expressed in percentages) can only be used as standalone expressions, not parts of a bigger expression, and cannot be referenced by property-value functions. The same limitation applies to
body-start()andlabel-end()functions. -
Property value functions (
from-nearest-specified-value(),from-parent(),from-table-column(),inherited-property-value()) cannot be used in shorthands, and cannot take shorthand property names as their arguments. -
Property value functions that take
start-indent/end-indentas arguments may not work correctly if the block with indents is placed into another block that has CSS-stylemargin-*attributes. For safety, use either expressions with indents, or CSS margins; mixing these two coding styles in the same stylesheet may yield unpredictable results.
XEP can produce PDF and PostScript output using the following color types:
-
Grayscale. The following specifiers produce grayscale color output:
-
Predefined HTML and SVG names that correspond to RGB values with
R=G=B:white,black,silver,gray,grey,lightgray,lightgrey,darkgray,darkgrey,dimgray,dimgrey,whitesmoke,gainsboro. -
HTML-style RGB values with
R=G=B:#555,#9D9D9D, etc. -
rgb-icc()function with built-in#Grayscalepseudo profile. Gray tone intensity is specified as a real value in the range0.0–1.0, the 5th argument to the function. Example:rgb-icc (128, 128, 128, #Grayscale, 0.5)
-
-
RGB. The following specifiers produce RGB color output:
-
HTML and SVG predefined names, and RGB specifiers that are not mentioned above.
-
rgb()function. Values of color components are specified as real values in the range0.0–255.0. Example:rgb (127.5, 39.86, 255)
-
-
CMYK. The following specifier produce CMYK color output:
-
rgb-icc()function with built-in#CMYKpseudo profile. Ink values are specified as real values in the range0.0–1.0, arguments from 5th to 8th; order of inks iscyan–magenta–yellow–black. Example:rgb-icc (255, 255, 0, #CMYK, 0, 0, 1, 0)
-
-
Spot colors. The following specifiers produce spot color output:
-
rgb-icc()function with built-in#SpotColorpseudo profile. The 5th argument is the colorant name, specified as a string; use quotes if the name contains spaces. The 6th argument is the tint value, specified as a real number in the range0.0–1.0. These mandatory attributes may be followed by an optional specification of the alternate color for the colorant, in either CMYK or grayscale color space: 7th argument is the color space name (either#CMYKor#Grayscale), and the rest are component intensities (1 for grayscale, 4 for CMYK).Note:
The alternate color specifies an equivalent representation for the full colorant intensity. Occurrences of the same spot color with different tints should have the same alternate color specifier.
If the alternate color is not specified, XEP looks it up in SpotColor matching table (path to the table is defined by the
<SPOT_COLOR_TRANSLATION_TABLE>option); if no matches found, black color in grayscale color space is used.Examples:
rgb-icc(255,255,0, #SpotColor,'PANTONE Orange 021 C',0.33)
rgb-icc(255,255,0, #SpotColor,'PANTONE 169 M',0.5, #CMYK,0,0.2,0.2,0)
rgb-icc(255,255,0, #SpotColor,MyColor,0.33, #Grayscale,0.5)
-
-
Registration color. The following specifier produces registration (all-colorants) color output:
-
rgb-icc()function with built-in#Registrationpseudo profile. Tint intensity is specified as a real value in the range0.0–1.0, the 5th argument to the function. Example:rgb-icc (128, 128, 128, #Registration, 0.5)
-
XSL 1.1 Recommendation introduced a number of new features compared to
XSL 1.0. Some of these new features closely match existing RenderX extensions.
Before version 4.19, XEP included an XSLT stylesheet to convert XSL 1.1 elements
and attributes to XSL 1.0 with RenderX extensions. Starting from version 4.19 and later
this conversion is perfomed in Java code for higher perfomance and lower memory
requirements.
The new features of XSL 1.1 that are supported by converting to RenderX extensions are the following:
Since there is no correspondence in RenderX extensions for some elements and attributes from XSL 1.1, they are ignored by XEP core. Following is a list of unsupported XSL 1.1 elements and attributes:
-
<fo:page-sequence-wrapper> -
<fo:flow-map> -
<fo:flow-assignment> -
<fo:flow-source-list> -
<fo:flow-target-list> -
<fo:flow-name-specifier> -
<fo:region-name-specifier> -
<fo:index-page-number-prefix> -
<fo:index-page-number-suffix> -
@index-class -
@merge-ranges-across-index-key-references -
@merge-pages-across-index-key-references -
<fo:scaling-value-citation>
| § | XSL 1.1 Object/Property Name | RenderX Extensions Object/Property Name |
|---|---|---|
| 6.11.1 | <fo:bookmark-tree> |
<rx:outline> |
| 6.11.2 | <fo:bookmark> |
<rx:bookmark> |
| 6.11.3 | <fo:bookmark-title> |
<rx:bookmark-label> |
| 7.23.6 | external-destination |
external-destination |
| 7.23.8 | internal-destination |
internal-destination |
| 7.23.10 | starting-state |
collapse-subtree |
| 7.18.1 | color |
color |
| 7.9.7 | font-style |
font-style |
| 7.9.9 | font-weight |
font-weight |
| § | XSL 1.1 Object/Property Name | RenderX Extensions Object/Property Name |
|---|---|---|
| 6.10.2 | <fo:index-page-number-prefix> |
No correspondence, ignored |
| 6.10.3 | <fo:index-page-number-suffix> |
No correspondence, ignored |
| 6.10.4 | <fo:index-range-begin> |
<rx:begin-index-range> |
| 6.10.5 | <fo:index-range-end> |
<rx:end-index-range> |
| 6.10.6 | <fo:index-key-reference> |
<rx:index-item> |
| 6.10.7 | <fo:index-page-citation-list> |
<rx:page-index> |
| 6.10.8 | <fo:index-page-citation-list-separator> |
list-separator |
| 6.10.9 | <fo:index-page-citation-range-separator> |
range-separator |
| 7.24.1 | index-class
|
No correspondence, ignored |
| 7.24.2 | index-key |
rx:key |
| 7.24.3 | page-number-treatment |
link-back |
| 7.24.4 | merge-ranges-across-index-key-references
|
No correspondence, ignored |
| 7.24.5 | merge-sequential-page-numbers |
merge-subsequent-page-numbers |
| 7.24.6 | merge-pages-across-index-key-references
|
No correspondence, ignored |
| 7.24.7 | ref-index-key |
<rx:index-item>/ref-key |
| 7.30.8 | id |
id |
| 7.30.13 | ref-id |
ref-id |
| § | XSL 1.1 Object Name | RenderX Extensions Object Name |
|---|---|---|
| 6.6.12 | <fo:page-number-citation-last> |
<rx:page-number-citation-last> |
The only required attribute,
ref-id, specifies the id of the element
whose last page number is retrieved.
| § | XSL 1.1 Object Name | RenderX Extensions Object Name |
|---|---|---|
| 6.13.2 | <fo:change-bar-begin> |
<rx:change-bar-begin> |
| 6.13.3 | <fo:change-bar-end> |
<rx:change-bar-end> |
All properties of
<fo:change-bar-begin> and
<fo:change-bar-end> map to themselves.
| § | XSL 1.1 Object Name | XSL 1.0 Object Name |
|---|---|---|
| 6.6.13 | <fo:folio-prefix> |
<the content> |
| 6.6.14 | <fo:folio-suffix> |
<the content> |
The content of
<fo:folio-prefix>
(<fo:folio-suffix>) is added inline before (after)
all occurrences of <fo:page-number>,
<fo:page-number-citation>, and
<fo:page-number-citation-last> referring to
elements in the respective <fo:page-sequence>.
In case of <fo:page-number> it is always
the current page sequence.
Note:
Starting from version 4.19, support for
<fo:folio-prefix> and
<fo:folio-suffix>
on <fo:page-number> is always on.
However, the respective support for these features on
<fo:page-number-citation> and
<fo:page-number-citation-last>,
implemented in Java, requires a second pass, which takes some additional time and
memory
due to existence of forward references.
Starting from version 4.19 the availability of this feature on these referential elements
is controlled by the
ENABLE_FOLIO core option, which is disabled by default.
This section contains the following topics:
- B.1. Document Information
- B.2. Document Outline (Bookmarks)
- B.3. Indexes
- B.4. Flow Sections
- B.5. Last Page Number Reference
- B.6. Change Bars
- B.7. Background Image Scaling and Content Type
- B.8. Initial Destination
- B.9. Omitted Initial Header in Tables
- B.10. Base URI Definition:
xml:base - B.11. Rounded Borders
- B.12. Border and Padding on Regions
- B.13. Floats Alignment
- B.14. Multicolumn Footnotes
- B.15. Unique Footnotes
- B.16. Watermark
- B.17. Transpromo
- B.18. PDF Forms module
- B.19. JavaScript for PDF
- B.20. Multimedia features
- B.21. Rich Media
- B.22. PDF Note Annotations
- B.23. Overprint
- B.24. Barcodes
XEP implements several extensions to the Specification, placed into a separate namespace: xmlns:rx="http://www.renderx.com/XSL/Extensions". They add support for useful functionality that cannot be expressed by XSL Formatting Objects.
This extension permits passing a set of name/value pairs to the
generator of the output format. A typical application is setting PDF
document info fields (‘Author’ and
‘Title’). Implementation uses two extension
elements: <rx:meta-info> and
<rx:meta-field>.
<rx:meta-info>-
This element is merely a container for one or more
<rx:meta-field>elements. It should be the first child of<fo:root>. <rx:meta-field>-
This element specifies a single name/value pair. It has two mandatory attributes:
nameandvalue. Current implementation of the PDF and PostScript generators recognize six possible values forname:-
name="author"-fills the ‘Author’ field in the resulting PDF file with a string specified by thevalueproperty. -
name="creator"- fills the ‘Creator’ field. -
name="title"- fills the ‘Title’ field. -
name="subject"- fills the ‘Subject’ field. -
name="keywords"- fills the ‘Keywords’ field. -
name="publisher"- fills the ‘Publisher’ field (in XMP metadata only).
The ‘Producer’ field in the PDF file is set to the current XEP version (e.g.
"XEP 4.31.1348"); there is no means to control it from the source file. All other values fornameare treated as custom meta-fields and appear in the same dictionaries in PostScript and PDF as predefined meta-fields. Unicode values fornameare not supported.In the PostScript generator module, the document info fields are added using the
pdfmarkoperator. The respective fields are filled when PostScript is converted to PDF using Adobe Acrobat Distiller or GhostScript. -
- XMP Metadata
-
Starting from version 4.18, it is possible to specify name-value pairs
to be inserted directly into XMP metadata of the document.
When the document opened in a PDF viewer, this data will be visible
in document Properties.
This feature is compatible with PDF/A compliance, too.
In order to use XMP metadata, two fields have to be specified first:
-
name="namespace"- specifies URL address of XML namespace which would be used (ex."http://www.renderx.com/XSL/Extensions"). -
name="prefix"- specifies abbreviation of the namespace (ex."rx").
All other
meta-fieldentries would be included into XMP metadata of the document.Example:
<rx:meta-info> <rx:meta-field name="namespace" value="http://www.renderx.com/XSL/Extensions" /> <rx:meta-field name="prefix" value="rx" /> <rx:meta-field name="ConsumerId" value="XXXXXX" /> <rx:meta-field name="Document_ID" value="YYYYYY" /> <rx:meta-field name="Description" value="ZZZZZZ" /> </rx:meta-info> -
Implementation of a document outline uses the following three extension elements:
-
<rx:outline>- The top-level element of the document outline tree. It should be located before any<fo:page-sequence>elements, and after the<fo:layout-master-set>and the<fo:declarations>elements (if present). It contains one or more<rx:bookmark>elements. -
<rx:bookmark>- This element contains information about a single bookmark. It contains a mandatory<rx:bookmark-label>element as its first child, and zero or more nested<rx:bookmark>elements that describe nested bookmarks. Bookmark destination is expressed either byinternal-destinationproperty (for internal navigation), or byexternal-destination(for extra-document links). The initial presentation of the children bookmarks is controlled bycollapse-subtreeattribute. Values are either"true"(collapse children) or"false"(expand children). -
<rx:bookmark-label>- This element contains text of a bookmark label. It must be the first child of its parent<fo:bookmark>. Content of this element should be plain text. The appearance of bookmark label is controlled bycolor,font-styleandfont-weightattributes, introduced in XSL 1.1 and supported in XEP Starting from version 4.19.
Building page number lists for back-of-the-book indexes is a common task. It is relatively easy to collect a list of references to index terms in the text; but then, to turn them into a real index entry, you should exclude repeated page numbers and merge adjacent numbers into ranges. Neither of these two operations can be done in XSL 1.0. Therefore, XEP supports an extension for this purpose.
The task of building an index can be split in two subtasks:
-
Mark up occurrences of index terms in the main text.
-
Specify composition and formatting of page number lists in the index.
In order to mark up occurrences of the index terms in the text,
XEP introduces a special extension attribute:
rx:key. It can be specified on any
element that can take an id
attribute; unlike the latter, it need not be unique across the
document. Its value is used as a key to select elements for the page
number list. For example, an index term to the word "rendering"
might look like this:
The process of converting XSL-FO to a printable format
	is called <fo:inline rx:key="key.render">rendering.</fo:inline>
There is also a mechanism to specify an explicit range, not distinct elements. Two extension elements serve this purpose:
<rx:begin-index-range>-
Starts a range. It takes two attributes, both required:
id-
A unique identifier used to define the limits of the range.
rx:key-
Index key used to select the range into a page number list.
<rx:end-index-range>-
Ends a range. It takes one attribute, required:
ref-id-
A reference to the
idattribute of the<rx:begin-index-range>that started the range.
These two elements always form a pair.
These elements may be located anywhere inside
<fo:flow>; there are no
constraints on their nesting with respect to other elements.
In the index, the actual page reference is created by another
extension element,
<rx:page-index>.
It picks elements from the text by their
rx:key properties,
and produces a sorted list of their page numbers,
eliminating duplicates.
<rx:page-index>
should contain one or more <rx:index-item> elements as
children. Each <rx:index-item> has a required
ref-key attribute, and selects
elements that have an rx:key
attribute with the same value.
A distinct element bearing the appropriate
rx:key value is represented as
follows:
-
If it fits completely onto one page, it is represented as a single page number.
-
If it spans multiple pages, its entry is formatted as a range from the first to the last of the spanned pages.
A range (created by a
<rx:begin-index-range> and
<rx:end-index-range>
element pair) is represented as a range from the page where <rx:begin-index-range> is located
to the page of its matching <rx:end-index-range>.
A basic entry in an index looks like this:
<fo:inline rx:key="key.elephant">Elephants</fo:inline> live in Africa. …
<fo:inline rx:key="key.elephant">African elephants</fo:inline> have big ears …
…
<fo:block text-align="center" font="bold 16pt Futura">INDEX</fo:block>
<fo:block>
    Elephants <rx:page-index>
                   <rx:index-item ref-key="key.elephant"/>
              </rx:page-index>
</fo:block>
There are other attributes of
<rx:index-item>
to control the formatting of the index entry:
range-separator-
Specifies the string used to separate page numbers that form a continuous range. Default is en dash:
"–" (U+2013). merge-subsequent-page-numbers-
Controls whether sequences of adjacent page numbers should be merged into ranges. Default is
"true."Note:
The default value for property
merge-subsequent-page-numberswas"false"before XEP 4.19. However, the matching XSL 1.1 propertymerge-sequential-page-numbershas the default value of"merge". This conflict of defaults has been resolved Starting from version 4.19 in favour of
XSL 1.1, and the default behavior is to merge. link-back-
If set to
"true", page numbers are made into hyperlinks to the corresponding page. Default is"false."
Besides that,
<rx:index-item> can take
additional inline attributes, applied to each page number generated
from this element. This allows for different presentation styles
across the list, e.g. To make references to primary definitions
bold.
Flow sections permit splitting the flow into subflows, with different column counts in each subflow. The following element creates flow sections:
<rx:flow-section>-
This element must be a direct child of
<fo:flow>. It can be mixed with other block-level elements. It takes two attributes: column-count, the number of columns for the subflow, and columngap, the space between the columns.
This extension element retrieves the number of the last page
occupied by a particular element. Its syntax and semantics are similar
to <fo:page-number-citation>.
Note:
This element is described in XSL 1.1 Working Draft of 17 December 2003. In subsequent versions of XEP, it is likely to move to the standard XSL-FO namespace.
XEP has support for change regions, as described in XSL 1.1 Working Draft of December 16, 2004.
<rx:change-bar-begin>,<rx:change-bar-end>-
These elements have exactly the same meaning and properties as listed in the Working Draft for elements
<fo:change-bar-begin>and<fo:change-bar-end>, sections 6.3.12 and 6.3.13, respectively. In future versions of XEP, when XSL 1.1 will become the W3C Recommendation, they will be moved to the standard XSL-FO namespace.
Note:
The content model for these elements is different than the
description in the Working Draft. The Working Draft, Section 6.2,
says the following about change-bar-begin/end elements:
“The following formatting objects are "neutral" containers
and may be used, provided that the additional constraints listed
under each formatting object are satisfied, anywhere where #PCDATA,
%block;, or %inline; are allowed”.” This essentially
forbids change-bar-begin/end elements from
appearing almost anywhere in
the lists or tables, for example, it’s not possible to mark a whole
list-item or table-cell as “changed.” XEP implementation does not
have such limitations, change bar anchors can be placed almost
anywhere in the flow.
In XSL 1.0, there is no provision to scale/size a background image. XEP implements this functionality via the following extension properties:
rx:background-content-height,rx:background-content-width,rx:background-scaling,rx:background-content-type-
These properties have exactly the same semantics as
content-height,content-width,scaling, andcontent-type, respectively. They apply to the image specified inbackground-imageproperty (or insidebackgroundshorthand).
This extension allows you to specify the destination to jump to
when the document is first opened. It uses a single extension
attribute, rx:initial-destination
placed on <fo:root>; its syntax is
the same as the
internal-destination attribute.
This extension permits you to omit a table header at the
beginning of a table. This feature can be used to create "continuation
headers", which are output only on page breaks. It uses a single
extension attribute,
rx:table-omit-initial-header
placed on
<fo:table>. The property has a
Boolean value: "true" or
"false" — same as for
table-omit-header-at-break.
XEP recognizes and processes
xml:base attribute, defined in
XML Base Recommendation.
It permits you to set the base for resolving relative URIs (link
targets, image locations, fonts, hyphenation patterns, etc) for the
whole document or a single subtree.
Note:
The use of xml:base in
XSL is not authorized by the XSL Specification; therefore, this
option should be considered a proprietary extension to XSL.
Starting from version 4.30, it is possible to specify
rx:border-radius attribute extension
for creating rounded corners on block areas.
Minimal Example. To define the properties for all four corners via a single shorthand:
rx:border-radius="10px"
The complete rx:border-radius syntax follows the
border-radius syntax of CSS specification.
Each rounded corner has a shape of a quarter ellipse, which, in turn, is defined by its horizontal and vertical radius.
So there are one to eight length-percentage values, separated by space and/or slash:
<length-percentage>{1,4} [ / <length-percentage>{1,4} ]?
Value types. The values for radii can be specified in absolute units or as a percentage value.
Absolute values can be expressed in the following units:
px, pc, pt, cm, mm, in.
Percentages for the horizontal radius refer to the width of the border box; percentages for the vertical radius refer to the height of the border box.
Other unit identifiers are not supported.
Zero Radii. If either radius for a certain corner is zero, the corner is square, not rounded.
Negative values for either raduis are not supported.
The four values in each group are given in the order top-left, top-right, bottom-right, bottom-left.
If bottom-left is omitted, it is assumed equal to top-right.
If bottom-right is omitted, it is assumed equal to top-left.
If top-right is omitted, it is assumed equal to top-left.
Horizontal and Vertical Radii. The first group (before slash) specify the horizontal radius, and the second group (after slash) set the vertical radius. If the values after slash are skipped, the vertical radii are copied from the respective horizontal ones.
Note:
Unlike the CSS specification mentioned above that supports a syntax
for rounded borders for each individual corner (like
border-top-left-radius),
XEP only accepts the shorthand form of rounded border specification.
Below are several practical examples:
rx:border-radius can be used on tables
along with border-collapse="separate".
Below is a table with rx:border-radius set for the table itself
and for individual cells:
rx:border-radius can be used
with zero borders for shaping the background. The example below demonstrates
a text on a tiled background with rounded corners:

See also: Appendix F for the full set of supported drawables in XEP Intermediate output format.
Limitations.
-
Border-radii support only solid style, no support for dashed or dotted.
-
Borders that are thicker than the radius of the corner (
rx:border-widthis greater thanrx:border-radius) would have no inner radii. -
If a block has different colors of its adjoining borders (e.g., left and top), and one or both borders are Rounded, they may touch in an underined way.
-
rx:border-radiusworks with PDF Forms module, however it doesn't affect the background filling or clipping, except the rounded radio button hack. -
If a block with rounded border breaks on page break, the rounded corners would appear on both pages, which may lead to inconsisten results (e.g., height percentage calculation).
-
Rounded borders are rendered as B?zier curves. Only PDF, PostSript, XPS, and SVG output formats are currently supported.
In the XSL Recommendation, border and padding properties are
permitted on region elements (
<fo:region-body>,
<fo:region-before>,
<fo:region-after>,
<fo:region-start>, and
<fo:region-end>). However, they may accept
values of 0 (sic!).
In XEP, non-zero values of these properties result in a border
around the respective region area,
and its content rectangle is padded by the specified amount.
Note:
When validation strictness level is
2, the validator issues a warning about
nonzero borders and padding on regions.
Floating figures often need to float towards different sides of
the page depending on their parity. However in XSL 1.0 Recommendation
there is no means to achieve such effect. XEP supports two additional
values for float property of the
<fo:float> element. Those values
are: "inside" and
"outside". Their meaning is the same as in
text-align property defined by
XSL 1.0 Recommendation: "inside" value aligns
floating block to the inner edge of the page (left for odd pages,
right for even pages) and "outside" aligns
floating block to the outer edge of the page (right for odd pages,
left for even pages). This functionality is often used to create
margin notes known as "marginalia."
Some documents have many short footnotes per page, and according to the Recommendation all the footnotes are stacked ontop of each other. This results in a lot of white space to the right of the footnotes in footnote-reference-area.
XEP supports two additional attributes:
footnote-column-count and
footnote-column-gap on
<fo:region-body>. They have the same
meaning as
column-count and
column-gap and result in
footnote-reference-area having the required number of columns separated with gaps.
XEP balances the footnotes among the columns in footnote-reference-area,
which makes the area be filled better and have smaller height, leaving more
space for the body.
Note:
The balancing algorithm is iterative and may affect performance in corner cases. The best quality of balancing is achieved in the most common cases: for short footnotes.There is a user's request to collapse footnote-bodies on a page if their anchors read the same. This is useful if, for example, several values in table cells must be marked with one and the same note. The Recommendation does not provide a way to achieve this, because one must know beforehand how the footnotes will be distributed among pages.
XEP can handle this request properly.
A footnote-body will not be added to the footnote-reference-area
if there is a footnote-body starting on this page wich has the
same value of id.
In other words, footnotes with equal
footnote-body/@id collapse
to one per page.
Note:
If a footnote-body starts on page N and continues on page N+1, there may appear another footnote-body with the sameid on page N+1: the tail
of a footnote may not collapse.Note:
Collapsed footnote-bodies are treated as if they were empty. Any special content (a term for the index, a target for a link, a part of a 'paired' element such a change-bar or an index-range) will be ignored. Avoid using such content together with the 'unique footnotes' feature.In mass print large number of pages differ in content, but not in static regions. XEP spends a significant share of time formatting static regions on each page. The request is to avoid formatting common parts of pages on each page to save time, and instead pick them up from an XEPOUT file prepared beforehand.
XEP provides an extension for this request:
rx:watermark attribute on
<fo:simple-page-master>.
The value of rx:watermark
is an URI reference to an XEP intermediate format file.
For every page created with a given page master, the content
of the first <xep:page>
of master's watermark file will be drawn before anything else on the page.
Note:
This extension saves formatting time for static contents, but does not reduce the time required to generate it to an output format.Note:
Do not forget to remove targets and bookmarks from a watermark file.Note:
No scaling is performed on the content of the watermark file, it is 'played' as is.Empty space often appears at the bottom of pages, especially of the last pages of page sequences. This space may be used for ads. Arbitrary content of a flow makes it impossible to tell how much space will be left on the last page beforehand, so for arbitrary content there is no way to determine the size of the ads box that will fit without making the flow content go to yet another page.
Having a set of ads boxes of different size, users need a way to place the largest such box (just one) that fits on the last page.
'Transpromo' is an extension to the page master selection algorithm that makes XEP iterate over a set of page masters that suite for 'last' until it finds one where all the tail of the flow content fits. For the sake of compatibility, alternatives for 'any' are not considered in the loop.
With the extended algorithm users may specify a set
of <fo:conditional-page-master-references>,
all with page-position='last', in desired order.
These page masters may, for example, have different extent on
<fo:region-after>, from large to small values
(in order of reading the <fo:conditional-page-master-references>
in <fo:repeatable-page-master-alternatives>).
The <fo:page-sequence> will have the respective set of
<fo:static-contents> with the ads boxes.
The largest box that fits together with the flow content will succeed,
and formatting will end.
The extended algorithm works similarly for the page masters for 'only'.
Starting from version 4.16, XEP is able to produce PDF documents with interactive forms.
This feature is controlled by a special license key file.
The following Form Fields are supported:
-
Text field, including specially formatted Date field
-
Radio button
-
Checkbox
-
Listbox
-
Combobox
-
Submit and Reset buttons
Starting from version 4.28, XEP fully supports:
-
Signature field
The new extension element <pdf-form-field>
with it's descendants describes a single field in the form.
This element and it's descendants exist both in 'rx:' and in 'xep:' namespaces,
so one may define fields in XSL FO documents or in XEP Intermediate Format documents.
In XSL FO the element <rx:pdf-form-field>
is allowed as a direct child of <fo:inline>
or <fo:block-container> only.
When the document is rendered the field is attached to the first area produced
by it's parent
<fo:inline> or <fo:block-container>.
Empty inlines or block-containers without dimensions produce no areas, so make sure to add something into the inline besides the field, and add something into the block-container or set dimentionals on it. Otherwize the field may be skipped or become zero size.
Type1 fonts in fields must use 'standard' encoding and may not be subset, so do not
forget to add
initial-encoding="standard" and
subset="false" on the font-families
used for fields in xep.xml.
Starting from version 4.30, it is possible to set alignment for Text fields by using
text-align attribute. Supported values are
left (default), center, and right (alias end).
Date fields in PDF Forms allow for entering date. This includes two aspects: validating the entered value according to an arbitrary format and display a popup calendar to make the entry comfortable. The basic approach is using JavaScript fields:
<rx:pdf-form-field name="textbox1"
	js-format="AFDate_FormatEx('mm/dd/yyyy');"
	js-keystroke="AFDate_KeystrokeEx('mm/dd/yyyy');">
	<rx:pdf-form-field-text text="" />
</rx:pdf-form-field>
Alternatively, XEP provides with a shortcut using the
<date-format> attribute, both declarations are equal:
<rx:pdf-form-field name="textbox2">
	<rx:pdf-form-field-text date-format="mm/dd/yyyy" text="" />
</rx:pdf-form-field>
In XEPOUT the element <xep:pdf-form-field>
additionally wears mandatory positioning attributes
x-from,
y-from,
x-till,
y-till. Positioning is usually calculated by XEP core
during the rendering process, but may be altered in XEPOUT by the user.
Note:
Some Form Fields, like Signature field, have no own size. In order to make it visible,
it is recommended to add a visible child element to a containing
<fo:block-container>, usually just a
<fo:leader>, like in example below:
<fo:block-container>
	<rx:pdf-form-field name="Signature">
		<rx:pdf-form-field-signature />
	</rx:pdf-form-field>
	<fo:block>
		<fo:leader/>
	</fo:block>
</fo:block-container>
Starting from version 4.30, Radio buttons can be defined as deselectable by using
deselectable attribute. Supported values are
true and false (default).
This can be used for various purposes, including two groups of Radio buttons which
are
mutually exclusive, or simply allowing for a certain group of Radio buttons to
have
a default, unchosen value.
The following DTD defines the extension elements and attributes. Namespaces are skipped, which means that both 'rx:' and 'xep:' apply. In XEPOUT the fields look pretty much the same, with some differences.
<!ENTITY % fields
  " pdf-form-field-text
  | pdf-form-field-radio-button
  | pdf-form-field-checkbox
  | pdf-form-field-listbox
  | pdf-form-field-combobox
  | pdf-form-field-signature
  | pdf-form-field-reset
  | pdf-form-field-submit
  | pdf-form-field-option">

<!ENTITY % appearance_inh
  " font-family CDATA #IMPLIED
  | font-size CDATA #IMPLIED
  | font-weight CDATA #IMPLIED
  | font-style CDATA #IMPLIED
  | color CDATA #IMPLIED">

<!ENTITY % appearance
  " background-color CDATA #IMPLIED
  | border-width CDATA #IMPLIED
  | border-style CDATA #IMPLIED
  | border-color CDATA #IMPLIED">

<!ENTITY % behavior
  " date-format CDATA #IMPLIED">

<!ELEMENT pdf-form-field (%fields;)>
<!-- just one particular field! -->
<!ATTLIST pdf-form-field
  name CDATA #REQUIRED
  readonly (true | false) #IMPLIED
  required (true | false) #IMPLIED
  noexport (true | false) #IMPLIED
  hidden (true | false) #IMPLIED
  printable (true | false) #IMPLIED
  js-format CDATA #IMPLIED
  js-keystroke CDATA #IMPLIED
  js-validate CDATA #IMPLIED
  js-calculate CDATA #IMPLIED
  %appearance_inh; >
<!-- pdf-form-field/@name must be unique within a document.
All boolean attributes in pdf-form-field
and it's descendants default to 'false',
except for 'printable', which defaults to 'true'.
The attributes js-* define JavaScripts to be executed
by the reader on the respective events (4.17 and higher).-->

<!ELEMENT pdf-form-field-text EMPTY>
<!ATTLIST pdf-form-field-text
  text CDATA #REQUIRED
  multiline (true | false) #IMPLIED
  password (true | false) #IMPLIED
  maxlen CDATA #IMPLIED
  text-align (left | center | right) #IMPLIED
  %appearance;
  %appearance_inh;
  %behavior; >

<!ELEMENT pdf-form-field-radio-button (pdf-form-field-option,
                                       pdf-form-field-option?)>
<!-- The first child pdf-form-field-option
   describes the "On" state,
   the second one describes the "Off" state and is optional.-->
<!ATTLIST pdf-form-field-radio-button
  group-name CDATA #REQUIRED
  deselectable (true | false) #IMPLIED
  %appearance;
  %appearance_inh; >
<!-- @group-name must be the same for all radio-button fields
of the same group. If the @group-name ends with "_NoToggleToOff"
exactly one radio-button in the group will be "On" at any moment.
If @deselectable is set to "true" it takes precedence
 over "_NoToggleToOff" name ending -->

<!ELEMENT pdf-form-field-checkbox (pdf-form-field-option,
                                   pdf-form-field-option?)>
<!-- The first child pdf-form-field-option
   describes the "On" state,
   the second one describes the "Off" state and is optional.-->
<!ATTLIST pdf-form-field-checkbox
  %appearance;
  %appearance_inh; >

<!ELEMENT pdf-form-field-listbox (pdf-form-field-option+)>
<!ATTLIST pdf-form-field-listbox
  multiselect (true | false) #IMPLIED
  %appearance;
  %appearance_inh; >
<!-- @multiselect="true" is PDF 1.4+;
      for 1.3 the attribute is ignored. -->

<!ELEMENT pdf-form-field-combobox (pdf-form-field-option+)>
<!ATTLIST pdf-form-field-combobox
  editable (true | false) #IMPLIED
  multiselect (true | false) #IMPLIED
  %appearance;
  %appearance_inh; >
<!-- @multiselect="true" is PDF 1.4+;
      for 1.3 the attribute is ignored. -->

<!ELEMENT rx:pdf-form-field-signature EMPTY>

<!ELEMENT pdf-form-field-reset EMPTY>
<!ATTLIST pdf-form-field-reset
  text CDATA #REQUIRED
  fields CDATA #IMPLIED
  %appearance;
  %appearance_inh; >
<!-- @fields is a space-separated list of field names
     to act on. -->

<!ELEMENT pdf-form-field-submit EMPTY>
<!ATTLIST pdf-form-field-submit
  text CDATA #REQUIRED
  url CDATA #REQUIRED
  submit-format (HTML | FDF | XFDF | PDF) #IMPLIED
  method (GET | POST) #IMPLIED
  fields CDATA #IMPLIED
  %appearance;
  %appearance_inh; >
<!-- @fields is a space separated list of field names to act on.
If a field which @name is on the @fields list
has @noexport="true", the field's value is not submitted.
@submit-format defaults to "FDF".
@method defaults to "POST" and only applies to 'HTML' format.
if @url is a 'mailto:', the form data will be sent by email.-->

<!ELEMENT pdf-form-field-option EMPTY>
<!ATTLIST pdf-form-field-option
  text CDATA #REQIRED
  initially-selected (true | false) #IMPLIED>
Starting from version 4.17, XEP provides a way to add custom features for AcroFields
defined as JavaScript scripts. These scripts are executed by the
Reader application
upon particular events that the user triggers on fields.
The scripts are expressed as attributes on
<rx:pdf-form-field> element:
Table B.1.
| attribute | example |
|---|---|
@js-format |
AFNumber_Format(2, 0, 0, 0, "", false); // Displaying a changed value. Doesn't affect initial view. // A number with two digits after the dot. |
@js-keystroke |
AFNumber_Keystroke(2, 0, 0, 0, "", false); // Validate and possibly reject each keystroke. |
@js-validate |
AFRange_Validate(true, 7, true, 31); // Leaving the field: validate the value or reject it. // 7 <= x <= 31 |
@js-calculate |
AFSimple_Calculate("SUM", new Array ("a", "b"));
// Automatically calculate the value upon a change
// in any other field. The calculation order is implicit.
// If field 'a' or 'b' has changed, ajust the
// value of the current field as the sum of them.
|
The functions "AF*" mentioned above
are built-in to Acrobat. It is also possible to provide a custom
JavaScript library (a set of functions) for a PDF document.
Functions defined in that library are available throughout the PDF document,
including the hooks on the fields.
The extension element
<rx:pdf-javascript> requires a single attribute
name and contains the library plain text, e.g. like this:
<?xml version="1.0" encoding="utf-8"?>
<fo:root xmlns:fo="http://www.w3.org/1999/XSL/Format"
	xmlns:rx="http://www.renderx.com/XSL/Extensions">
	<rx:pdf-javascript name="myJSLib">
		function v_email() {
			var email = new RegExp();
			email.compile("^[a-zA-Z0-9._-]+@[a-zA-Z0-9.-]+\.[a-zA-Z]{2,4}$");
			// not the best one though
			if (!email.test(event.value)) {
				app.alert("The string '"+event.value+"' is not a valid email address.");
				event.rc = false; // do not accept the change of the value
			}
		};
	</rx:pdf-javascript>

	<fo:layout-master-set>
		<fo:simple-page-master master-name="all-pages">
			<fo:region-body region-name="xsl-region-body" margin=".5in"/>
		</fo:simple-page-master>
	</fo:layout-master-set>
	<fo:page-sequence master-reference="all-pages">
		<fo:flow flow-name="xsl-region-body">
			<fo:block>email address:
				<fo:inline>
					<rx:pdf-form-field name="email_address"
						js-validate="v_email();"
						alt-description="email"
					>
						<rx:pdf-form-field-text text="you@example.com"/>
					</rx:pdf-form-field>
					<fo:leader leader-length="5in"/>
				</fo:inline>
			</fo:block>
		</fo:flow>
	</fo:page-sequence>
</fo:root>
At most one element <rx:pdf-javascript> is allowed,
it may not contain nested elements, and it is only allowed inside
<fo:root> before any other FO elements.
Starting from version 4.18, XEP additionally provides various Javascript hooks
for various PDF objects listed below. Although support for PDF Forms is licensed
separately,
generic support for Javascript hooks and <rx:pdf-javascript>
does not require a special license key.
Table B.2.
| attribute | definition |
|---|---|
<fo:root>:
|
These attributes define scripts to be execute by the PDF reader when the respective
events happen. They go transparently to The attributes The attribute |
<fo:simple-page-master>:
|
These are hooks for events of a page coming into or out of the view
in the PDF reader. They go transparently to
<xep:page> and then to Page objects in PDF
document for each page created with the page master where the attributes were
set. |
<rx:pdf-form-field>:
|
These are hooks for PDF Form Fields only. They define the code to be executed by the PDF reader when a field loses or receives focus, when a mouse button is pressed or released in the field area, and when the mouse pointer enters or exits the field area, respectively. |
Starting from version 4.17, XEP is able to produce PDF documents with multimedia objects.
The multimedia features are only supported in the PDF generator,
and only if the
PDF_VERSION option is set to
1.5 or higher.
XEP supports all media formats recommended in
PDF Reference, version 1.5.
-
XEP supports SMIL 2.0 version.
-
Starting from version 4.18,
content-typeattribute is required only for SMIL media format. -
For an SMIL media to be processed, it must have defined internal layout. If layout specified as
<topLayout>elements list, to determine the media box processed the first element. -
SMIL media layout
heightandwidthcan be expressed in the following units: px, pc, pt, cm, mm, in. Other unit identifiers are not supported.. -
If media object type embedded in SMIL is not supported by XEP, but media embedding is forced, it is being treated as plain text.
The new extension element <media-object>
is a special inline element for including multimedia into XSL FO. This element
exists both in 'rx:' and in 'xep:' namespaces, so media can be defined in XSL FO
documents or in XEP Intermediate Format documents.
An <rx:media-object> may be placed
in <fo:block> or <fo:inline>.
The source media is specified by the src
attribute whose value is a URI. XEP handles HTTP, FTP, data and filesystem
resource locators in URIs. An unqualified URI is treated as a path to a file in
the
local file system; if the path is relative, it is calculated from the location
of the source XSL FO document.
Attribute content-type
specifies media MIME type.
The attribute embed specifies whether
the media should be embedded in a generated document (default value: 'true')
The attribute extraction-policy is
a string indicating the circumstances under which it is acceptable to write
a temporary file in order to play a media clip (default value: 'tempaccess').
For more details see PDF Reference.
The attribute show-controls specifies whether
playing controls should be visible (default value: 'false')
Note:
For SWF files the value of show-controls
attribute is ignored. SWF file itself defines whether playing control should be
visible.
The attribute play-mode specifies the play mode
for playing movie. Possible values:
-
'once' - play once and stop;
-
'continuously' - play repeatedly from beginning to end until stopped;
-
a positive float that specifies the number of times to replay.
Default value is '1.0'
Note:
If overriden in file,
play-mode attribute may not affect the SWF
file playing.
The attribute volume specifies audio
volume level. Possible values:
-
'silent' - 0% (mute);
-
'x-soft' - 0% (mute);
-
'soft' - 25%;
-
'medium' - 50%;
-
'loud' - 75%;
-
'x-loud' - 100%;
-
a positive integer that specifies the desired volume level as a percentage of recorded volume level.
Default value is '100%'
The attributeduration specifies
the duration of the movie segment to be played. Possible values:
-
'intrinsic' - the duration is the intrinsic duration of the associated media;
-
'infinity' - the duration is infinity;
-
a positive float that specifie the number of seconds in the time span.
Default value is 'intrinsic'
The source poster is specified by the poster
attribute whose value is a URI. Attribute poster-content-type
specifies poster image MIME type.
The following DTD defines the extension element and attributes.
<!ENTITY % basic-inlines
  "...
  rx:media-object">

<!ENTITY % media-properties
  " embed  ( false | true ) #IMPLIED
  | alt CDATA #IMPLIED
  | extraction-policy ( tempaccess | tempnever | tempextract
                      | tempalways ) #IMPLIED
  | show-controls ( true|false ) #IMPLIED
  | play-mode CDATA #IMPLIED
  | volume CDATA #IMPLIED
  | duration CDATA #IMPLIED
  | poster CDATA #IMPLIED
  | poster-content-type CDATA #IMPLIED"
  >

<!ELEMENT rx:media-object EMPTY>

<!ATTLIST rx:media-object
  %media-properties;
  id  CDATA  #IMPLIED
  content-type  CDATA  #IMPLIED
  content-height  CDATA  #IMPLIED
  content-width  CDATA  #IMPLIED
  src  CDATA  #REQUIRED
  scaling  ( uniform | non-uniform | inherit )  #IMPLIED
  scaling-method  ( auto | integer-pixels
                  | resample-any-method | inherit )  #IMPLIED>
For further details on
<xep:media-object>
see Appendix F.
Starting from version 4.19, XEP is able to produce PDF documents with Rich Media Objects.
This feature is controlled by a special license key file.
The RMO are only supported in the PDF generator, only if the PDF_VERSION option is set to 1.7 or higher (currently only SWF rich media format is supported). Design and Implementation of Rich Media Objects in XEP are based on PDF Specification version 1.7, Extension Level 3.
The new extension element <rich-media-object>
with it's descendants allows the user to produce PDF files with interactive and
parameterized Flash objects. This element and it's descendants exist both in
'rx:' and in 'xep:' namespaces.
In XSL FO the element <rx:rich-media-object>
behaves the same way as multimedia and images.
The following DTD defines the extension elements and attributes for XSL FO:
<!ELEMENT rx:rich-media-object
        ((flash-var | rich-media-resource)*)>

<!ATTLIST rich-media-object
  id  CDATA  #IMPLIED
  content-type  CDATA  #IMPLIED
  content-height  CDATA  #IMPLIED
  content-width  CDATA  #IMPLIED
  name CDATA #REQUIRED
  src CDATA #REQUIRED
  scaling  ( uniform | non-uniform | inherit )  #IMPLIED
  scaling-method  ( auto | integer-pixels
                  | resample-any-method | inherit )  #IMPLIED>
  poster CDATA #IMPLIED
  poster-content-type CDATA #IMPLIED
  transparency ( true | false ) #IMPLIED
  activate-condition (page_visible
                     | page_open | explicit_activation) #IMPLIED
  deactivate-condition (page_invisible | page_close
                       | explicit_deactivation) #IMPLIED>

<!ELEMENT rx:flash-var (#PCDATA)>
<!ATTLIST rx:flash-var
  name CDATA #REQUIRED
  value CDATA #IMPLIED>

<!ELEMENT rx:rich-media-resource (#PCDATA)>
<!ATTLIST rx:rich-media-resource
  name CDATA #REQUIRED
  src CDATA #IMPLIED>
The following DTD defines the extension elements and attributes for XEPOUT:
<!ELEMENT rich-media-object
       (poster? | (flash-var | rich-media-resource)*)>
<!ATTLIST rich-media-object
  name CDATA #REQUIRED
  src CDATA #REQUIRED
  type CDATA #IMPLIED
  x-from CDATA #REQUIRED
  y-from CDATA #REQUIRED
  scale-x CDATA #REQUIRED
  scale-y CDATA #REQUIRED
  transparency ( true|false ) #IMPLIED
  activate-condition (page_visible
                     | page_open | explicit_activation) #IMPLIED
  deactivate-condition (page_invisible
                       | page_close | explicit_deactivation) #IMPLIED>

<!ELEMENT poster EMPTY>
<!ATTLIST poster
  src CDATA #REQUIRED
  type CDATA #IMPLIED
  x-from CDATA #REQUIRED
  y-from CDATA #REQUIRED
  scale-x CDATA #REQUIRED
  scale-y CDATA #REQUIRED>

<!ELEMENT flash-var EMPTY>
<!ATTLIST flash-var
  name CDATA #REQUIRED
  value CDATA #IMPLIED        (Either @value, or @content, not both.
  content CDATA #IMPLIED>      @content must contain base64-encoded bytes
                              of what was inside the element in XSL FO file)

<!ELEMENT rich-media-resource EMPTY>
<!ATTLIST rich-media-resource
  name CDATA #REQUIRED
  src CDATA #IMPLIED>
The transparency
attribute indicates
whether the page content is displayed through the transparent areas of the rich
media content (where the alpha value is less than 1.0). If true, the rich media
artwork is composited over the page content using an alpha channel. If false,
the rich media artwork is drawn over an opaque background prior to composition
over the page content.
The activate-condition/deactivate-condition
attributes specify the animation style when the annotation is activated/deactivated.
The activate-condition attribute can
have 3 possible values:
-
explicit_activation- the annotation is explicitly activated by a user action; -
page_open- the annotation is activated as soon as the page that contains the annotation receives focus as the current page; -
page_visible- the annotation is activated as soon as any part of the page that contains the annotation becomes visible. One example is in a multiple-page presentation. Only one page is the current page although several are visible.
The deactivate-condition can have 3 possible values:
-
explicit_deactivation- the annotation is explicitly deactivated by a user action; -
page_close- the annotation is deactivated as soon as the page that contains the annotation loses focus as the current page; -
page_invisible- the annotation is deactivated as soon as the entire page that contains the annotation is no longer visible.
Here is an example of Rich Media Object:
<?xml version="1.0" encoding="utf-8"?>
<!DOCTYPE root [
  <!ENTITY Column3d.xml.content SYSTEM "Column3d.xml">
]>
<fo:root xmlns:fo="http://www.w3.org/1999/XSL/Format"
      xmlns:rx="http://www.renderx.com/XSL/Extensions">
  <fo:layout-master-set>
    <fo:simple-page-master master-name="p">
      <fo:region-body region-name="xsl-region-body" margin="1in" />
    </fo:simple-page-master>
  </fo:layout-master-set>

  <fo:page-sequence master-reference="p">
    <fo:flow flow-name="xsl-region-body">
      <fo:block background-color="#9999cc" padding="10pt">
        This is Column3d.pdf.
        It has been made by XEP using Column3d.xml (pointed as DATA)
        and Column3D.swf. Both sources are from FusionCharts tutorial.
      <fo:block text-align="center" text-align-last="center">
  <rx:rich-media-object name="MyColumn3dFlash"
                       src="url('./Fusion/Column3D.swf')">
    <rx:flash-var name="someVar">some content for a var that
      may or may not be XML at all</rx:flash-var>
    <rx:flash-var name="dataURL" value="resource.column3d.xml"/>
    <rx:rich-media-resource name="resource.column3d.xml">
      &Column3d.xml.content;
    </rx:rich-media-resource>
    <rx:rich-media-resource name="another.resource"
                       src="url('http://test.com/dialog.jpg')"/>
  </rx:rich-media-object>
      </fo:block>
      </fo:block>
    </fo:flow>
  </fo:page-sequence>
</fo:root>
Column3d.xml:
<chart caption='Weekly Sales Summary'
   xAxisName='Week' yAxisName='Sales' numberPrefix='$'>
    <set label='Week 1' value='14400' />
    <set label='Week 2' value='19600' />
    <set label='Week 3' value='24000' />
    <set label='Week 4' value='15700' />
</chart>
Column3d.xml is the initial data to be used by the Flash file Column3D.swf.
Note:
The usage of XML file with the help of DTD and entities as shown above is used for convenience, and it is equivalent to plain text insertion of the data into XSL FO document.
Sample code in XEPOUT:
...
<xep:rich-media-object name="MyColumn3dFlash" src="<abs_url_to_Column3D.swf>"
                       type="application/x-shockwave-flash"
                       x-from="168000" y-from="499550"
                       scale-x="1.0" scale-y="1.0">
  <xep:poster src="<DEFAULT_POSTER>" type="image/svg+xml" role="Poster image"
                       x-from="168000" y-from="499550"
                       scale-x="1.0" scale-y="1.0"/>
  <xep:flash-var name="someVar" content="wC20aSaN...<base64-encoded
                       content of that var>...8N+xweW5zD9"/>
  <xep:flash-var name="dataURL" value="resource.column3d.xml"/>
  <xep:rich-media-resource name="resource.column3d.xml"
                              content="wC20aSaN...<base64-
                              encoded Column3d.xml>...8N+xweW5zD9"/>
  <xep:rich-media-resource name="another.resource"
                              src="url('http://test.com/dialog.jpg')"/>
</xep:rich-media-object>
Using FlashVars allows to pass data or variables from PDF document to a Flash movie.
Variables passed via FlashVars will go into the _root
level of the Flash movie when first instantiated. All variables are created
before the first frame of the SWF is played. The format of the string is a set
of name=value combinations separated by &.
The new <rx:flash-var> element presents
one of such a name=value pair.The value
attribute is optional. It holds a simple string value if present. Otherwise
the element's content is used as the value of this Flash variable.
FlashVars limitations:
-
The size limit of a FlashVars file is 64K (more than 65,000 bytes or between 32,500 to 65,000 characters, depending on the encoding).
-
Only letters, underline, and numbers can be used in the variable names.
-
A variable name must not start with a number (for example: 1message is an invalid variable name because it starts with a number; whereas message1 is a valid variable name). Flash will certainly reject or get confused if a variable name that starts with a number or other special characters is used - except underlines (ie: _message, and _1message are valid names).
-
A variable name should not contain any space characters (ie: my message is an invalid name, my_message is a valid name).
Rich Media Resources are resources used by SWF. They can be .fla files with defined Flash variables inside, XML config, images, etc.
The new <rich-media-resource> element holds
URI reference to the Rich Media Resource. The src
attribute is optional. If it is absent, the element's content is used as the
content of the resource in PDF.
Starting from version 4.19, XEP is able to produce PDF documents with note annotations.
The new extension element <pdf-comment>
with it's descendants describes a single note annotation.
This element and it's descendants exist both in
'rx:' and
'xep:' namespaces,
so one may define comment in XSL FO documents or in XEP Intermediate Format documents.
In XSL FO the element <rx:pdf-comment>
is allowed as a direct child of <fo:inline>,
<fo:block> or <fo:block-container>
and does not affect the actual document flow.
In XEPOUT the element
<xep:pdf-comment>
additionally wears mandatory positioning attributes
x-from,
y-from,
x-till,
y-till. Positioning is usually calculated by XEP core
during the rendering process, but may be altered in XEPOUT by the user.
The color attribute is transformed into
<xep:color> child element.
The following DTD defines the extension elements and attributes.
Namespaces are skipped, which means that both
'rx:' and
'xep:' apply.
In XEPOUT the comments look pretty much the same,
with some differences.
<!ENTITY % comments
  " pdf-sticky-note
  | pdf-file-attachment">

<!ELEMENT pdf-comment (%comments;)>
   <!-- just one particular comment! -->
<!ATTLIST pdf-comment
  content CDATA #IMPLIED
  title CDATA #REQUIRED
  color CDATA #IMPLIED
  opacity CDATA #IMPLIED>

<!ELEMENT pdf-sticky-note EMPTY>
<!ATTLIST rx:pdf-sticky-note
  icon-type ( comment | key | note | help | newparagraph
                      | paragraph | insert ) #IMPLIED
  open ( false | true ) #IMPLIED>

<!ELEMENT pdf-file-attachment EMPTY>
<!ATTLIST pdf-file-attachment
  src CDATA #REQUIRED
  filename CDATA #REQUIRED
  icon-type ( graph | pushpin | paperclip | tag ) #IMPLIED>
opacity attribute value is an positive
integer that specifies an opacity level of the icon appearance in the PDF file.
Default value of the attribute is '100%' (and 1.0 in XEPOUT).
Note:
The following Annotation Flags are set on the PDF note annotations by XEP: 'Print', 'NoZoom', 'NoRotate'. However, in addition to 'Print' flag setting, user should make settings in Acrobat Reader to print comments. This feature is not available in Adobe Reader 9, so the flag has been ignored by the viewer.
Text Annotations (i.e. "sticky notes") are allowed in PDF/A standard.
However, opacity property was implemented
in PDF 1.4. So, XEP ignores the property, if PDF version < 1.4.
FileAttachment Annotations are not allowed in PDF/A standard. In case of PDF/A, XEP ignores this feature.
Starting from version 4.19, XEP provides an extension attribute
rx:overprint
with values
"true" and
"false" (default).
This inheritable attribute controls whether overprining is turned on or off
for particular drawing commands in Postscript (true setoverprint)
and PDF (/OP true).
This attribute is allowed and supported in FO wherever
color and
background-color
attributes are allowed.
In XEP Intermediate Format this flag appears as attribute
overprint on all
<xep:*-color> elements.
Starting from version 4.29, XEP provides a fast and convenient way
to use barcodes in XSL-FO documents via RenderX extension
<rx:barcode>.
Based on specified barcode type and its data value,
XEP generates a corresponding barcode as SVG graphic object.
XEP supports following barcode types:
-
1D barcodes: CODABAR, Code 128, Code 39, Code 93, EAN-8, EAN-13, ITF, UPC-A, UPC-E;
-
2D barcodes: QRCode, Aztec, Data Matrix, PDF417.
Barcode generation requires at least
barcode type specified via type attribute
and barcode data which can be specified via
data attribute or via
descendants of <rx:barcode> element including character descendants.
The latter allows using formatting objects for specifying barcode data,
which is especially useful for including page numbers in barcode date,
e.g. <fo:page-number> for current page,
<fo:page-number-citation> or
<fo:page-number-citation-last> for the last page or any other page of interest.
The following attributes on <rx:barcode> element control barcode generation:
type(enumeration, required)-
The type of barcode set as string. Required, case-sensitive, note the underscore naming convention. Can be one of the following:
AZTEC,QR_CODE,DATA_MATRIX,CODABAR,CODE_128,CODE_39,CODE_93,EAN_13,EAN_8,ITF,PDF_417,UPC_A,UPC_E data-
The value to encode with the barcode. Required if the value is not specified by
<rx:barcode>element's descendants (character data and/or formatting object descendants).Note:
Can be used together with
<rx:barcode>element's descendants for variable length barcode types (whose length vary depending on its data like Code 39). If<rx:barcode>element has bothdataattribute and descendants including character data and child formatting objects like<fo:page-number>and<fo:page-number-citation-last>which will be resolved by formatter as text and contribute to<rx:barcode>element character data,dataattribute value will be used for calculating barcode length and therefore define space allocated for barcode by formatter, but barcode image placed in the document will contain the value specified by<rx:barcode>element's descendants. Usingdataattribute in addition to character and formatting object descendants provide a way to manually notify formatter of barcode data length because formatter must allocate space for barcode image before page references are resolved. Ex:<rx:barcode type="CODE_39" data="Page 000 of 000" format="001"> Page <fo:page-number /> of <fo:page-number-citation-last ref-id="pageSeqID"/> </rx:barcode>
format-
Controls page number conversion into a string form for
<fo:page-number>,<fo:page-number-citation>and<fo:page-number-citation-last>formatting objects. Works in the same way as<format>attribute specified on<fo:page-sequence>but for<rx:barcode>element's descendants. barcode-height-
Height of the underlying 1D barcode block in millimeters (mm). Optional.
Note:
This parameter make sense only for 1D barcodes. For 2D barcodes, see the section called “Sizes and Dimensions” below.
error-correction-
The algorithm of error correction, specific to the chosen
type. Optional. The possible values are:-
for
QR_CODE-type barcodes, an 1-alpha value that stands for the percentage of correction data:-
Lfor7%correction; -
Mfor15%correction; -
Qfor25%correction; -
Hfor30%correction.
-
-
for
AZTEC-type barcodes, a numeric value specifying a minimal percentage of error correction words, must be>=25; -
for
PDF417-type barcodes, a numeric value in range0...8.
-
data-encoding-
Character encoding for
data. Ifdatacontains non ASCII symbols,data-encodingshould be specified. In most cases it'll add Extended Channel Interpretation (ECI) to barcode data which will allow barcode reader to correctly interpret encoded data. We recommend usingUTF-8and for the Japanese language you may preferShift_JISbut you can specify any standard encoding of your own preference. Optional.Example:
<rx:barcode data-encoding="UTF-8" type="QR_CODE" data="กรุงเทพ มหานคร" /> <rx:barcode data-encoding="Shift_JIS" type="QR_CODE" data="ハローワール ド" /> - All attributes applicable to
<fo:external-graphic> -
XEP generates barcodes as SVG and places them in document by wrapping in
<fo:external-graphic>internally. For the convenience of understanding, you can imagine that each<rx:barcode>element is replaces by<fo:external-graphic>element containing SVG. All attributes specific to barcodes(describer above) are used for barcode generation while all other attributes are applied to<fo:external-graphic>element wrapping barcode SVG. Especially useful and notable attributes arecontent-widthandcontent-height. See the section called “Sizes and Dimensions” below.
Sizes and Dimensions
Visual appearance and dimensions play an important role in barcode readability. Scanning machines and software are accustomed to certain stroke widths and lengths, interleave, color, and overall dimensions. So it is not recommended to alter the visual appearance of barcodes unless specifying a custom size is inevitable (e.g., because of the lack of free place on the page).
Quiet zones and human-readable barcode data are included in generated svg only in the case of EAN-8 and EAN-13, for all other barcodes set quiet zones and human-readable text manually using standard xsl-fo means.
Default dimensions for various barcode types are as follows:
-
for
EAN-13, default height is25.93mmand width is37.29mm -
for
EAN-8, default height is21.31mmand width is26.73mm
By default XEP produces barcodes with 1.00 magnification factor.
As barcodes are generated as svg, they can be scaled by standard XSL FO means to
any size.
Therefore, the default dimensions specified below are used to create svg and
determine barcode dimensions in the document only if no
content-width or content-height
attribute is specified.
The default x-dimension for 1D barcodes is 0.33mm.
For CODE 39 X-dimension is 0.25mm, the ratio between narrow and wide is 1:2.
For CODE 93 and CODE 128 X-dimension is 0.19mm.
The default barcode height (excluding EAN-13 and
EAN-8, see above) is 13mm.
Barcode height can be set to any required value via
barcode-height attribute.
25.9mmEAN-*Note:
In case if a custom size is needed, one can specify the exact barcode size
via content-width or
content-height
attributes.
The underlying barcode will fit the specified dimension, keeping it's standard
aspect ratio.
In order to produce a barcode with a specific size, first set
barcode-height to achieve desired
width/height aspect ratio and then set content-width
and/or content-height attribute.
The barcode will scale to fit the smallest dimension.
For example to get a half-height EAN-13 barcode,
set barcode-height="13mm"
Barcodes can be scaled to fit any size, however one should remember that
scaling them to less than 80% of their default size
(recommended by specs) is strongly discouraged.
Example:
The following fragment of XSL-FO source document...
<fo:block>
  [...]
  <rx:barcode type="EAN_13" data="8711253001202"/>
  [...]
</fo:block>
...will be processed to generate the following SVG code:
<svg:svg xmlns:svg="http://www.w3.org/2000/svg" height="25.93mm" width="31.35mm">
  <desc>
    <barcode value="8711253001202" type="EAN-13"/>
  </desc>
<svg:text x="0" y="25.93mm">8</svg:text>
<svg:g transform="translate(3.63mm)">
  <svg:rect x="0.00mm" y="0" width="0.33mm" height="24.39mm" fill="black"/>
  <svg:rect x="0.66mm" y="0" width="0.33mm" height="24.39mm" fill="black"/>
  ...
  <svg:text x="26.07mm" y="25.93mm">0</svg:text>
  <svg:text x="28.380000000000003mm" y="25.93mm">2</svg:text>
</svg:g>
</svg:svg>
For more information about the compatibility with the AFP Barcode Architecture (BC:OCA), see also: Section 6.6.
The following DTD defines the Barcode extension element and attributes.
<!ELEMENT rx:barcode (#PCDATA | fo:page-number | fo:page-number-citation | fo:page-number-citation-last)*>
<!ATTLIST rx:barcode
  type ( AZTEC | QR_CODE | DATA_MATRIX | CODABAR
       | CODE_128 | CODE_39 | CODE_93 | EAN_13
       | EAN_8 | ITF | PDF_417 | UPC_A | UPC_E ) #REQUIRED
  data              CDATA  #IMPLIED
  content-width     CDATA  #IMPLIED
  content-height    CDATA  #IMPLIED
  barcode-height    CDATA  #IMPLIED
  error-correction  CDATA  #IMPLIED
  data-encoding     CDATA  #IMPLIED>
For further details on SVG compatibility, see Chapter 7.
This section contains the following topics:
The following rules comprise XEP's line-breaking algorithm:
-
Line-break is permitted if one of the following conditions are fulfilled:
-
Line-break is forced by the explicit linefeed characters:
U+000A, U+000D, U+2028,
                                       						and U+2029
. Note, however, that the default behavior of XEP is to perform linefeed normalization, which treats all linefeed characters like spaces. Therefore, the linefeed characters actually force a line-break only if thelinefeed-treatmentattribute is set to "preserve." -
Line-break is permitted at space characters:
U+0009, U+0020, U+2000 - U+200B, andU+3000.
-
-
Line-break is not allowed in the following cases, unless one of the conditions of rule 1 is fulfilled:
-
Immediately preceding or following non-breaking spaces (
U+00A0) and non-breaking hyphens (U+200C). -
Immediately preceding trailing punctuation characters, closing brackets and quotes, small Katakana and Hiragana characters, superscript characters, etc.
-
Immediately after opening brackets and quotes, Spanish leading punctuation, currency symbols, etc.
-
-
If the
hyphenateattribute is set to "true" and all hyphenation conditions (hyphenation-push-character-count, hyphenation-remain-character-count, etc.) are satisfied, then line-break is permitted after a soft hyphen (U+00AD). A soft hyphen at the end of a line is replaced by the text specified in thehyphenation-characterattribute; all other soft hyphens are suppressed. -
Unless prohibited by the above rules, line-break is permitted before or after CJK ideographic, Katakana, Hiragana, and Hangul characters.
-
In all other cases, line-break is prohibited.
The algorithm will be refined in future versions of XEP, when more feedback about non-European scripting systems is received.
XEP uses Unicode soft hyphen characters
(U+00AD)
to mark possible hyphenation points.
These characters can either be contained in the source XSL-FO document
(e.g. from an external hyphenation application), or can be added by XEP
automatically before the source is passed to the formatter.
The hyphenator implements Liang's algorithm. XEP's distribution includes patterns for the following languages: English (American and British), French, German, Spanish and Russian. All patterns are borrowed from CTAN (the Comprehensive TeX Archive Network, http://www.ctan.org/), with some modifications for non-English patterns. More patterns can be added if necessary.
The hyphenator uses TEX format for hyphenation patterns. It recognizes the following sections in the pattern files:
-
patterns (for hyphenation patterns)
-
hyphenation (for exceptions)
Any other section in the pattern file is ignored. Hexadecimal escape codes (e.g. ^^ae) and control characters (^^A) are supported; they can be used to encode non-ANSI European characters. Additionally, XEP recognizes a set of \rm macros for accented characters: \^a is ? (a with circumflex accent), \l is ? (Polish barred l), etc.
XEP supports both left-to-right and
right-to-left text. To define ordering of characters within lines and
stacking direction of lines into paragraphs, we use the
writing-mode attribute.
It can be specified on the
<fo:simple-page-master>,
                     			<fo:region-*>, <fo:table>,
                     			<fo:block-container>
, and
<fo:inline-container> elements.
Its primary values are:
-
"lr-tb": left-to-right, top-to-bottom. This is the default writing mode in XSL-FO; it is used by the majority of world languages, including English. -
"rl-tb": right-to-left, top-to-bottom. This mode is used in Arabic writing system (adopted by many languages of the Middle East), Hebrew, and Syriac alphabets. -
"tb-rl": top-to-bottom, right-to-left. This way of writing is widely used for Japanese, but also for Chinese and other languages of East Asia.
Note:
As of version 4.0, XEP supports only horizontal writing
modes: "lr-tb"
and "rl-tb".
The writing-mode attribute
defines every aspect of the document organization: binding edge, column
ordering in tables, text alignment in blocks, etc. It also sets the
correspondence between relative directions
(before – after – start – end) and
absolutely-oriented ones
(top – bottom – left – right).
Bidirectionality is the interleaving of text
which is to be displayed in both directions: for example, operating
instructions are in Hebrew, but the name of the product appears in the
middle of the instructions, in English. In simple situations, the
renderer handles the bidirectionality on its own; there are, however,
many situations where there may be an ambiguity as to the exact
resolution desired. For these situations, XSL defines a special element,
<fo:bidi-override> that
enables altering the bidirectional behaviour of the whole text or its
parts. It has two properties:
direction-
Sets the dominant direction for a span of text. Possible values are:
-
"ltr"— from left to right -
"rtl"- from right to left
-
unicode-bidi-
Specifies behaviour of a text span with respect to the Unicode bidi algorithm. Possible values are the following:
-
"normal"— order characters by Unicode bidi. -
"embed"— open a new level of embedding. -
"bidi-override"— ignore directionality of the text and arrange characters in the order specified by thedirectionproperty.
-
XEP supports contextual selection of Arabic
positional glyph variants, known as glyph shaping.
Shaping proceeds as follows: each character that belongs to
Arabic Unicode range U+0600–U+06FF
is replaced by its counterpart in the
Arabic Presentation Forms ranges
U+FB50–U+FDFF and
U+FE70–U+FEFF, in accordance with the
Unicode rules for Arabic. Only basic changes are considered:
-
Substitution of initial, final, and medial forms
-
Insertion of
lam-alefligatures
Shaping occurs before font selection. For the algorithm to work, the following conditions must be met:
-
Fonts chosen for Arabic text spans shall cover all positional variants for glyphs used (You can specify a list of fonts. Glyphs will be searched in all of them, following the usual rules for processing of multiple font families).
-
Positional variants are accessible through their Unicode codepoints.
This is the case for most TrueType fonts that support Traditional Arabic; however, XEP does not work with Simplified Arabic fonts.
This section contains the following topics:
This appendix lists font types currently supported in XEP, and describes the details of their use. The overall structure of font configuration is described in the chapter Chapter 5; here, details specific to particular font formats are described.
To use a Type 1 font with XEP, it is necessary to obtain an AFM
(Adobe Font Metrics) file for the font, and specify the URL to it in the
afm attribute of the <font-data> element. If the font is to be
embedded into the resulting PDF or PostScript documents, a font outline
file in PFA or PFB format is also needed; its location is specified in
the respective attribute of the <font-data> — either pfa or pfb.
Example: suppose we have a metrics file
foobar.afm and an outline file
foobar.pfb. Its descriptor in the configuration
file should look like this:
<font embed="true" subset="true">
    <font-data afm="foobar.afm" pfb="foobar.pfb"/>
</font>
If your Type 1 font uses non-standard glyph names, you may need an additional step — custom glyph list registration. This is discussed in more detail in the next section.
Type 1 font support in XEP is based on direct mapping of Unicode characters to glyph names. Built-in character codes aren't used in the formatting.
XEP follows Adobe's guidelines for mapping Unicode values to glyph names, as described in the following document: Unicode and Glyph Names, version 2.3 (http://partners.adobe.com/public/developer/opentype/index_glyph.html). By default, Adobe Glyph List, version 2.0 (hereinafter, AGL; http://partners.adobe.com/public/developer/en/opentype/glyphlist.txt) is used to determine Unicode positions for Type 1 glyphs; AGL is hard coded inside XEP.
If a font includes only glyphs comprised in the AGL and all glyphs are named according to Adobe standards, you need no additional steps to use them in XEP. (This is normally the case with most Latin-based Type 1 fonts). However, some fonts cannot be covered by the AGL:
-
Some fonts define glyphs outside the scope of AGL — exotic scripts, custom dingbats, etc.
-
Some others give non-standard names to glyphs, e.g. Cyrillic or Armenian fonts from TeX.
With XEP, it is possible to use such fonts, and access
characters from them by their regular Unicode values. All you need to
do is to write an extension to the Adobe Glyph List, and register in
the font descriptor: glyph-list
attribute of a <font-data> element
which contains a URL to the extension glyph list. Glyph lists are
ascribed to fonts individually: different fonts in your system may use
different glyph naming systems.
The syntax of a custom glyph list is as follows:
-
Lines starting with
'#'are comments. -
Empty lines are ignored.
-
Each non-comment & non-empty line contains information about a single glyph.
-
Within a line, records are separated by semicolons.
-
The first record is the Unicode value — 4 hex digits.
-
The second record is the glyph name as used in the AFM file.
-
The rest of the line is treated as a comment.
Note:
The syntax for the glyph list follows the structure of the previous version of AGL, Adobe Glyph List 1.2 (http://www.renderx.com/glyphlist-old.txt). Unfortunately, the two versions of AGL are not compatible with each other.
Duplicate entries are allowed in glyph lists: you can assign different Unicode values to one and the same glyph, and have more than one glyph point to the same Unicode value.
In a custom glyph list, there is no need to cover all symbols present in the font: only non-standard mappings should be included. All glyphs not found in the glyph list are processed according to AGL 2.0 (hard coded into the formatter).
Given below is a schematic example of a custom glyph list:
# Sample Glyph List
…
0020;space
0021;exclam;EXCLAMATION MARK
…
A registration entry for a font with custom glyph mapping looks like this:
<font-data afm="foobar.afm"
  pfa="foobar.pfa"
  glyph-list="foo.glyphs"/>
A sample glyph list IPA.glyphs can be found
in the fonts/ subdirectory of the distribution.
It maps IPA (International Phonetic Association) symbols from
OmegaSerifIPA font (borrowed from Omega TeX distribution) to Unicode
IPA range where possible; characters not covered by Unicode are placed
into the private-use area (range starting from
U+E000).
An important kind of Type1 fonts are Adobe standard font
families: Times, Helvetica,
Courier, Symbol and
ZapfDingbats. They are present in every PDF or
PostScript installation, and don't require embedding. The default XEP
configuration includes settings for them.
All symbols from these fonts are accessed by Unicode, including
Symbol and ZapfDingbats fonts.
For Symbol, mapping of Unicode to glyph names is contained in the
Adobe Glyph List, version 2.0 (http://partners.adobe.com/public/developer/en/opentype/glyphlist.txt);
for ZapfDingbats, the mapping is taken from a separate document, also
available at the Adobe technical support site:
http://partners.adobe.com/public/developer/en/opentype/zapfdingbats.txt.
XEP samples include three files where all glyphs available from standard Adobe fonts are listed, with their Adobe glyph names and Unicode values:
-
adobe-standard.folists all glyphs from Roman Extended character set. -
symbol.folists all glyphs from Symbol character set. -
zapf-dingbats.folists all glyphs from Zapf Dingbats character set.
TrueType fonts are supported in XEP, with the following limitations:
-
These fonts are supported by PDF generator module only. PostScript generator can only use Type 1 and OpenType/CFF fonts (except for CID ones).
-
XEP can only use Unicode-enabled TrueType fonts, i.e. those with an internal cmap table for mapping glyph IDs to Unicode. Most TrueType fonts (both for Windows and Mac) now satisfy this condition, but not all. A notable exception is
Wingdingsfont, commonly found on Windows machines.
XEP supports both standalone TrueType fonts
(normally stored in files with a *.ttf extension)
and fonts in TrueType Collection files (they normally have a
*.ttc extension). To use a standalone TrueType font
with XEP, a URL to its font file should be specified in a
ttf attribute to the
<font-data> element,
like in the example below:
<font-data ttf="FOOBAR.TTF"/>
To access a font from a TrueType Collection
file, a URL to its font file should be specified in a
ttc attribute to the
<font-data> element.
Additionally, it is necessary to specify the subfont number in a
subfont attribute,
such as in the example below:
<font-family name="Gungsuh" embed="true">
  <font><font-data ttc="batang.ttc" subfont="3"/></font>
</font-family>
OpenType/CFF fonts fall into two groups, depending on whether the CFF font inside them is CID-based. Their level of support in XEP is different.
-
Non-CID OpenType fonts are supported by both PDF and PostScript generators (Level 3 only).
-
CID-based OpenType fonts are supported by PDF generator only. These fonts are mostly used for languages with ideographic scripts, like Chinese, Japanese and Korean. They appear in Asian font packs for Adobe Acrobat; XEP can produce documents that can be viewable by users who have these font packs installed.
To use an OpenType font with XEP, an URL to its
font file should be specified in an otf attribute to the <font-data> element, such as in the example
below:
<font-data otf="KozMinPro-Regular-Acro.otf"/>
Native AFP fonts are supported Starting from version 4.18, with the following limitations:
-
These fonts are supported by AFP generator module only.
-
Only raster AFP fonts are supported so far.
-
Embedding, subsetting and algorithmic slanting of native AFP fonts are not supported.
Native AFP Fonts are Non-CID OpenType fonts described in F:OCA specifications. Usually, they are uploadable to AFP printers. In order to retrieve their metrics, the font files must be located via URL, and the file(s) mapped within XEP configuration file. Please refer the section called “AFP Fonts” for more details on how to configure XEP to use this kind of fonts.
XEP distribution does not include any native AFP fonts.
This section contains the following topics:
XEP supports the following raster graphics formats:
-
PNG
-
JPEG
-
GIF
-
TIFF
Bitmap graphic that have no built-in resolution or dimension data, default to a resolution of 120 dpi (5 dots of a 600-dpi printer) as prescribed by the CSS2 Spec. This is always the case for GIF images, but may also occur with other image types. The XSL Recommendation suggests using 0.28 mm as a pixel size in such cases, which corresponds to 90 dpi resolution. A smaller pixel size gives better print results because the proportion between pixel size and page width is similar to that of a computer screen. With lower resolutions, often the large GIF/JPEG images fit onto a screen but not into the printable area on the page. For interoperability with other XSL-FO implementations, it is advisable to specify image size explicitly in XSL-FO code.
XEP recognizes all types of PNG images described in the PNG specification, and reproduces them with the following limitations:
-
16-bit component colors are trimmed down to 8-bit.
Single-color transparency and alpha channel are supported in PDF output only. For indexed-color images with alpha, the first completely transparent color in the palette is used.
Note:
Combining single-color transparency with 16-bit color is not safe in XEP because of color depth reduction and consequent merging of adjacent colors.
If the image has an explicit gamma, it is corrected to the sRGB value of 2.2.
Grayscale, RGB, and CMYK JPEGs are supported. Data stream is copied directly from the image file to the resultant PDF or PostScript, so there is no additional loss of quality.
For CMYK JPEGs, XEP analyzes the contents of
APP14 marker. If the marker indicates that the
image is created by Adobe, color polarity is inverted: 0 means "full
colorant". Otherwise, standard CMYK conventions apply: 0 is treated as
"no colorant".
XEP supports both interlaced and non-interlaced GIF images and includes implementation of LZW algorithm.
GIF transparency is supported in PDF output.
XEP supports the following principal TIFF flavors:
-
File organization - strip-based or tiled
-
Color model - monochrome, grayscale, RGB or CMYK
-
Compression type - uncompressed, CCITT Fax (monochrome images only), PackBits or LZW
TIFF images with separate color planes
(PlanarConfiguration=2)
and/or associated alpha channel
(ExtraSamples=1) are not
supported.
XEP supports the following vector graphics formats:
-
SVG
-
PDF (PDF generator only)
-
EPS (PostScript generator only)
-
XEPOUT (All generators except AFP, XPS and XHTML)
XEP supports a subset of
Scalable Vector Graphics,
version 1.1. SVG images can be either referenced as external files (in
src and background-image attributes) or directly
embedded into the XSL-FO flow through <fo:instream-foreign-object> wrapper.
XEP implements the following SVG elements:
-
structure elements -
<svg>,<g>,<defs>,<use>,<symbol>,<image> -
styling -
<style> -
shapes -
<rect>,<circle>,<ellipse>,<polygon>,<polyline>,<path> -
basic clipping -
<clipPath>(see limitations below) -
text -
<text>,<tspan>,<tref> -
conditional processing -
<switch> -
paint servers -
<linearGradient>,<radialGradient>,<pattern>
The following SVG properties are supported:
-
baseline-shift -
clip-path(see below for limitations on clipping support) -
color -
fill -
fill-opacity -
fill-rule -
font -
font-family -
font-size -
font-stretch -
font-style -
font-weight -
gradientTransform -
gradientUnits -
letter-spacing -
marker -
marker-end -
marker-start -
marker-mid -
opacity(controls transparency) -
patternContentUnits -
patternTransform -
patternUnits -
stroke -
stroke-width -
stroke-linecap -
stroke-linejoin -
stroke-miterlimit -
stroke-dasharray -
stroke-dashoffset -
stroke-opacity -
text-anchor -
transform -
visibility -
word-spacing -
xml:base -
xml:space
Notes on SVG support in XEP:
-
Color treatment for SVG follows the same rules as for XSL-FO. In particular,
#CMYK,#Grayscale,#SpotColorand#Registrationpseudo profile names can be used inicc-color()function to produce CMYK, grayscale, spot, or registration colors. -
For an SVG image to be processed by XEP, it must have an intrinsic size. If
heightorwidthare expressed in percents, aviewBoxattribute must be present: the intrinsic size is determined by theviewBox, assuming 1 user space unit = 1 pixel. -
Animation-related elements and attributes are ignored. All objects are drawn at their specified static positions; no attempt is made to reconstruct the initial state of an animated picture.
-
The
clip-pathattribute is not supported on the elements inside<clipPath>element and on the<clipPath>element itself. -
Remote references to
clipPathandmarkerelements are unsupported: only the fragment identifier is used to retrieve them. (Remote links inuseelements are supported). -
Character-by-character placement and rotation in text elements are not supported. If an array is used in
x,y,dx,dy, orrotateattributes of<text>or<tspan>element, only the first number is considered. -
Bidi reordering and Arabic glyph shaping does not work in SVG text.
-
xml:baseattribute works only when resolving relative URLs for external images via<image>element. It is ignored in<use>,<tref>and similar elements. -
XEP supports
opacity,fill-opacity, andstroke-opacityattributes. Because of the output format limitations, these features are only supported in the PDF generator, and only if the PDF version is set to 1.4 or higher. -
XEP supports SVG styling via embedded CSS stylesheets (
<style>element,styleandclassattributes). CSS support is limited to Level 1: only ancestor, class, and ID selectors are recognized. Pseudo classes and pseudo elements are not supported.
PDF images are supported in PDF generator only. XEP is capable to embed an arbitrary page of a PDF document as a vector image. All related resources (fonts, images, color profiles) are transferred to the output file. Annotations (text notes, hyperlinks, etc) are dropped.
The following XSL-FO code demonstrates this feature:
<fo:external-graphic src="url(background.pdf)" rx:pdf-page="5"/>
Here, the optional rx:pdf-page attribute defines the page to use.
The attribute value must evaluate to a positive integer value.
Default: 1 (the first page in the document).
If the value is not parsed properly, or if a page number specified is greater than the total number of pages in the PDF document, the warning is issued and the selected page reverted to default value.
Any unencrypted PDF document which conforms to PDF 1.3 can be embedded as an image, provided that it does not mix LZW and non-LZW compression for parts of the same content stream.[1]
EPS images are supported in PostScript generator only. In the PDF generation module, they are replaced by a bitmap preview image (EPSI or TIFF) if available; otherwise, the corresponding area is left blank.
XEPOUT images are supported in all generators
except AFP. The MIME type used for XEPOUT images is
application/xepout. XEP embeds
the first page of a XEPOUT (XEP Intermediate Output Format) document as a
vector image. All elements are transferred to the output file except:
<xep:target>,
<xep:internal-link>,
<xep:internal-bookmark>,
<xep:external-bookmark>,
<xep:external-link> (supported in PS generator only).
[1] This possibility is purely theoretical: chances that an application uses different compression methods for parts of the same stream are virtually zero.
This section contains the following topics:
This section describes the XEP intermediate output format — an XML
based representation of the layout that is passed from the generator to
the final output generators (PDF, PostScript, etc). All elements reside in
a separate namespace, http://www.renderx.com/XEP/xep
(omitted from the description for brevity). All lengths are measured in
units of 0.001 pt (1/72,000 inch), and expressed as integers. The format
is represented by the following DTD fragment:
<!ENTITY % drawables
  " rotate
  | translate
  | word-spacing
  | letter-spacing
  | font-stretch
  | font
  | text
  | line
  | image
  | rgb-color
  | cmyk-color
  | spot-color
  | registration-color
  | rectangle
  | clip
  | polygon
  | path
  | target
  | internal-link
  | external-link
  | internal-bookmark
  | external-bookmark
  | page-number
  | media-object">

<!ENTITY % rx-accessibility-properties "
  xpath CDATA  #IMPLIED
  pdf-structure-tag CDATA  #IMPLIED
  pdf-artifact-type CDATA  #IMPLIED
  pdf-artifact-subtype CDATA  #IMPLIED
  alt-description CDATA  #IMPLIED
  actual-text CDATA  #IMPLIED
  abbreviation CDATA  #IMPLIED">

<!ENTITY % pages
  " page
  | insert-document">

<!ELEMENT document (pages+)>
<!ATTLIST document
  creator CDATA #REQUIRED
  initial-destination CDATA #IMPLIED>

<!ELEMENT page (%drawables;)*>
<!ATTLIST page
  width CDATA #REQUIRED
  height CDATA #REQUIRED
  page-number CDATA #REQUIRED
  page-id CDATA #REQUIRED>

<!ELEMENT insert-document EMPTY>
<!ATTLIST insert-document
  src CDATA #REQUIRED
  document-content-type CDATA #IMPLIED>

<!ELEMENT rotate EMPTY>
<!ATTLIST rotate
  phi CDATA #REQUIRED>

<!ELEMENT translate EMPTY>
<!ATTLIST translate
  x CDATA #REQUIRED
  y CDATA #REQUIRED>

<!ELEMENT word-spacing EMPTY>
<!ATTLIST word-spacing
  value CDATA #REQUIRED>

<!ELEMENT letter-spacing EMPTY>
<!ATTLIST letter-spacing
  value CDATA #REQUIRED>

<!ELEMENT font-stretch EMPTY>
<!ATTLIST font-stretch
  value CDATA #REQUIRED>

<!ELEMENT font EMPTY>
<!ATTLIST font
  family CDATA #REQUIRED
  weight CDATA #REQUIRED
  style CDATA #REQUIRED
  variant CDATA #REQUIRED
  size CDATA #REQUIRED>

<!ELEMENT text (line*)>
<!ATTLIST text
  x CDATA #REQUIRED
  y CDATA #REQUIRED
  value CDATA #REQUIRED
  width CDATA #REQUIRED
  %rx-accessibility-properties;>

<!ELEMENT page-number (line*)>
<!ATTLIST page-number
  x CDATA #REQUIRED
  y CDATA #REQUIRED
  value CDATA #REQUIRED
  width CDATA #REQUIRED
  %rx-accessibility-properties;>

<!ELEMENT line EMPTY>
<!ATTLIST line
  x-from CDATA #REQUIRED
  y-from CDATA #REQUIRED
  x-till CDATA #REQUIRED
  y-till CDATA #REQUIRED
  thickness CDATA #REQUIRED
  style CDATA #REQUIRED>

<!ELEMENT image EMPTY>
<!ATTLIST image
  src CDATA #REQUIRED
  base CDATA #IMPLIED
  type CDATA #REQUIRED
  x-from CDATA #REQUIRED
  y-from CDATA #REQUIRED
  scale-x CDATA #REQUIRED
  scale-y CDATA #REQUIRED
  %rx-accessibility-properties;>

<!ELEMENT gray-color EMPTY>
<!ATTLIST gray-color
  gray CDATA #REQUIRED>

<!ELEMENT rgb-color EMPTY>
<!ATTLIST rgb-color
  red CDATA #REQUIRED
  green CDATA #REQUIRED
  blue CDATA #REQUIRED>

<!ELEMENT cmyk-color EMPTY>
<!ATTLIST cmyk-color
  cyan CDATA #REQUIRED
  magenta CDATA #REQUIRED
  yellow CDATA #REQUIRED
  black CDATA #REQUIRED>

<!ELEMENT spot-color EMPTY>
<!ATTLIST spot-color
  colorant CDATA #REQUIRED
  tint CDATA #REQUIRED
  alt-gray CDATA #IMPLIED
  alt-red CDATA #IMPLIED
  alt-green CDATA #IMPLIED
  alt-blue CDATA #IMPLIED
  alt-cyan CDATA #IMPLIED
  alt-magenta CDATA #IMPLIED
  alt-yellow CDATA #IMPLIED
  alt-black CDATA #IMPLIED>

<!ELEMENT registration-color EMPTY>
<!ATTLIST registration-color
  tint CDATA #REQUIRED>

<!ELEMENT rectangle EMPTY>
<!ATTLIST rectangle
  x-from CDATA #REQUIRED
  y-from CDATA #REQUIRED
  x-till CDATA #REQUIRED
  y-till CDATA #REQUIRED>

<!ELEMENT clip (%drawables;)*>
<!ATTLIST clip
  x-from CDATA #REQUIRED
  y-from CDATA #REQUIRED
  x-till CDATA #REQUIRED
  y-till CDATA #REQUIRED
  clip-by-following-polygon CDATA #IMPLIED>

<!ELEMENT polygon (point,point+,arc,arc+)>
<!ATTLIST polygon
  x-from CDATA #REQUIRED
  y-from CDATA #REQUIRED>

<!ELEMENT point EMPTY>
<!ATTLIST point
  x-till CDATA #REQUIRED
  y-till CDATA #REQUIRED>

<!ELEMENT arc EMPTY>
<!ATTLIST arc
  x1-ctrl-point CDATA #REQUIRED
  y1-ctrl-point CDATA #REQUIRED
  x2-ctrl-point CDATA #REQUIRED
  y2-ctrl-point CDATA #REQUIRED
  x-till CDATA #REQUIRED
  y-till CDATA #REQUIRED>

<!ELEMENT target EMPTY>
<!ATTLIST target
  name CDATA #REQUIRED
  x CDATA #REQUIRED
  y CDATA #REQUIRED
  %rx-accessibility-properties;>

<!ELEMENT internal-link EMPTY>
<!ATTLIST internal-link
  destination-id CDATA #REQUIRED
  destination CDATA #REQUIRED
  destination-x CDATA #REQUIRED
  destination-y CDATA #REQUIRED
  %rx-accessibility-properties;>

<!ELEMENT external-link EMPTY>
<!ATTLIST external-link
  destination CDATA #REQUIRED
  show-destination (new | replace) #REQUIRED
  %rx-accessibility-properties;>

<!ELEMENT internal-bookmark (grey-color?, rgb-color?, cmyk-color?)>
<!ATTLIST internal-bookmark
  label CDATA #REQUIRED
  id CDATA #REQUIRED
  parent-id CDATA #REQUIRED
  destination-id CDATA #REQUIRED
  destination CDATA #REQUIRED
  destination-x CDATA #REQUIRED
  destination-y CDATA #REQUIRED
  collapse-subtree (true | false) #REQUIRED
  font-style CDATA #IMPLIED
  font-weight CDATA #IMPLIED
  %rx-accessibility-properties;>

<!ELEMENT external-bookmark (grey-color?, rgb-color?, cmyk-color?)>
<!ATTLIST external-bookmark
  label CDATA #REQUIRED
  id CDATA #REQUIRED
  parent-id CDATA #REQUIRED
  destination CDATA #REQUIRED
  collapse-subtree (true | false) #REQUIRED
  show-destination (new | replace) #REQUIRED
  font-style CDATA #IMPLIED
  font-weight CDATA #IMPLIED
  %rx-accessibility-properties;>

<!ELEMENT media-object (poster?)>
<!ATTLIST media-object
  src CDATA #REQUIRED
  base CDATA #IMPLIED
  type CDATA #REQUIRED
  x-from CDATA #REQUIRED
  y-from CDATA #REQUIRED
  scale-x CDATA #REQUIRED
  scale-y CDATA #REQUIRED
  embed  ( false | true ) #IMPLIED
  extraction-policy ( tempaccess | tempnever | tempextract
                    | tempalways ) #IMPLIED
  alt CDATA #IMPLIED
  show-controls ( true|false ) #IMPLIED
  play-mode CDATA #IMPLIED
  volume CDATA #IMPLIED
  duration CDATA #IMPLIED
  %rx-accessibility-properties;>

<!ELEMENT poster EMPTY>
<!ATTLIST poster
  src CDATA #REQUIRED
  type CDATA #REQUIRED
The following table provides a detailed description of the output elements:
Table F.1. Output Elements
| Element | Description | Attributes |
|---|---|---|
<document> |
The root element. At its beginning and at its end, initialization and finalization are usually performed. |
|
<page> |
Wraps a single page of the document. There is one <page> element for each page in the
document. |
|
<rotate> |
Rotates the coordinate system. |
|
<translate> |
Shifts the origin of the coordinate system. |
|
<word-spacing> |
Sets word spacing (additional spacing between words). |
|
<letter-spacing> |
Sets letter spacing (additional spacing between non-space characters). |
|
<font-stretch> |
Sets font-stretch factor. |
|
<font> |
Changes the current font. |
|
<text> |
Prints a character string. |
|
<line> |
Draws a line. |
|
<image> |
Embeds an external image. |
|
<gray-color> |
Sets the current color for stroking and filling. The color is chosen in a grayscale color space. |
|
<rgb-color> |
Sets the current color for stroking and filling. The color is chosen in an RGB color space (additive). |
|
<cmyk-color> |
Sets the current color for stroking and filling. The color is chosen in CMYK color space (subtractive). |
|
<spot-color> |
Sets the current color for stroking and filling. The color is chosen in a spot color space (subtractive). |
To describe an alternate color, one of the following attribute sets must be present:
|
<registration-color> |
Sets the current color for stroking and filling. The color is chosen in registration color space (subtractive): it appears on all separations in the document. |
|
<rectangle> |
Draws a filled rectangle. |
|
<clip> |
Sets the clipping area. |
|
<polygon> |
Draws a filled polygon. All vertices but the first one are
specified in the contained <point> elements. |
|
<point> |
Adds a vertex to a polygon. |
|
<arc> |
Normally, Polygon is a figure that is defined by a finite number of straight line segments connected to form a closed polygonal chain or polygonal circuit. Arc element adds a curve to the form instead of a straight line added by point element. So, Polygon containing an Arc element is not a polygon anymore but a complex shape formed by a sequence of lines and curves. Basically, Arc is a B?zier curve
defined by two base- and two control points. The first base point is
inherited from the previous point of a Polygon in the sequence,
the second base point is defined by Only quadratic B?zier curves (with two control points) are currently supported. |
|
<path> |
Container element for grouping together multiple <polygon> elements.
In case of further formatting to PDF all grouped polygons will be drawn as one pdf
path
which eliminates the problem with rough line and curve joins.
|
None |
<target> |
Sets the endpoint for an internal destination. |
|
<internal-link> |
Specifies an internal link destination. |
|
<external-link> |
Specifies an external link destination. |
|
<internal-bookmark> |
Specifies an internal bookmark destination. |
|
<external-bookmark> |
Specifies an external bookmark destination. |
|
<media-object> |
Places multimedia. |
|
<poster> |
Embeds an external image to show, when not playing media. |
|
| (see above) | See above for applicable elements. |
|
Processing instructions may appear in the output. They are taken from the source file and passed straight to the generator with no modification. Processing instructions placement meets the following conditions:
-
Instructions placed before
<fo:root>element in the source file are reproduced at the very top, before the root<document>element. -
Instructions placed inside an
<fo:simple-page-master>element are reproduced on each page generated using that master, immediately after the opening tag of the<page>element.
All other processing instructions may vanish during formatting. Except for those specified above, ordering of instructions is not preserved.
This section contains the following topics:
This section contains the following topics:
-
Accessibility Support in XEP
-
Tagged PDF
-
RenderX XEP
rolemap.xml-
XSL-FO Extensions
-
PDF Structure Tag
-
PDF Artifact Type and Subtype
-
Alternate Description
-
Actual Text
-
Abbreviations
-
Tables
-
-
Hints and Tips
-
Using rolemap.xml
XEP can create accessible PDF documents that are in compliance with Section 508 Standards (http://www.section508.gov)
This feature is controlled by the
ENABLE_ACCESSIBILITY
core option in the configuration file that ships with XEP
named xep.xml.
Note:
Accessibility support is applied to PDF documents only.
The major requirements for accessible PDF documents are the following:
-
Logical reading order
-
Alternate text descriptions for images
-
Document language
An accessible PDF document should include the document's default language
which applies to all text in a PDF document.
A document's default language should be specified on
<fo:root> element using
xml:lang attribute.
You can change a language on descendant elements by overriding the document's language.
Note:
The syntax for the document's default language is the same as
for the xml:lang attribute.
XEP automatically creates document's logical structure by generating a tagged PDF. XEP creates a tagged PDF with a logical structure derived from the structure of the input XSL-FO document.
Note:
By default, Adobe Acrobat reads a tagged PDF according to its logical structure, which coincides with the order of the input XSL-FO document. To change the reading order to be in accordance with a visual content, choose the 'Left-to-right, top-to-bottom reading order' from the 'Reading order' combo box and select the 'Override the reading order in tagged documents' check box in the 'Edit->Preferences->Reading' dialog box.
All the elements of the input source will generate a structure item
of one of the standard types in the resulting tagged PDF. These structure
items can be seen in the file rolemap.xml
defined at the bottom of this Appendix the section called “Using rolemap.xml”,
which is also described more thoroughly in the next section.
In accessible PDF documents we handle proper pronunciation of terms like "RenderX" and "508" with some additional "Span" elements which have a minimal hierarchy.
Note:
Adobe Acrobat's 'Accessibility check' plug-in fails if some table cells do not have a table row as the parent. Make sure that all table cells in your XSL-FO file are within table rows.
For those capabilities required to meet Section 508 requirements
that are outside XSL-FO or cannot be interpreted through the
rolemap.xml, RenderX implemented
extensions in XSL-FO so that
the user can produce fully compliant tagged PDF files. These
extensions include PDF Structure Tag, PDF Artifact Type and
Subtype, Alternate Description, Actual Text and Abbreviations.
RenderX implemented an extension attribute
rx:pdf-structure-tag
that is allowed at the lowest level where content is formatted to output.
This attribute allows the user to spot remap some piece of content
to the proper (intended) PDF tag,
that is, it sets the name tag ('tag'/'tag mapping')
of the given structural element in the output document.
This same extension attribute also allows the user to mark content
as a PDF artifact.
By using the special value for
rx:pdf-structure-tag of "Artifact",
the user can control information which is not intended to be included
in the tag structure or reading of a document when using read out loud in Acrobat/JAWS.
The rx:pdf-structure-tag attribute
can also be set to either "TH"/ "TR", these values are for table header cells.
"TH"/ "TR" marks these cells as 'column'/'row' respectively
(in the table properties for accessible documents).
If Accessibility support is enabled, the formatter automatically
marks entities within <fo:table>
unless the document overrides it.
See Section G.4.6 for implementation details and full example.
The most common use is to map an
<fo:block> to tagged PDF headings
like "H1" to "H6".
This is required because there is no direct equivalent in XSL-FO,
all of these are merely <fo:block> elements.
There is no way to truly understand which
<fo:block> is an "H1" or an "H3" or a "P".
Now, you can simply mark an <fo:block>
with rx:pdf-structure-tag
and set the value to your intended PDF tag like "H1".
The valid values for the
rx:pdf-structure-tag attribute are
"H1", "H2", "H3", "H4", "H5", "H6", "P" , "TH", "TR", "TD", or "Artifact".
The Syntax for the
rx:pdf-structure-tag attribute is:
<fo:block rx:pdf-structure-tag="H1">
  This is block tagged with Heading 1
</fo:block>
RenderX has implemented two additional attributes that apply only
to something classified as a PDF artifact.
These two extensions,
rx:pdf-artifact-type and
rx:pdf-artifact-subtype
allow the user to further classify artifacts.
It should be noted that these are optional according to the PDF specification.
The valid values for the type of an artifact are
"Pagination", "Page" or "Layout".
"Pagination" is used for artifacts that are the direct result of
the formatter's pagination of the document and they should (must) not be
included in the PDF tag structure or reading.
Running and headers and footers are force marked with
rx:pdf-structure-tag of "Artifact" and
rx:pdf-artifact-type of "Pagination"
during output of the tagged PDF.
"Page" artifacts are normally used for something on a page like colored boxes
and "Layout" artifacts are used for things like table borders.
If the rx:pdf-artifact-type is "Pagination", then the user can further classify a subtype. The valid values for
rx:pdf-artifact-subtype are "Header", "Footer" or "Watermark".
The syntax of the
rx:pdf-artifact-type is:
<fo:block rx:pdf-structure-tag="Artifact"
          rx:pdf-artifact-type="Layout">
	1.
</fo:block>
Or when Artifact Type and Subtype are used together:
<fo:block rx:pdf-structure-tag="Artifact"
          rx:pdf-artifact-type="Pagination"
          rx:pdf-artifact-subtype="Watermark">
	mark
</fo:block>
Basically, Alternate Description implements the concept of Tooltip feature.
Normally used with images, the
rx:alt-description extension attribute
allows you to assign alternate text to something that is not normally read out
loud.
Once the screen reader encounters the image that contains an alternate description,
its text is read out loud to the user.
Alternate Description is one of the key parts of Section 508 document compliance strategy.
The syntax of the
rx:alt-description is:
<fo:external-graphic
		src="url('tags.png')"
		rx:alt-description="This is an image showing the tagging structure of this document."
/>

When the example <fo:external-graphic>
code above runs, the PDF document would show the image above
and the screen reader would read "This is an image showing the
tagging structure of this document." in lieu of the image.
The extension rx:alt-description
can also be used for marking PDF Form Fields.
The extension rx:actual-text allows the user to change what is read for some text content that is displayed in
the PDF. This is most commonly used to read numbers in a special way, overriding the
behavior of some screen readers from assuming a string of things is a number. Since
this can be misinterpreted, it is best to override what is read to the user.
The syntax of the
rx:actual-text attribute is shown
in the example below:
<fo:inline rx:actual-text="5,O,8">508</fo:inline>
The following shows two ways of formatting some numbers that appear exactly the same in context of the PDF. If you allow a screen reader to read them out loud, you will see the difference:
-
No actual text: 12345678910
-
With actual text: 1,2,3,4,5,6,7,8,9,10.
Note:
The example with no actual text will attempt to read as a number.
You would hear twelve billion, three hundred forty five million,
six hundred seventy eight thousand nine hundred ten.
The example with actual text is formatted with
rx:actual-text="1,2,3,4,5,6,7,8,9,10."
and would be read exactly like it is intended:
one, two, three, ...
Actual text is used throughout this document within content that is
being read to clarify how it should be read,
like for the terms Section 508 and RenderX.
The extension
rx:abbreviation allows you to mark
content that is an abbreviation with an appropriate text to be read out loud.
The syntax of this is:
<fo:inline rx:abbreviation="United States Health and Human Services">
    US H&HS
</fo:inline>
Which will produce text - US H&HS - when rendered to PDF with XEP and the screen reader would read it as "United States Health and Human Services".
RenderX internally already understands the content with the
"table-header" XSL FO tag should be marked as "TH" in the tagged PDF result.
The user does not need to do anything special except
to use "table-header" structure in their XSL FO.
The combined functionality of the rolemap.xml and
XSL-FO extensions allows the user to mark up tables as prescribed by Section 508.
The default markup as follows:
-
table:TH -
table-header/table-row:TH -
table-body/table-row:TR -
table-cell:TD
One typical problem when overriding markup is required
is when first cells in data row actually contain a header
associated with the following cells.
XSL-FO has no mechanism for marking table headers that are in a column.
However, HTML has, and the Section 508 specification allows for this.
In this case, the corresponding <fo:table-cell>
can be marked with rx:pdf-structure-tag="TH" .
The code below shows an example table that exhibits
both the rolemap which is mapping elements within this table header rows
to be classified as "TH" and also shows that
<rx:pdf-structure-tag> can be used to override
the content in the first column of cells to map them also as row-based table headers.
This is an essential requirement of Section 508 compliance.
<fo:table text-align="center" border="1pt solid black"
space-before="6pt">
<fo:table-header font-weight="bold">
<fo:table-row>
<fo:table-cell id="column0">
<fo:block margin="2pt"> </fo:block>
</fo:table-cell>
<fo:table-cell id="column1">
<fo:block margin="2pt">Column Header 1</fo:block>
</fo:table-cell>
<fo:table-cell id="column2">
<fo:block margin="2pt">Column Header 2</fo:block>
</fo:table-cell>
<fo:table-cell id="column3">
<fo:block margin="2pt">Column Header 3</fo:block>
</fo:table-cell>
</fo:table-row>
</fo:table-header>
<fo:table-body>
<fo:table-row>
<fo:table-cell font-weight="bold">
<fo:block rx:pdf-structure-tag="TH"
margin-left="2pt">Row Header 1</fo:block>
</fo:table-cell>
<fo:table-cell rx:header-idref="column1">
<fo:block>Cell</fo:block>
</fo:table-cell>
<fo:table-cell rx:header-idref="column2">
<fo:block>Cell</fo:block>
</fo:table-cell>
<fo:table-cell rx:header-idref="column3">
<fo:block>Cell</fo:block>
</fo:table-cell>
</fo:table-row>
<fo:table-row>
<fo:table-cell font-weight="bold">
<fo:block rx:pdf-structure-tag="TH"
margin-left="2pt">Row Header 2</fo:block>
</fo:table-cell>
<fo:table-cell rx:header-idref="column1">
<fo:block>Cell</fo:block>
</fo:table-cell>
<fo:table-cell rx:header-idref="column2">
<fo:block>Cell</fo:block>
</fo:table-cell>
<fo:table-cell rx:header-idref="column3">
<fo:block>Cell</fo:block>
</fo:table-cell>
</fo:table-row>
<fo:table-row>
<fo:table-cell font-weight="bold">
<fo:block rx:pdf-structure-tag="TH"
margin-left="2pt">Row Header 3</fo:block>
</fo:table-cell>
<fo:table-cell rx:header-idref="column1">
<fo:block>Cell</fo:block>
</fo:table-cell>
<fo:table-cell rx:header-idref="column2">
<fo:block>Cell</fo:block>
</fo:table-cell>
<fo:table-cell rx:header-idref="column3">
<fo:block>Cell</fo:block>
</fo:table-cell>
</fo:table-row>
</fo:table-body>
</fo:table>
In XSL-FO, there is no mechanism for referring to data table cells
in header table cells.
The user can use
rx:header-idref to refer header table cells by their id
(a common 'id-refid' mechanism), which allows for better control of reading order.
Within XEP, there is a separate, customizable file
called rolemap.xml.
It serves two different purposes. It allows the user to:
-
Map common XSL-FO structures to different PDF tags. Simple examples would be an
<fo:root>becomes a "Document" or an<fo:block>becomes a "P". Therolemap.xmlallows the user to define these for the output. -
Define structures that are excluded from the tagging. This is a very important feature for compliance. Using the
rolemap.xml, the user can specify XSL-FO structures to exclude from the tagging of the output. These would be common XSL-FO structures that really do not contribute to the structure but are in place because of the XSL-FO specification. Examples would be<fo:flow>and<fo:static-content>tags. This greatly simplifies the structure of the tagged PDF per the requirements of Section 508.
Using rolemap.xml
The user can set tag mapping on the document level
(document-level; unlike
@rx:pdf-structure-tag, which is element-level).
Using a set of <structure-element>
in rolemap.xml - just change
@role-mapping for corresponding element.
The user also can exclude or 'roll up' any element from
the PDF 'structure' ('tagged structure') by commenting out
the corresponding structure-elements element in rolemap.xml
The <structure-elements standard="true"> section
and aliases (the 'structure-alias' elements) in rolemap.xml
are mainly for compatibility with older versions of role mapping in XEP.
They should not be touched!
Below is the code from the current
rolemap.xml file in full that ships with RenderX XEP:
<?xml version="1.0" encoding="UTF-8"?>

<role-map xmlns="http://www.renderx.com/XEP/config">

  <!-- ======================================================= -->
  <!-- PDF Structure Types                                     -->
  <!-- ======================================================= -->

  <!-- Maps input XSL-FO elements to the PDF structure types -->

  <structure-elements>
    <structure-element name="root"
                       role-mapping="Root"/>
    <structure-element name="page-sequence"
                       role-mapping="PageSequence"/>
    <structure-element name="block"
                       role-mapping="Block"/>
    <structure-element name="leader"
                       role-mapping="Leader"/>
    <structure-element name="page-number"
                       role-mapping="PageNumber"/>
    <structure-element name="page-number-citation"
                       role-mapping="PageNumberCitation"/>
    <structure-element name="page-number-citation-last"
                       role-mapping="PageNumberCitationLast"/>
    <structure-element name="external-graphic"
                       role-mapping="ExternalGraphic"/>
    <structure-element name="instream-foreign-object"
                       role-mapping="InstreamForeignObject"/>
    <structure-element name="basic-link"
                       role-mapping="BasicLink"/>
    <structure-element name="footnote"
                       role-mapping="Footnote"/>
    <structure-element name="footnote-label"
                       role-mapping="FootnoteLabel"/>
    <structure-element name="footnote-body"
                       role-mapping="FootnoteBody"/>
    <structure-element name="list-block"
                       role-mapping="ListBlock"/>
    <structure-element name="list-item"
                       role-mapping="ListItem"/>
    <structure-element name="list-item-label"
                       role-mapping="ListItemLabel"/>
    <structure-element name="list-item-body"
                       role-mapping="ListItemBody"/>
    <structure-element name="table"
                       role-mapping="Table"/>
    <structure-element name="table-row"
                       role-mapping="TableRow"/>
    <structure-element name="header-table-cell"
                       role-mapping="HeaderTableCell"/>
    <structure-element name="body-table-cell"
                       role-mapping="BodyTableCell"/>
    <structure-element name="footer-table-cell"
                       role-mapping="FooterTableCell"/>
    <structure-element name="flow"
                       role-mapping="Flow"/>
    <structure-element name="static-content"
                       role-mapping="StaticContent"/>
    <structure-element name="flow-section"
                       role-mapping="FlowSection"/>
    <structure-element name="block-container"
                       role-mapping="BlockContainer"/>
    <structure-element name="inline"
                       role-mapping="Inline"/>
    <structure-element name="wrapper"
                       role-mapping="Wrapper"/>
    <structure-element name="table-header"
                       role-mapping="TableHeader"/>
    <structure-element name="table-body"
                       role-mapping="TableBody"/>
    <structure-element name="table-footer"
                       role-mapping="TableFooter"/>
    <structure-element name="ruler"
                       role-mapping="Ruler"/>
  </structure-elements>

  <!-- Standard structure types -->
  <structure-elements standard="true">
    <!-- Grouping elements -->
    <structure-element name="Document" />
    <structure-element name="Part" />
    <structure-element name="Art" />
    <structure-element name="Div" />
    <structure-element name="Sect" />
    <structure-element name="BlockQuote" />
    <structure-element name="Caption" />
    <structure-element name="TOC" />
    <structure-element name="TOCI" />
    <structure-element name="Index" />
    <structure-element name="NonStruct" />
    <structure-element name="Private" />
    <!-- Paragraphlike elements -->
    <structure-element name="P" />
    <structure-element name="H" />
    <structure-element name="H1" />
    <structure-element name="H2" />
    <structure-element name="H3" />
    <structure-element name="H4" />
    <structure-element name="H5" />
    <structure-element name="H6" />
    <!-- List elements -->
    <structure-element name="L" />
    <structure-element name="LI" />
    <structure-element name="Lbl" />
    <structure-element name="LBody" />
    <!-- Table elements -->
    <structure-element name="Table" />
    <structure-element name="TR" />
    <structure-element name="TH" />
    <structure-element name="TD" />
    <structure-element name="THead" />
    <structure-element name="TBody" />
    <structure-element name="TFoot" />
    <!-- Inline-level elements -->
    <structure-element name="Span" />
    <structure-element name="Quote" />
    <structure-element name="Note" />
    <structure-element name="Reference" />
    <structure-element name="BibEntry" />
    <structure-element name="Code" />
    <structure-element name="Link" />
    <structure-element name="Annot" />
    <structure-element name="Ruby" />
    <structure-element name="Warichu" />
    <!-- Illustration elements -->
    <structure-element name="Figure" />
    <structure-element name="Formula" />
    <structure-element name="Form" />
    <!-- 'Artifact' is a special value -->
    <structure-element name="Artifact" />
  </structure-elements>

  <!-- The aliases for XEP structure types -->
    <structure-alias name="Root" value="Document"/>
    <structure-alias name="PageSequence" value="Part"/>
    <structure-alias name="Flow" value="Sect"/>
    <structure-alias name="StaticContent" value="Sect"/>
    <structure-alias name="FlowSection" value="Sect"/>
    <structure-alias name="BlockContainer" value="Div"/>
    <structure-alias name="Block" value="P"/>
    <structure-alias name="Inline" value="Span"/>
    <structure-alias name="Wrapper" value="Span"/>
    <structure-alias name="Leader" value="Span"/>
    <structure-alias name="Ruler" value="Span"/>
    <structure-alias name="PageNumber" value="Quote"/>
    <structure-alias name="PageNumberCitation" value="Quote"/>
    <structure-alias name="PageNumberCitationLast" value="Quote"/>
    <structure-alias name="ExternalGraphic" value="Figure"/>
    <structure-alias name="InstreamForeignObject" value="Figure"/>
    <structure-alias name="BasicLink" value="Link"/>
    <structure-alias name="Footnote" value="Note"/>
    <structure-alias name="FootnoteLabel" value="Span"/>
    <structure-alias name="FootnoteBody" value="Sect"/>
    <structure-alias name="ListBlock" value="L"/>
    <structure-alias name="ListItem" value="LI"/>
    <structure-alias name="ListItemLabel" value="Lbl"/>
    <structure-alias name="ListItemBody" value="LBody"/>
    <structure-alias name="Table" value="Table"/>
    <structure-alias name="TableRow" value="TR"/>
    <structure-alias name="HeaderTableCell" value="TH"/>
    <structure-alias name="BodyTableCell" value="TD"/>
    <structure-alias name="FooterTableCell" value="TD"/>
    <structure-alias name="TableHeader" value="THead"/>
    <structure-alias name="TableBody" value="TBody"/>
    <structure-alias name="TableFooter" value="TFoot"/>
</role-map>
There are a few other things to consider in the setup of RenderX XEP software for proper processing of Section 508 compliant documents.
-
Try to use the base 14 fonts and avoid using custom fonts. Because of the nature of custom font processing and requirements special spacing between words, many custom fonts will cause document sizes to increase considerably over using built-in fonts (Helvetica, Times, Courier).
-
Turn off kerning. Font kerning causes many fragments of text in the output PDF, as they must all be placed individually to account for the kerning. While it improves the visual appearance, it may generate unwanted effects like a longer word being read as two smaller words. Setting KERN as "false" in the setup file should turn off font kerning.
-
Avoid nested blocks as they clutter the PDF structure and trigger structure verification errors.
You should avoid the use of nested
<fo:block>elements as they are really unnecessary. This by nature would lead to nested "P" elements in the tagged PDF. While not a violation, it can certainly be avoided by structuring the input FO without nested<fo:block>elements. -
Ensure the proper tab order. Tab Order field is a feature of PDF Version 1.5+. If the output document is generated for PDF 1.4, Acrobat 7 and 8 would report "page(s) with tab order that may be inconsistent with the structure order". XEP would report a runtime warning about use it against PDF 1.4.
Besides the Adobe Preflight, there are other PDF Accessibility validation tools, which may have stricter requirements for documents to pass validation. Such tools include veraPDF (https://verapdf.org/). and PDF Accessibility Checker (PAC3) (http://www.access-for-all.ch/en/pdf-lab/pdf-accessibility-checker-pac.html). Following are several Content checkpoints that may report failure with these tools, and suggestions for fixing it:
-
PDF/UA identifier missing: PDF/UA identifier must be specified in document's XMP data. By default, XEP adds a minimal data, but it also allows for overriding the entire XMP metadata as shown in the example below:
<fo:root xmlns:fo="http://www.w3.org/1999/XSL/Format"
   xmlns:rx="http://www.renderx.com/XSL/Extensions">
   <rx:meta-info>
      <rx:custom-meta><![CDATA[
<rdf:Description rdf:about=""...
...
</rdf:Description>
]]>
      </rx:custom-meta>
   </rx:meta-info>
...
Note:
The Custom XMP metadata overrides
<rx:meta-field>defined in Section B.1. As the data is represented in a single block, one should be extremely careful specifying correct technical fields like Producer, CreationDate, ModDate, etc.The actual metadata may vary depending on the document's needs. Here's the minimal data to satisfy the PAC3 check:
Note:
Here and below, the "
•" symbol represents the Unicode "zero width non-breaking space character" (U+FEFF) used as a byte-order marker.<?xpacket begin="•" id="W5M0MpCehiHzreSzNTczkc9d"?> <x:xmpmeta xmlns:x="adobe:ns:meta/" x:xmptk="Adobe XMP Core 5.6-c017 91.164464, 2020/06/15-10:20:05"> <rdf:RDF xmlns:rdf="http://www.w3.org/1999/02/22-rdf-syntax-ns#"> <rdf:Description rdf:about="" xmlns:dc="http://purl.org/dc/elements/1.1/" xmlns:pdf="http://ns.adobe.com/pdf/1.3/" xmlns:xmp="http://ns.adobe.com/xap/1.0/" xmlns:pdfuaid="http://www.aiim.org/pdfua/ns/id/"> <dc:format>application/pdf</dc:format> <dc:title> <rdf:Alt> <rdf:li xml:lang="x-default">Document title</rdf:li> </rdf:Alt> </dc:title> <dc:creator> <rdf:Seq> <rdf:li>Unknown</rdf:li> </rdf:Seq> </dc:creator> <pdf:Producer>XEP 4.31.1348</pdf:Producer> <pdf:Trapped>Unknown</pdf:Trapped> <xmp:CreatorTool>Unknown</xmp:CreatorTool> <pdfuaid:part>1</pdfuaid:part> </rdf:Description> </rdf:RDF> </x:xmpmeta> <?xpacket end="w"?>And here's a more sophisticated one that defines a PDF-A extension schema:
<?xpacket begin="•" id="W5M0MpCehiHzreSzNTczkc9d"?> <x:xmpmeta xmlns:x="adobe:ns:meta/" x:xmptk="Adobe XMP Core 5.6-c017 91.164464, 2020/06/15-10:20:05"> <rdf:RDF xmlns:rdf="http://www.w3.org/1999/02/22-rdf-syntax-ns#"> <rdf:Description rdf:about="" xmlns:dc="http://purl.org/dc/elements/1.1/" xmlns:pdf="http://ns.adobe.com/pdf/1.3/" xmlns:xmp="http://ns.adobe.com/xap/1.0/" xmlns:pdfaExtension="http://www.aiim.org/pdfa/ns/extension/" xmlns:pdfaSchema="http://www.aiim.org/pdfa/ns/schema#" xmlns:pdfaProperty="http://www.aiim.org/pdfa/ns/property#" xmlns:pdfuaid="http://www.aiim.org/pdfua/ns/id/"> <dc:format>application/pdf</dc:format> <dc:title> <rdf:Alt> <rdf:li xml:lang="x-default">Document title</rdf:li> </rdf:Alt> </dc:title> <dc:creator> <rdf:Seq> <rdf:li>Unknown</rdf:li> </rdf:Seq> </dc:creator> <pdf:Producer>XEP 4.31.1348</pdf:Producer> <pdf:Trapped>Unknown</pdf:Trapped> <xmp:CreatorTool>Unknown</xmp:CreatorTool> <pdfuaid:part>1</pdfuaid:part> <pdfaExtension:schemas> <rdf:Bag> <rdf:li rdf:parseType="Resource"> <pdfaSchema:schema> PDF/UA Universal Accessibility Schema </pdfaSchema:schema> <pdfaSchema:namespaceURI> http://www.aiim.org/pdfua/ns/id/ </pdfaSchema:namespaceURI> <pdfaSchema:prefix>pdfuaid</pdfaSchema:prefix> <pdfaSchema:property> <rdf:Seq> <rdf:li rdf:parseType="Resource"> <pdfaProperty:name>part</pdfaProperty:name> <pdfaProperty:valueType>Integer</pdfaProperty:valueType> <pdfaProperty:category>internal</pdfaProperty:category> <pdfaProperty:description> Indicates, which part of ISO 14289 standard is followed </pdfaProperty:description> </rdf:li> </rdf:Seq> </pdfaSchema:property> </rdf:li> </rdf:Bag> </pdfaExtension:schemas> </rdf:Description> </rdf:RDF> </x:xmpmeta> <?xpacket end="w"?> -
Table header cell has no associated subcells: All table header cells (e.g. column headers and row headers, if any) have to be tagged with
rx:header-idrefattribute referring to its header cell. Currently, PAC3 does not support multipleheader-idref's, so one may need to pick either row or column header. Normally, one should refer row header (usually a cell in the first column) if it exists, alternatively it should be the column header (a cell in the first row). Also keep in mind that no cell header should be empty (have no content or regular whitespaces). At least, place an   as the content. See Section G.4.6 for implementation details and full example. -
Alternative description missing for an annotation: This error is caused by an image being the only child of
<fo:basic-link>. To fix it, insert an additional text child element to<<fo:basic-link>>- for example, placenbsp ( )after the image and specifytext-decoration="none"to make thenbspcompletely invisible:<fo:basic-link external-destination="url('https://www.renderx.com/')" rx:alt-description="RenderX logo" text-decoration="none"> <fo:external-graphic src="url('img/renderx-logo.jpg')" rx:alt-description="RenderX logo">   </fo:basic-link> -
"Figure" element on a single page with no bounding box:
This section contains the following topics:
This section contains the following topics:
This DTD describes the format of XEP configuration file. Namespace nodes and prefixes are omitted for clarity.
<!ELEMENT config (options?, fonts, languages?)>
<!ATTLIST config
          xmlns CDATA #IMPLIED
          xml:base CDATA #IMPLIED>

<!ELEMENT options (option | generator-options)+>
<!ATTLIST options
          href CDATA #IMPLIED>

<!ELEMENT generator-options (option*, charsets?)>
<!ATTLIST generator-options
          format CDATA #REQUIRED>

<!ELEMENT option EMPTY>
<!ATTLIST option
          name CDATA #REQUIRED
          value CDATA #REQUIRED>

<!ELEMENT fonts ((font-family | font-group | font-alias)+)>
<!ATTLIST fonts
           xmlns CDATA #IMPLIED
          default-family CDATA #IMPLIED
          embed CDATA #IMPLIED
          subset CDATA #IMPLIED
          xml:base CDATA #IMPLIED
          href CDATA #IMPLIED>

<!ELEMENT font-group (font-family | font-group | font-alias)+>
<!ATTLIST font-group
          label CDATA #IMPLIED
          embed CDATA #IMPLIED
          subset CDATA #IMPLIED
          xml:base CDATA #IMPLIED
          href CDATA #IMPLIED>

<!ELEMENT font-family (font+)>
<!ATTLIST font-family
          name CDATA #REQUIRED
          embed CDATA #IMPLIED
          subset CDATA #IMPLIED
          ligatures CDATA #IMPLIED
          codepage-name CDATA #IMPLIED
          codepage-file CDATA #IMPLIED
          encoding CDATA #IMPLIED
          xml:base CDATA #IMPLIED>

<!ELEMENT font (font-data, transform?)>
<!ATTLIST font
          weight CDATA #IMPLIED
          style CDATA #IMPLIED
          variant CDATA #IMPLIED
          embed CDATA #IMPLIED
          subset CDATA #IMPLIED
          ligatures CDATA #IMPLIED
          size CDATA #IMPLIED
          xml:base CDATA #IMPLIED>

<!ELEMENT font-data EMPTY>
<!ATTLIST font-data
          afm CDATA #IMPLIED
          pfa CDATA #IMPLIED
          pfb CDATA #IMPLIED
          glyph-list CDATA #IMPLIED
          ttf CDATA #IMPLIED
          otf CDATA #IMPLIED
          ttc CDATA #IMPLIED
          subfont CDATA #IMPLIED
          charset-name CDATA #IMPLIED
          charset-file CDATA #IMPLIED
          xml:base CDATA #IMPLIED>

<!ELEMENT transform EMPTY>
<!ATTLIST transform
          slant-angle CDATA #IMPLIED>

<!ELEMENT font-alias EMPTY>
<!ATTLIST font-alias
          name CDATA #REQUIRED
          value CDATA #REQUIRED>

<!ELEMENT languages (language+)>
<!ATTLIST languages
          href CDATA #IMPLIED
          xml:base CDATA #IMPLIED
          default-language CDATA #IMPLIED>

<!ELEMENT language (hyphenation?, font-alias*)>
<!ATTLIST language
          name CDATA #IMPLIED
          codes NMTOKENS #REQUIRED
          xml:base CDATA #IMPLIED>

<!ELEMENT hyphenation EMPTY>
<!ATTLIST hyphenation
          pattern CDATA #REQUIRED
          encoding CDATA #IMPLIED
          xml:base CDATA #IMPLIED>

<!ELEMENT charsets (charset+)>

<!ELEMENT charset ((code-range+ | code-ranges), character-mapping?, codepage) >
<!ATTLIST charset
            name CDATA #REQUIRED>

<!ELEMENT code-ranges (code-range+) >

<!ELEMENT code-range EMPTY>
<!ATTLIST code-range
            from CDATA #REQUIRED
            to CDATA #REQUIRED>

<!ELEMENT codepage EMPTY>
<!ATTLIST codepage
            name CDATA #REQUIRED
            ibm-name CDATA #REQUIRED
            forcelatin CDATA #REQUIRED
            desc CDATA #IMPLIED>

<!ELEMENT character-mapping (character+) >

<!ELEMENT character EMPTY>
<!ATTLIST character
            unicode CDATA #REQUIRED
            afp CDATA #REQUIRED
            desc CDATA #IMPLIED>
This section contains the following topics:
To process a DocBook
(http://www.docbook.org) document use the
xep shell (or xep.bat on Windows)
command syntax or XEP Assistant putting DocBook document instead of XML source
document.
Use fo/docbook.xsl stylesheet file from the DocBook XSL Stylesheets
distribution to specify it as XSL stylesheet. The DocBook XSL Stylesheets distribution
is available
at
http://wiki.docbook.org/topic/DocBookXslStylesheets. Any release of DocBook
XSL can be used. Recommended versions are docbook-xsl-1.69.1 and higher.
Validating DocBook document may require downloading DocBook stylesheets on every use. As discussed in Section 5.3, it is possible to improve the performance by adding XML Catalog.
If necessary of using a catalog in XML provide a mapping from generic
addresses to specific local directories on a given machine use Norman
Walsh's catalog library:
Download the resolver.jar file from
http://xml.apache.org/commons/dist/
(it may have a version number in the filename) and copy it to a
convenient location.
Next create a CatalogManager.properties file in a directory that will be
included in your CLASSPATH.
The resolver will look in this file to determine the locations of the catalog files.
The next example shows a properties file that loads the catalog named
catalog.xml from the current working directory and the standard DocBook
catalog from the absolute path /usr/local/xml/docbook/docbook.cat.
catalogs=catalog.xml;/usr/local/xml/docbook/docbook.cat
relative-catalogs=true
static-catalog=yes
catalog-class-name=org.apache.xml.resolver.Resolver
verbosity=1
To know how to write XML catalog in detail see http://www.sagehill.net/docbookxsl/Catalogs.html
Next browse to the XEP installation directory and edit one of XEP
commands which will be used for the catalog file.
Add in one of the xep.bat or xep,
x4u.bat or x4u scrpts like the
following:
-
specify additional paths in your CLASSPATH environment variable of the
javacommand to$XEP_HOME/lib/crimson.jar, downloadedresolver.jarand theCatalogManager.propertiesfile's directory; -
set additional parameters in the Java command like the following:
-
"-Xmx256M"(optional, can be more or less than256 Mb) -
"-Dcom.renderx.sax.entityresolver=com.sun.resolver.tools.CatalogResolver" -
"-Dcom.renderx.jaxp.uriresolver=com.sun.resolver.tools.CatalogResolver"
-
If everything is done as mentioned above, use the changed XEP command with usual syntax.